
Edit your files in TidyTic: Rename, sort, move etc.
If you have read the previous tutorials you already know that the software provides you many tools to view or navigate in your files.
But TidyTic allows you even more possibilities to modify your files !
Like renaming all files in a folder at once, adding a number to their names or even assigning tag to facilitate your tidying.
However, all of these changes depend on the files you want to tidy and how you want tidy them.
This tutorial will therefore mainly consist of examples in order to show you possibilities offered by all tools available in TidyTic.
My goal here is to show you how these tools work.
How to edit your files :
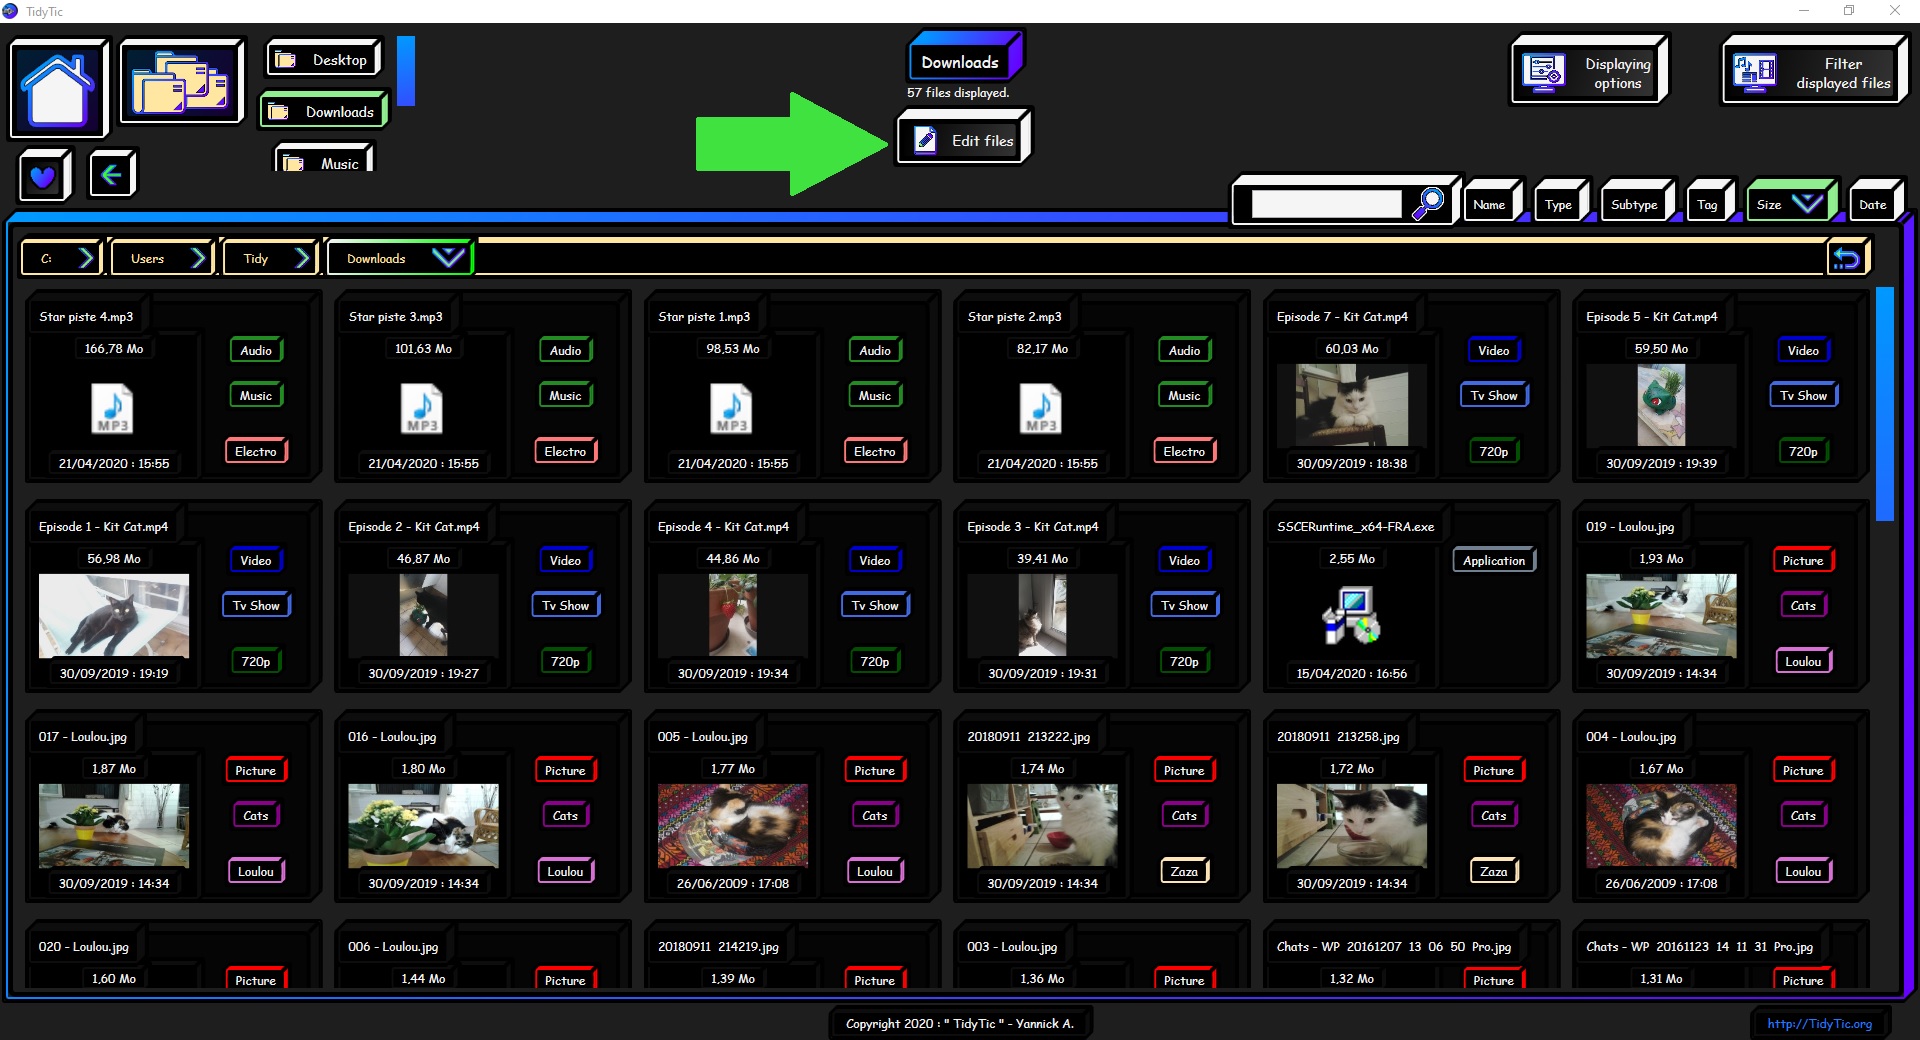
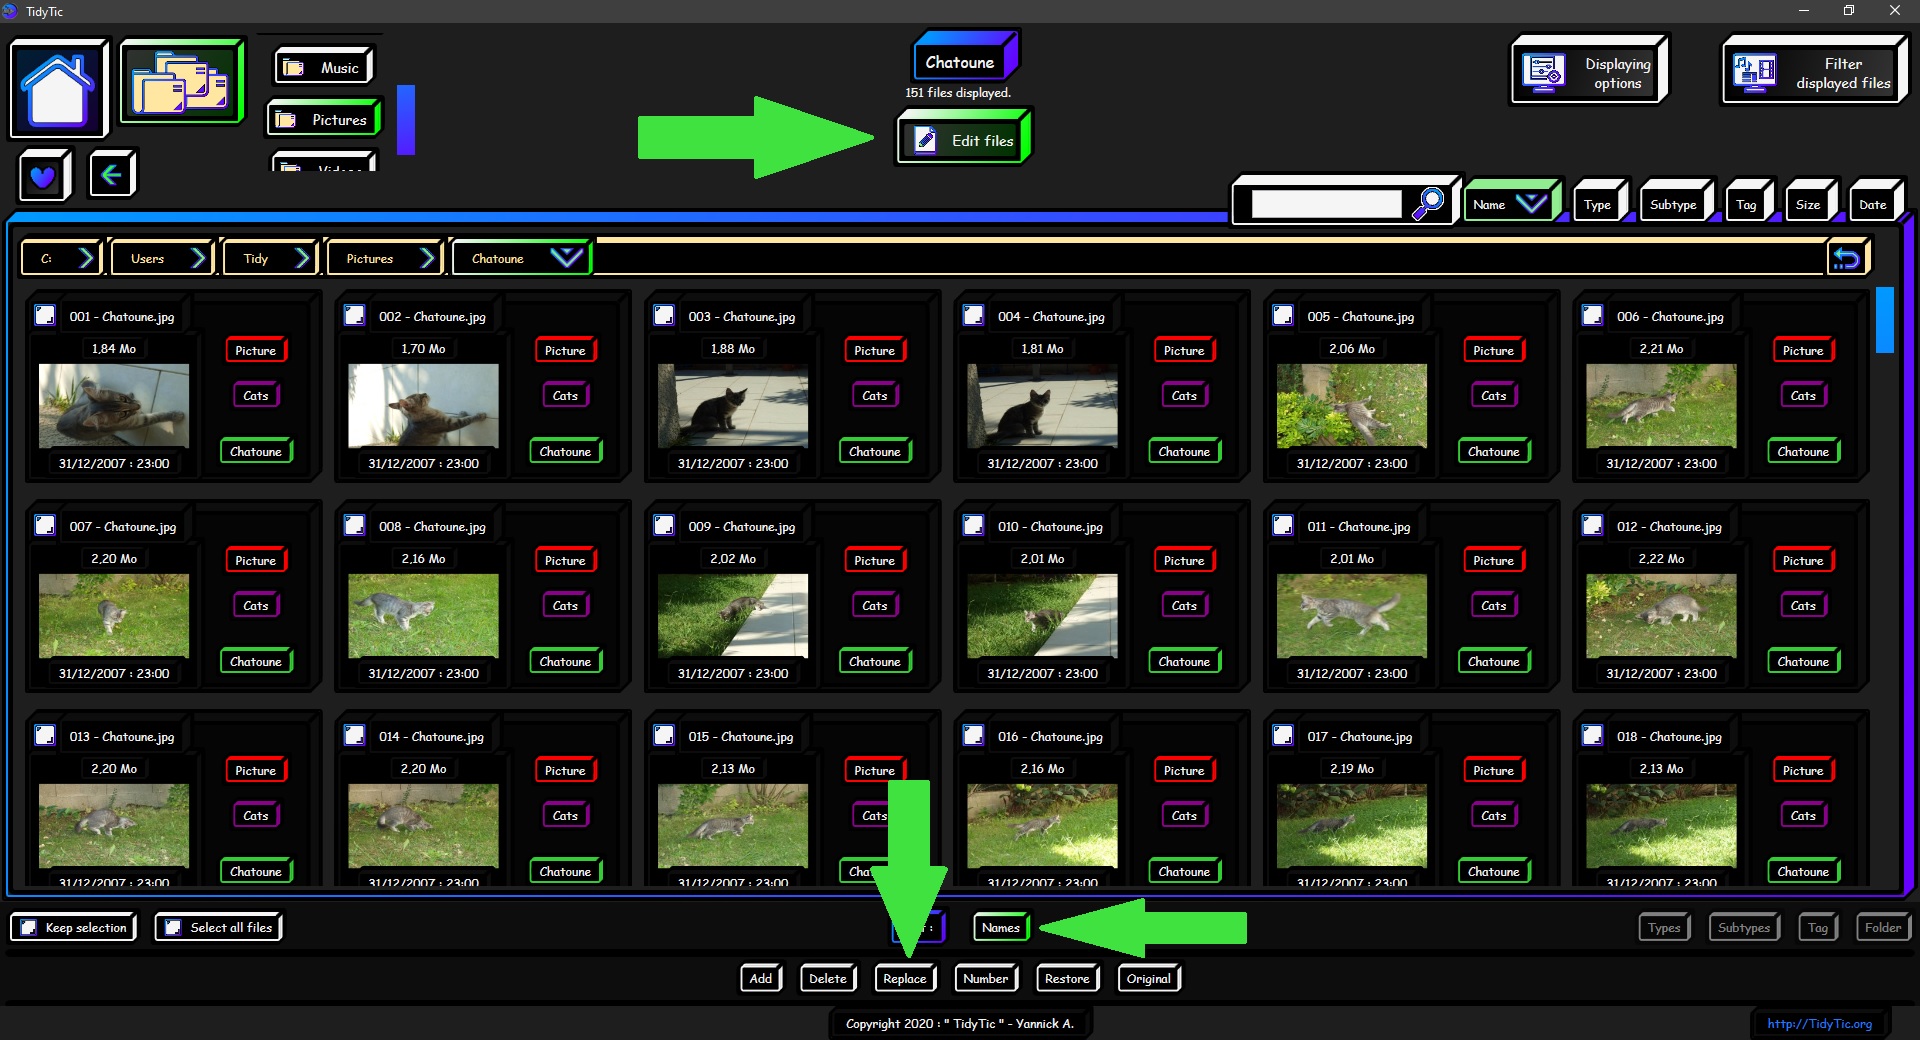
When browsing your files, whether is in display by type or by folder, you will be able to open the "Edit files" menu that you will find at the top in the middle.
 ____
____ 
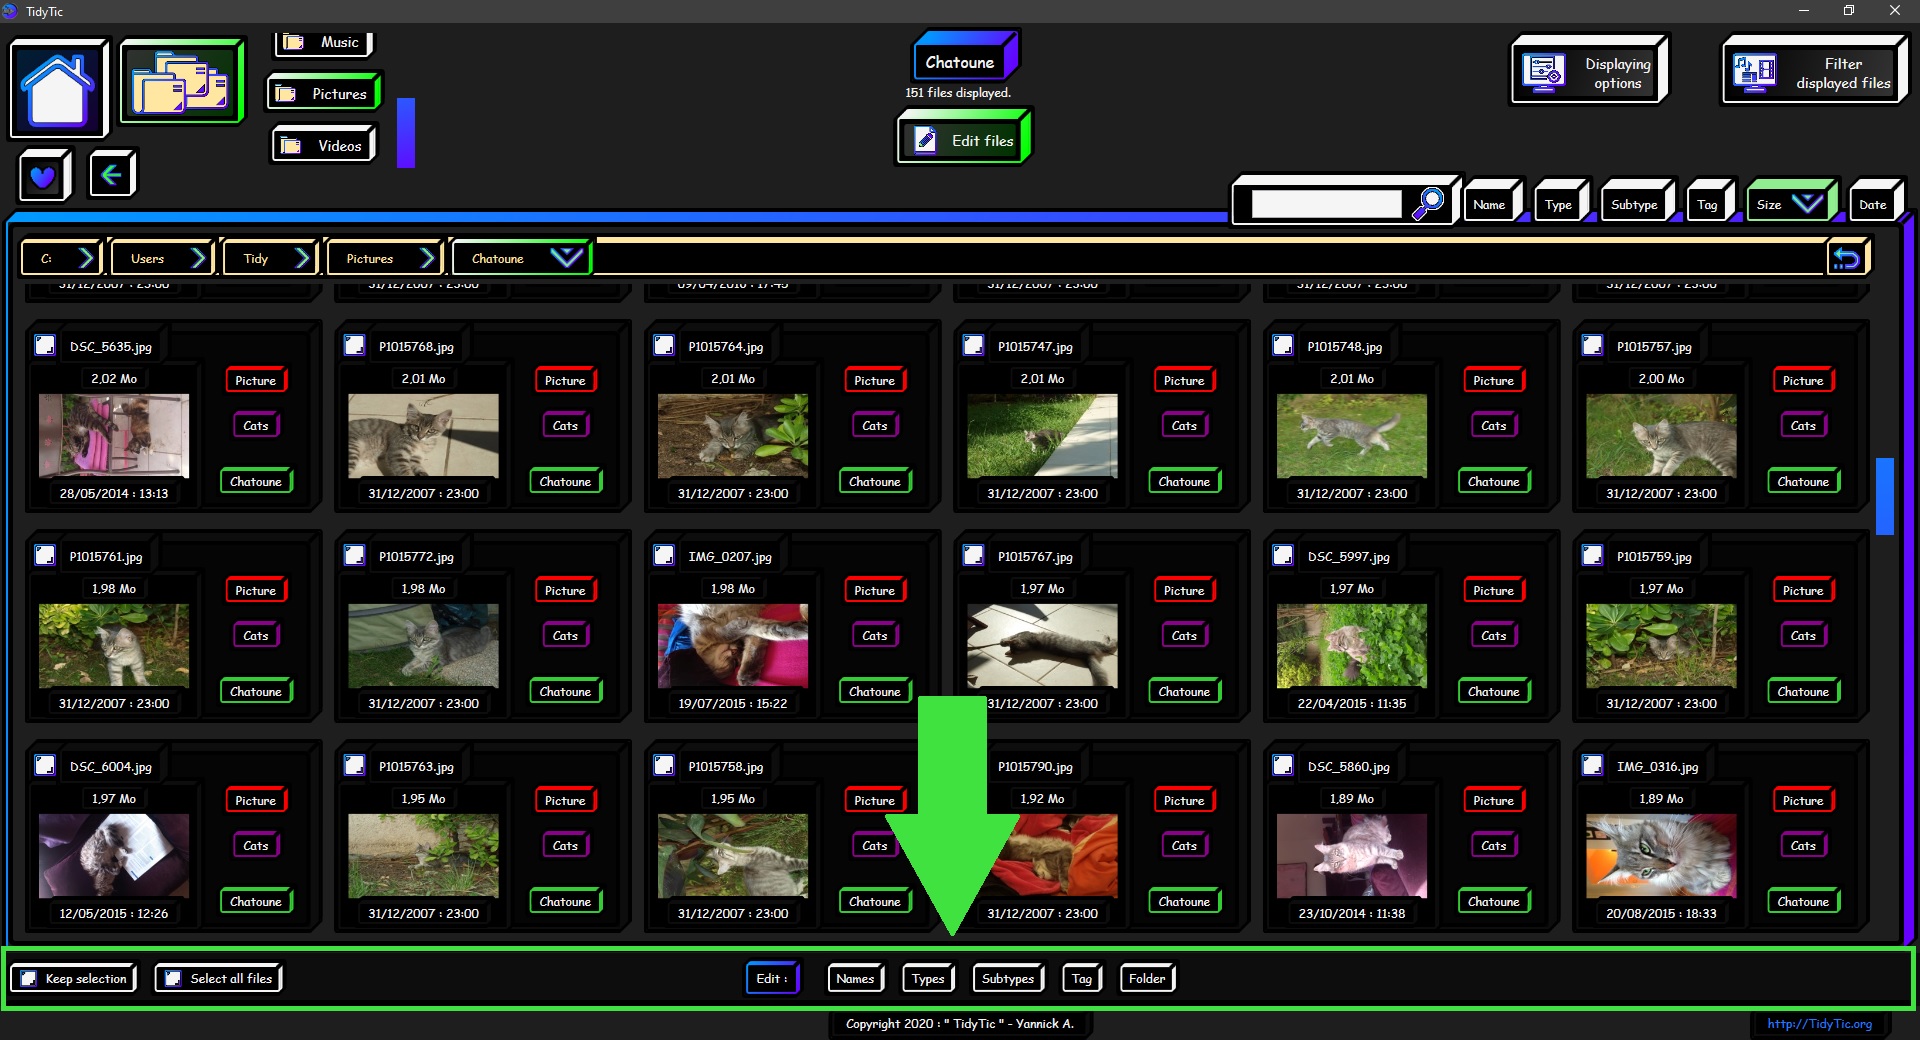
Once activated (the border of the button turns green) you will find a menu at the bottom of the software offering you the modifications available on your files:
Edit the name, type, subtypes, tag or folder.
Part 1 : Rename your files : Add, replace, delete, number etc.
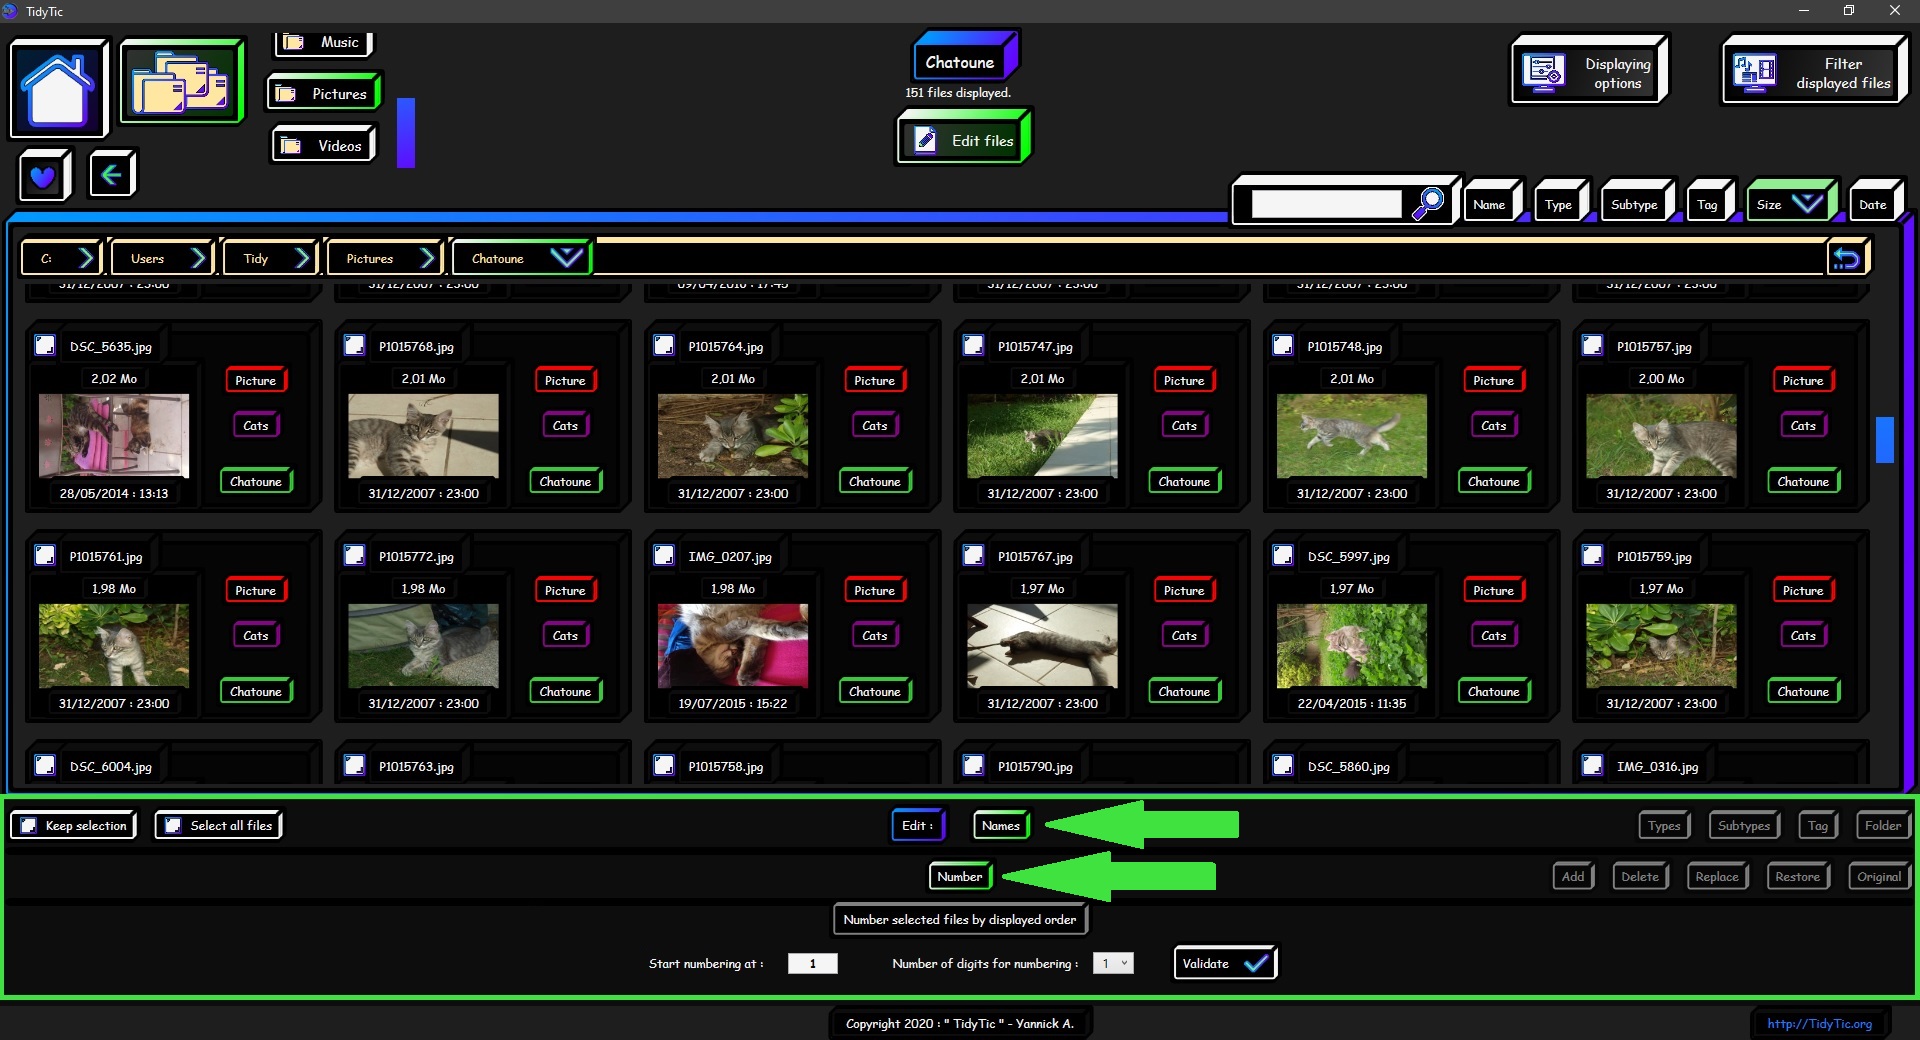
Here I will focus on renaming the files and therefore choosing edit : "Name".
Once chosen a new line will be added to this menu offering me the tools available to modify the name of the files.
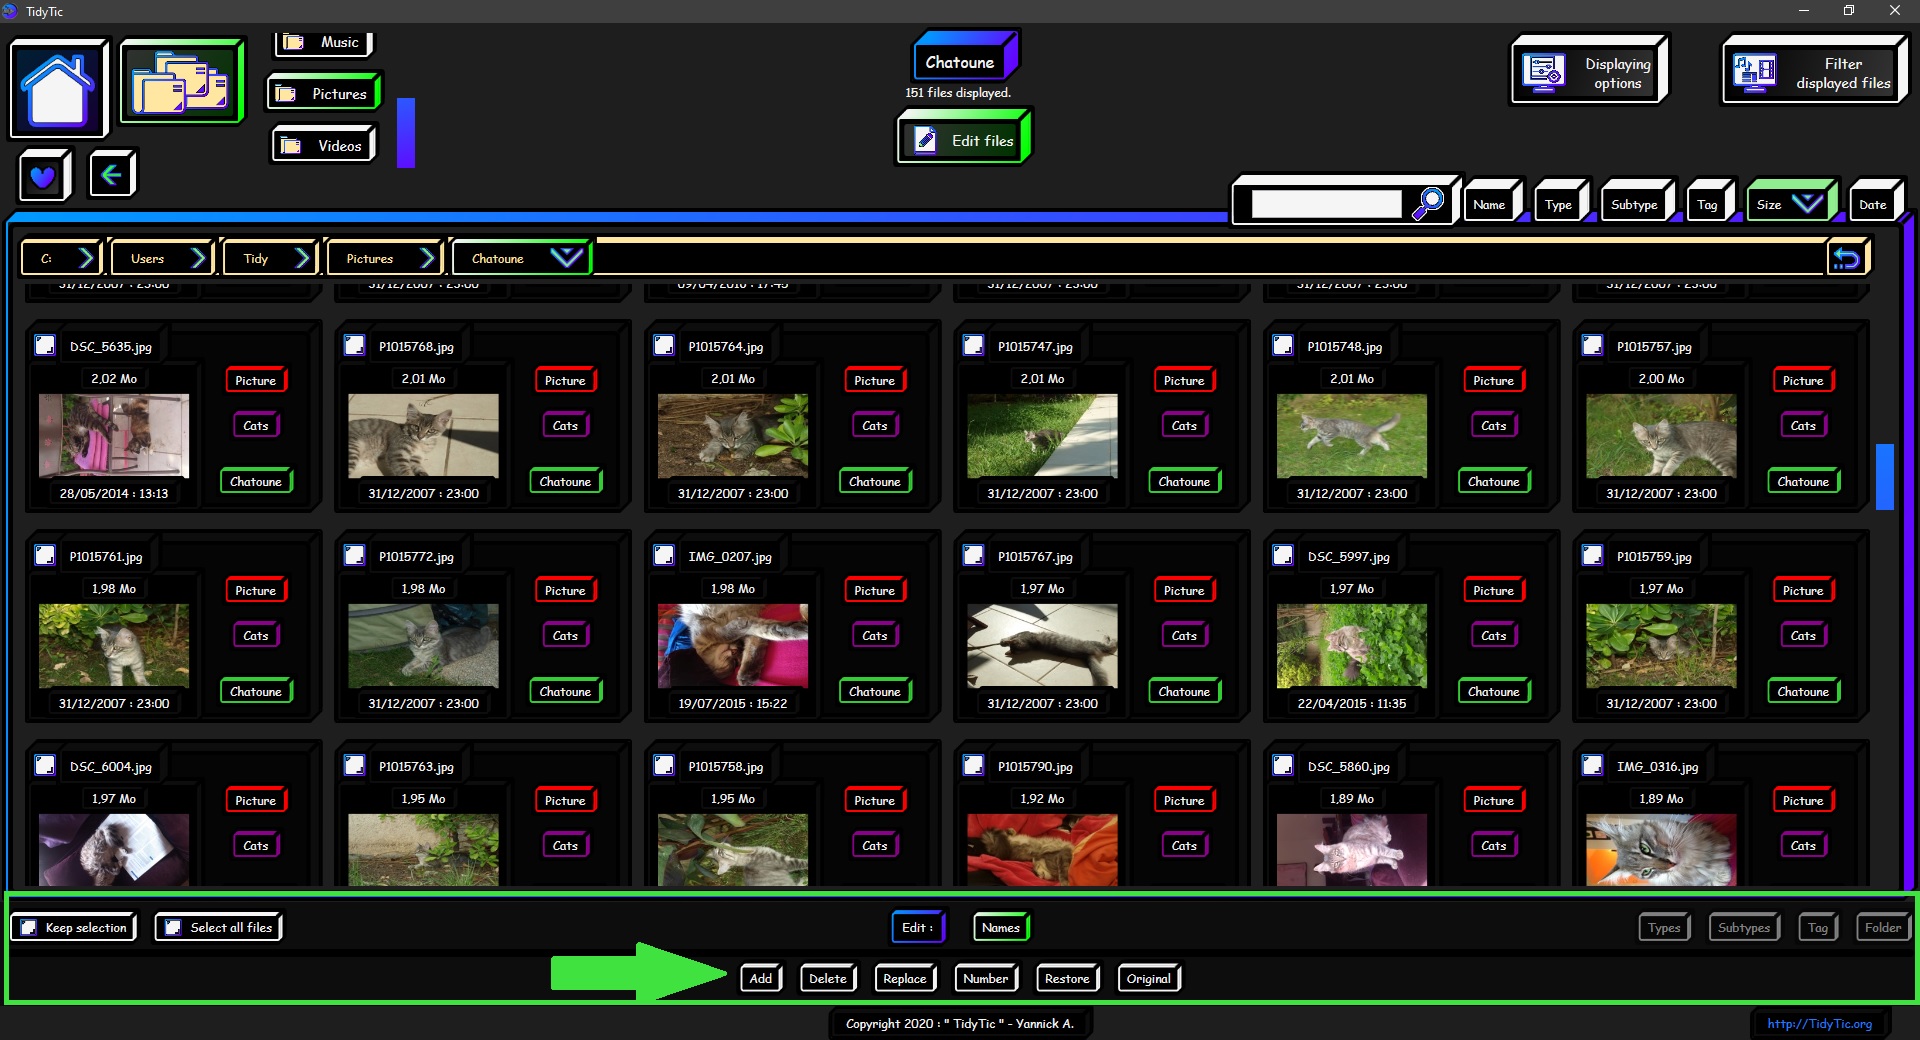
The other modification tools remain available, they are now simply on the left on this menu. Just click on them to select them.
In order to make this example of the renaming tools very easy to understand, I will give myself a goal :
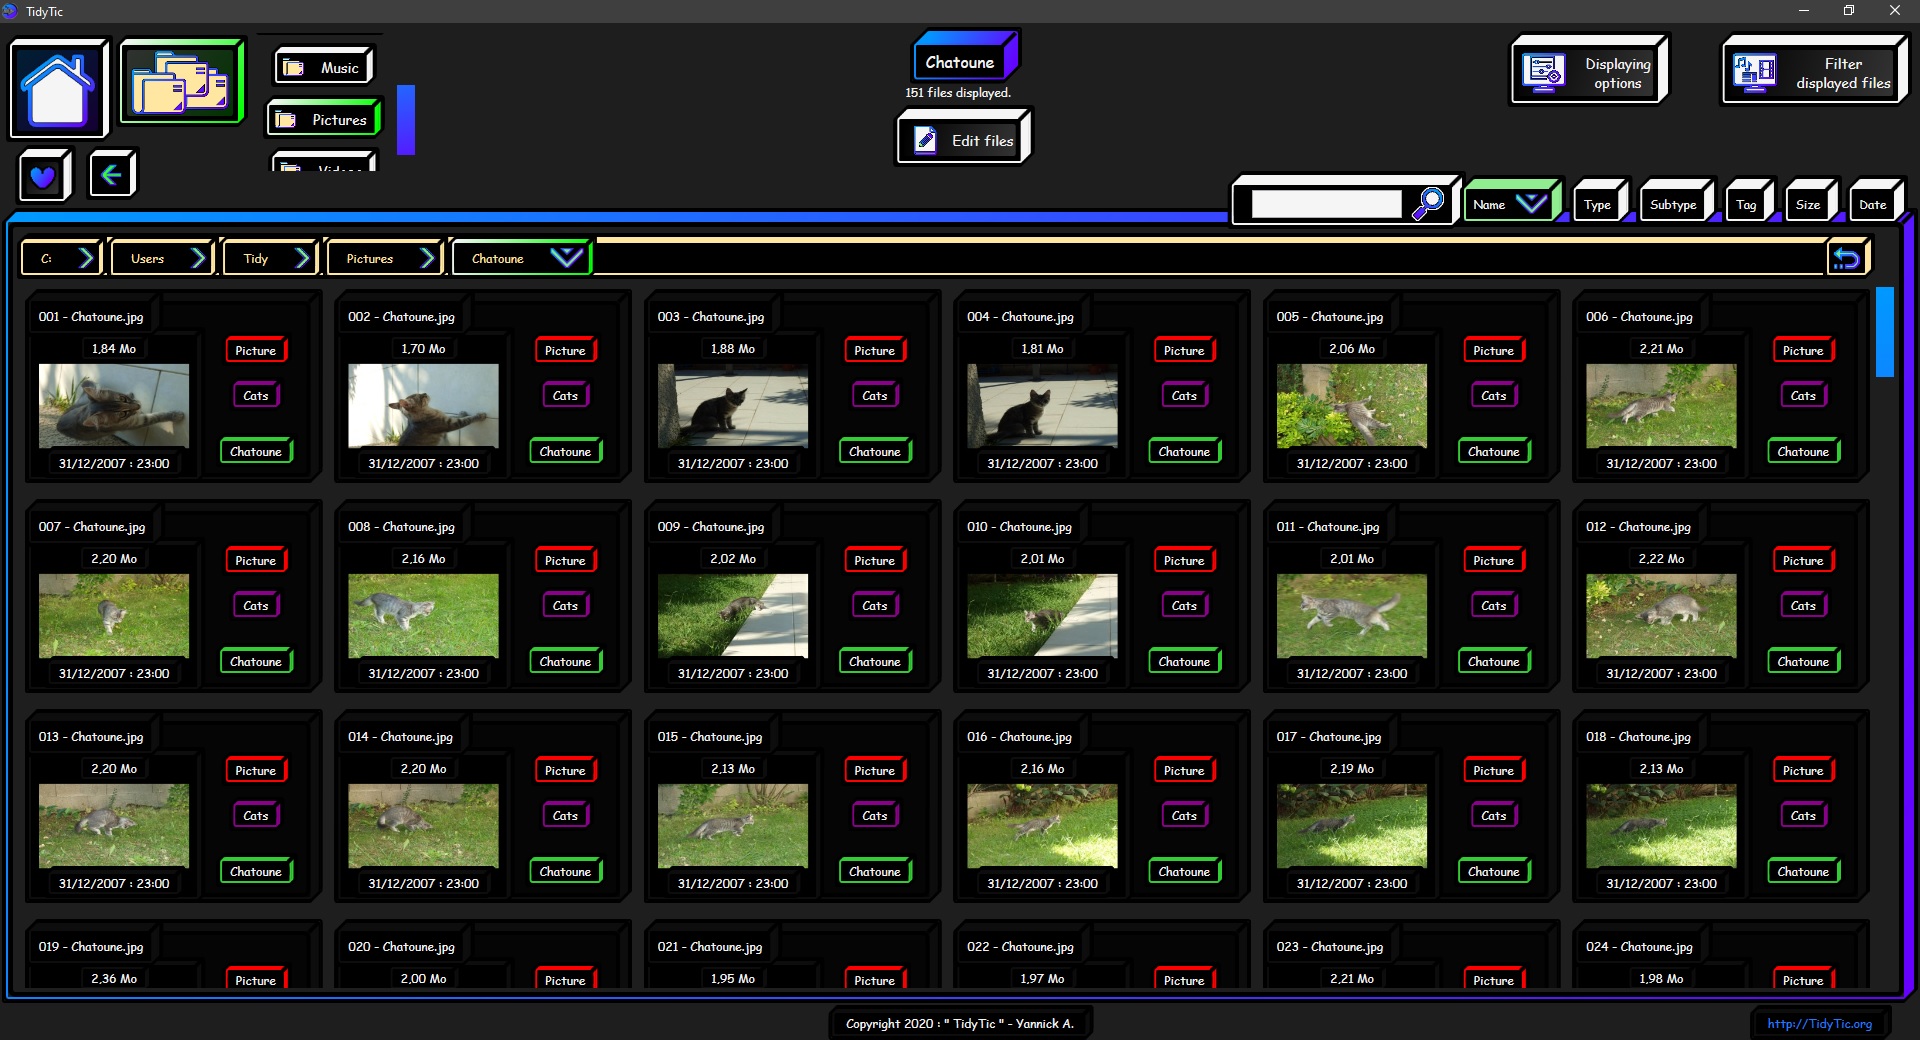
Rename all photos of "Chatoune" with a proper name and in order of date of this photos (from the oldest to the most recent).
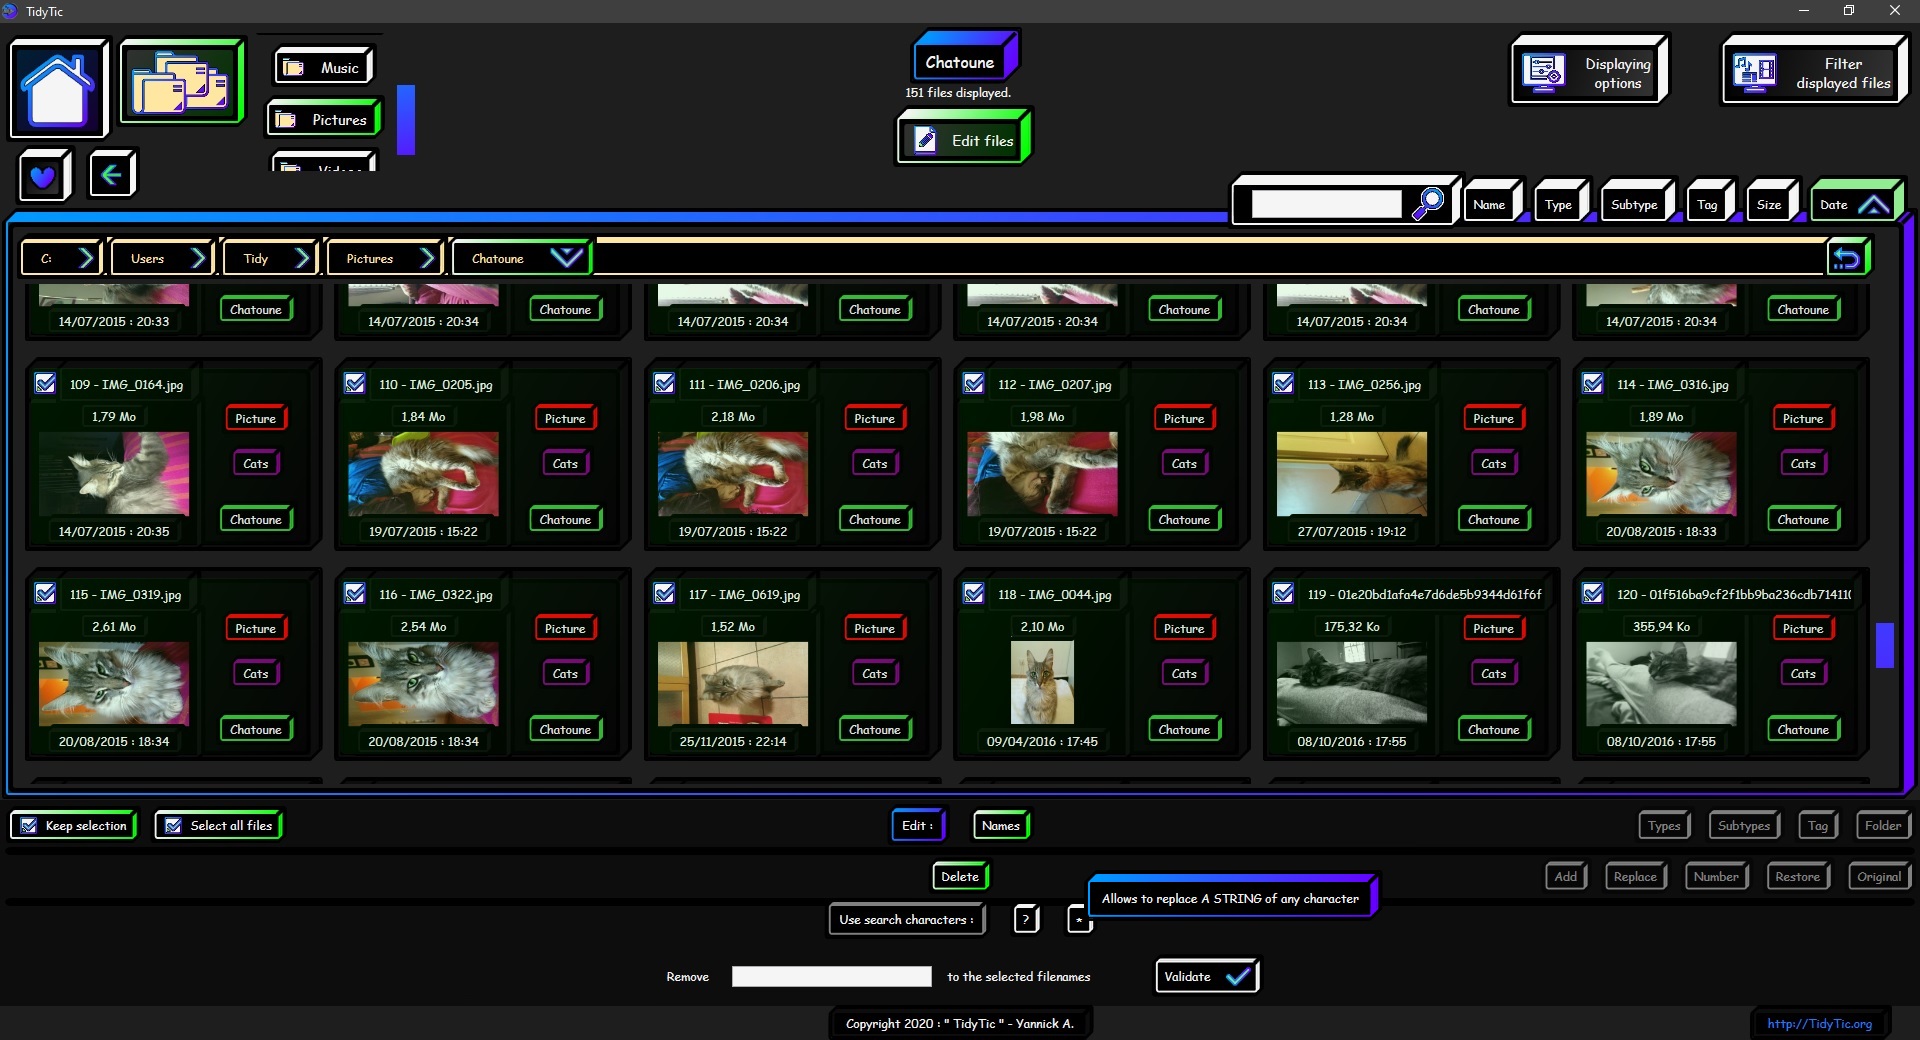
Currently the names of this photos as you can see on the screenshots are far from explicit: "P1015749.jpg", "IMG_1551.jpg", "DSC_5855.jpg" etc.
These are the names automatically given by cameras. Each camera or phone naming its files in different ways makes sorting by file name really useless.
Here I have 151 photos, taken over several years with different cameras / phones, they are all stored in a subfolder of my "Pictures" folder.
My goal is to have in the end "001 - Chatoune.jpg", "002 - Chatoune.jpg" etc for the file name, sorted by date.
I'm going to start by numbering all the names of this photos to avoid having problems when I'm going to remove the names given automatically by the devices.
Because it is impossible on Windows to have two files with same name in the same folder.
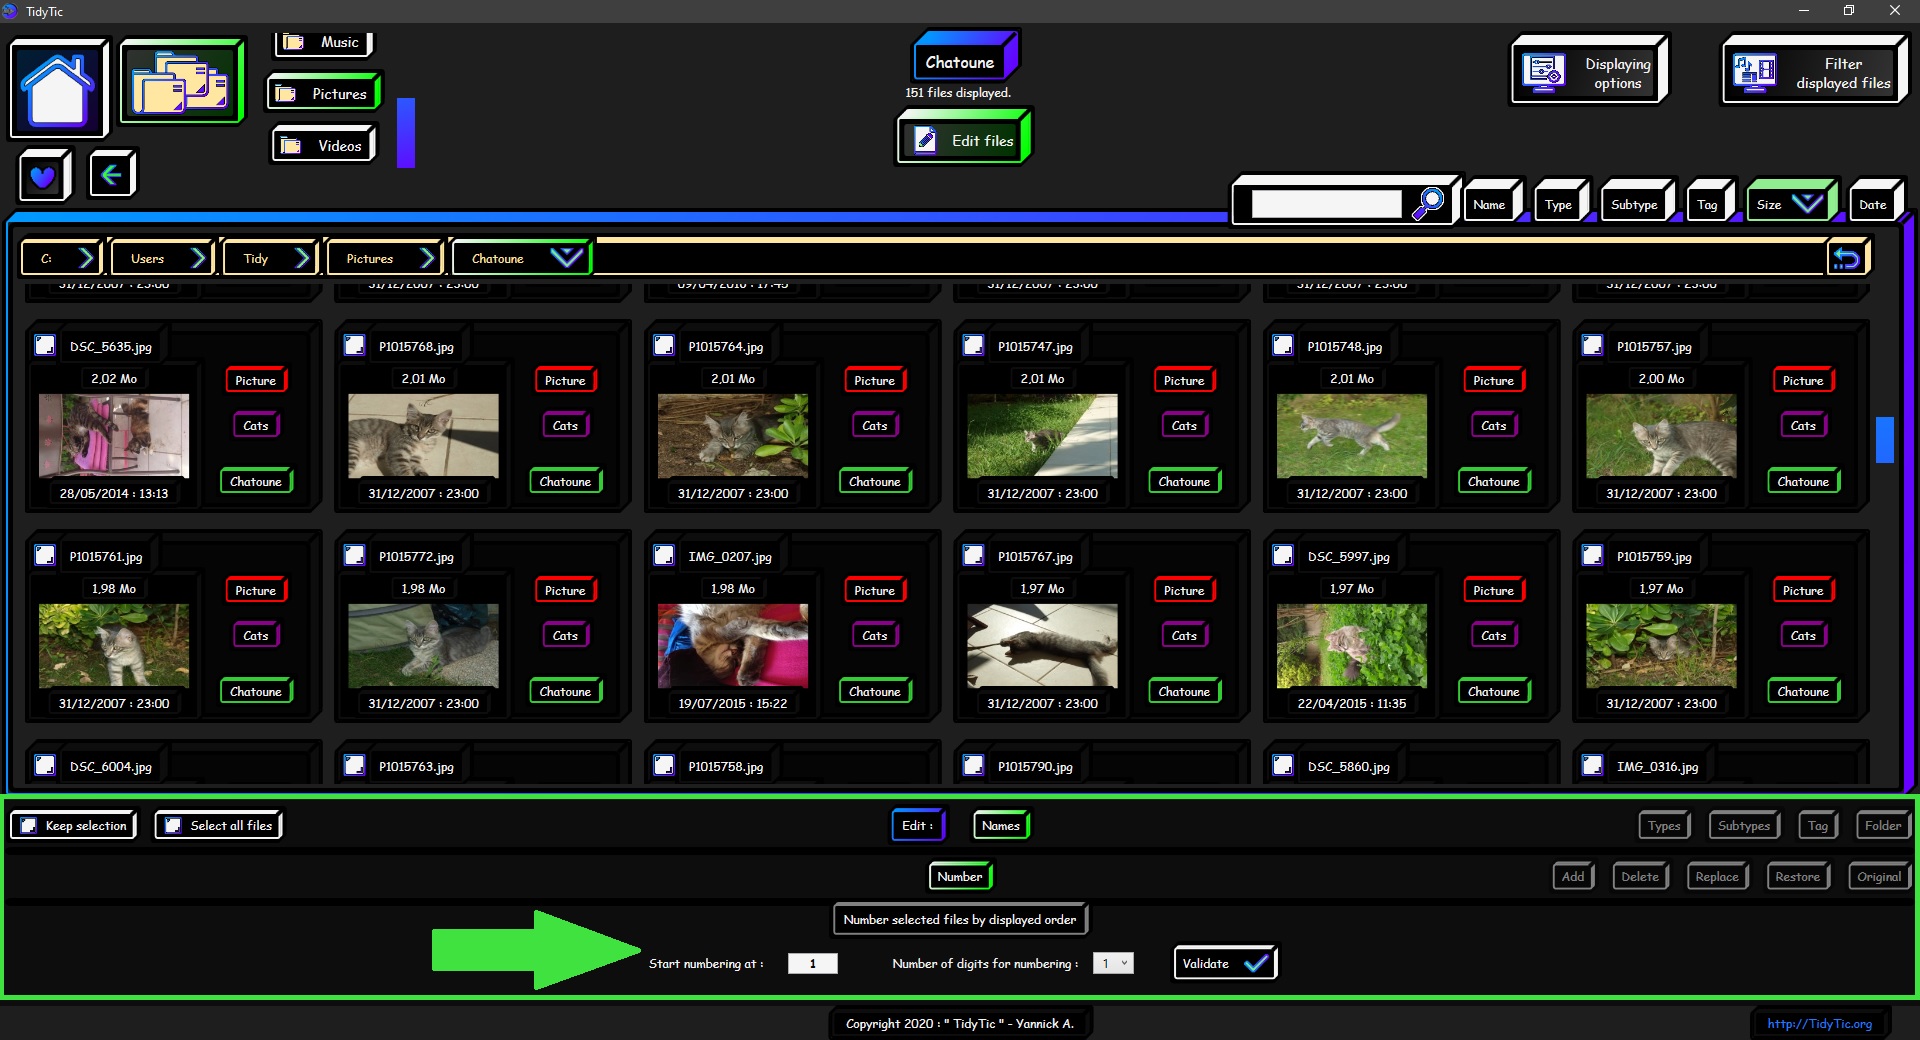
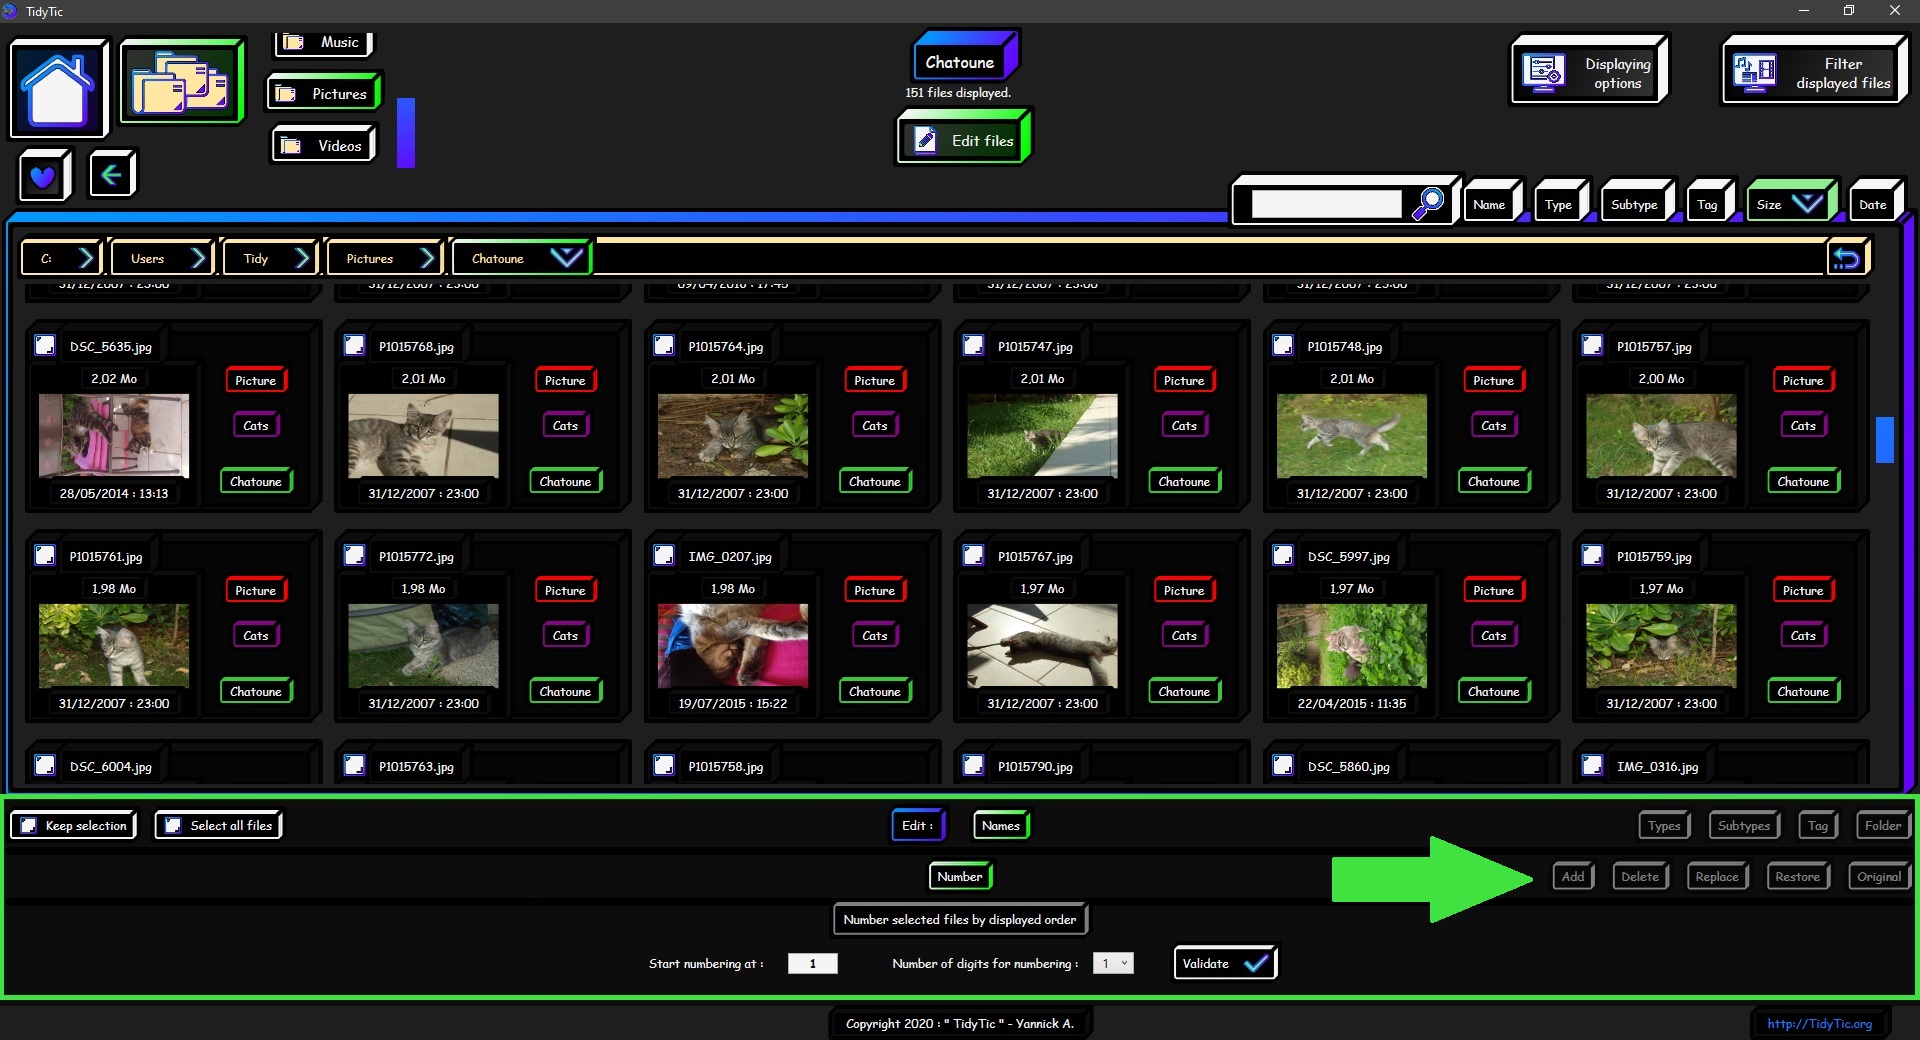
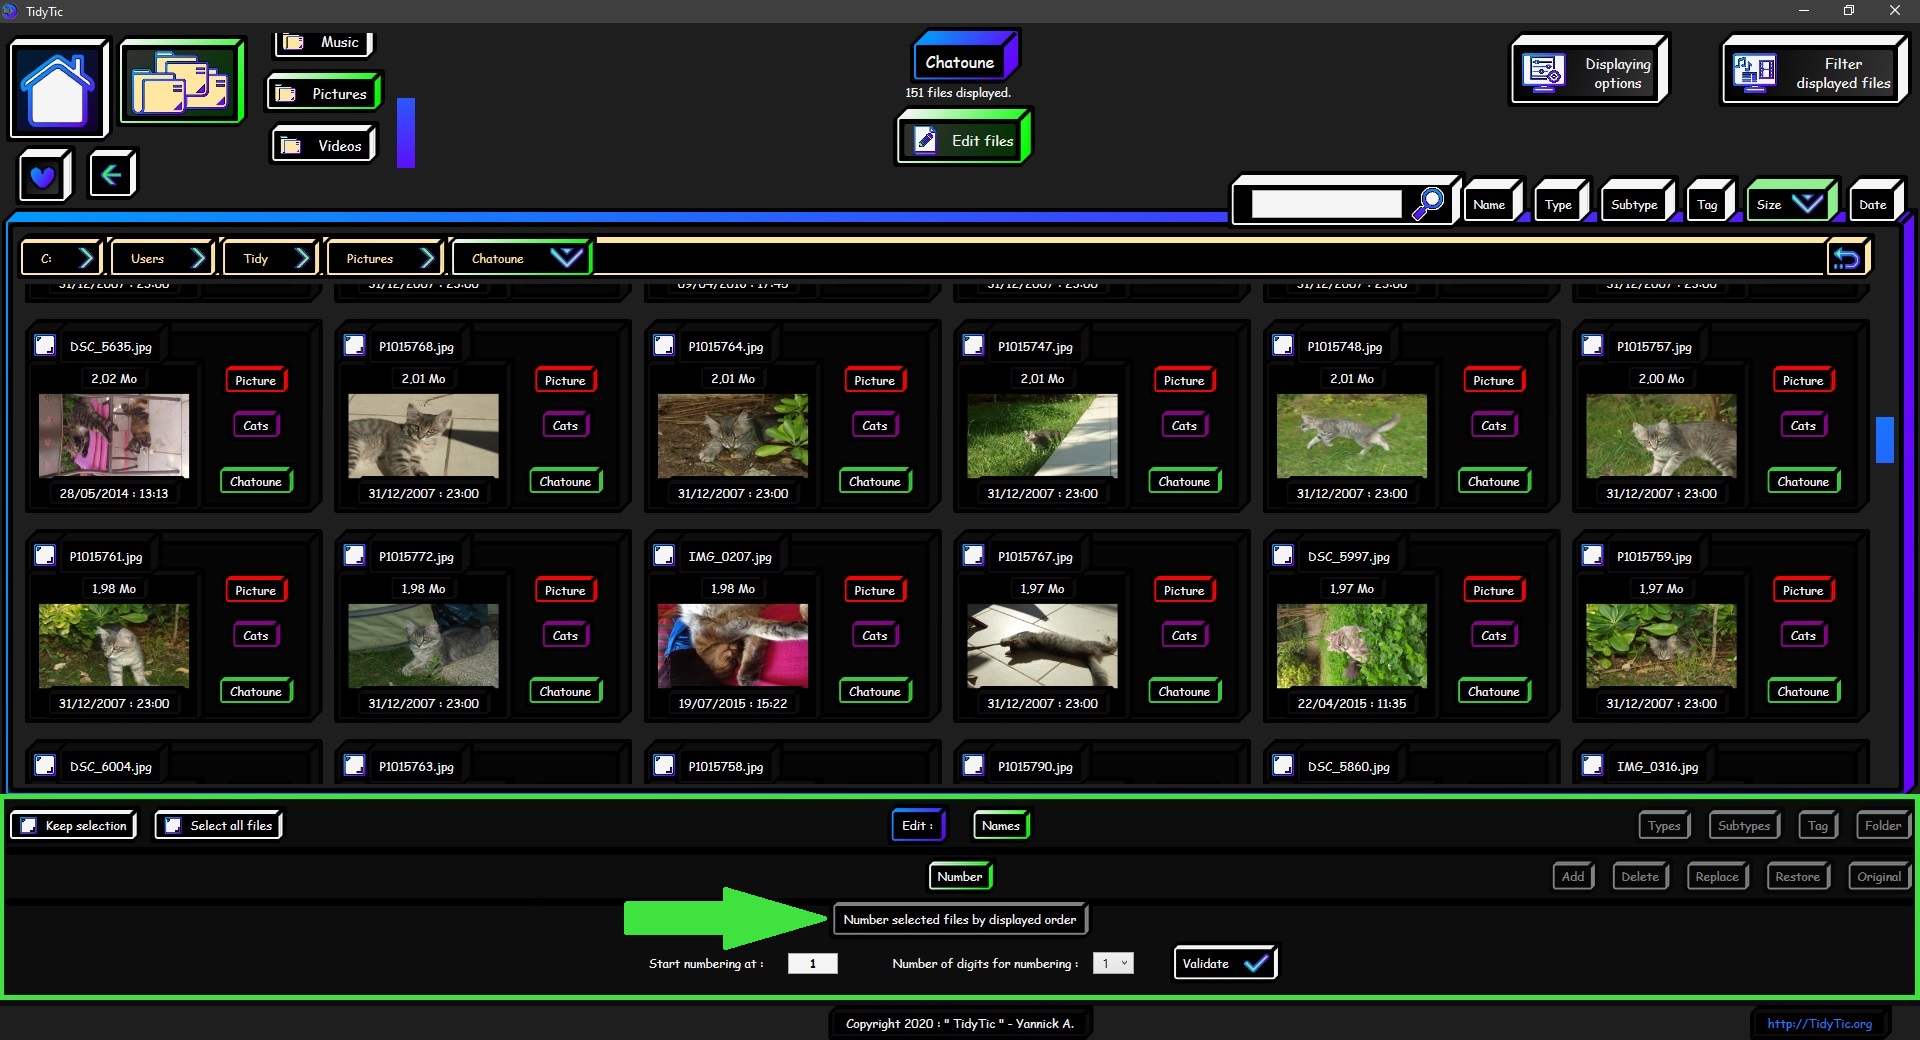
I will therefore choose as renaming action : "Number", which will bring up a third line in the file modification menu with several options.
Again all other options remain available, they are just passed to the left in the menu in order to keep the best possible visibility for the current option.
The currently selected option remains in the middle and his border turns green to give you visual support of the selected option.
In the third line of the menu you will see the information and options concerning chosen option.
Here the software tells me in the title of this option that the files will be numbered according to the order in which they are currently displayed.
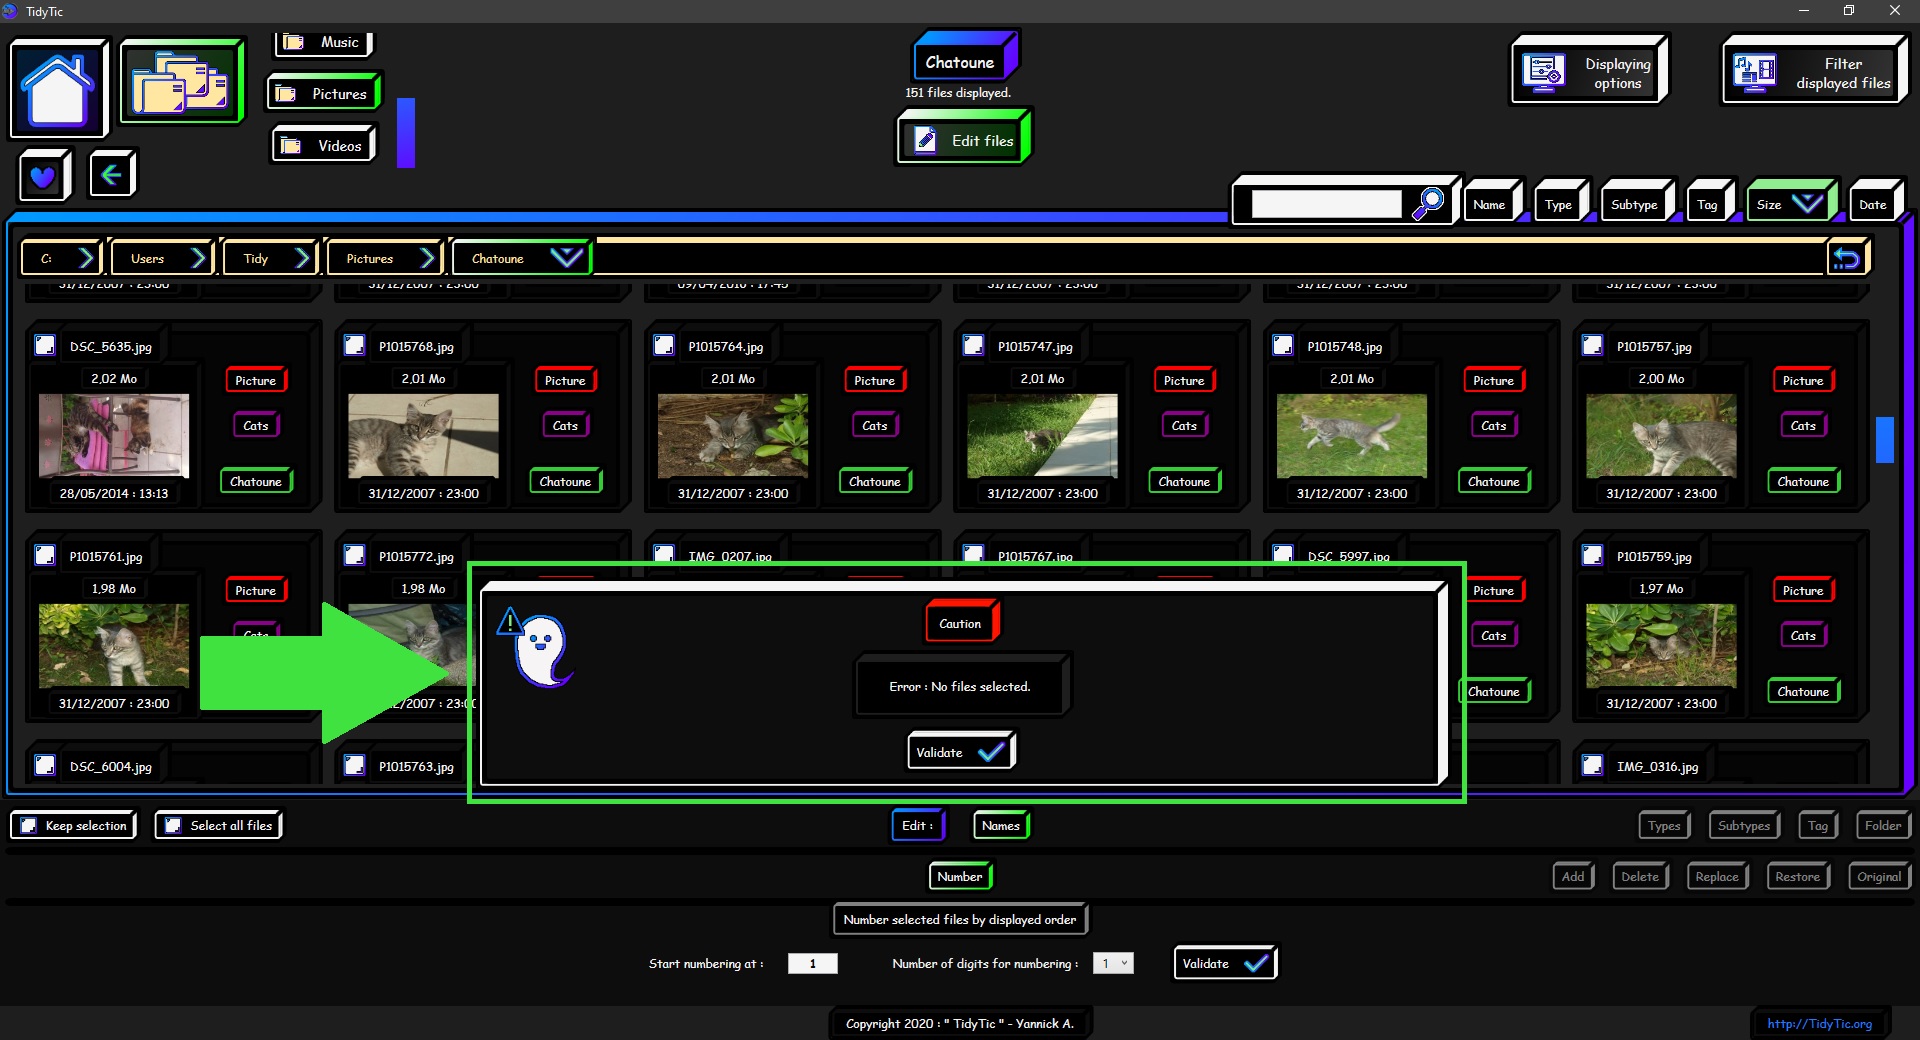
The action will only apply on files that I will select.
If I try to validate the action without selecting a file, a message will inform me that no file is selected and the action will not be launched.
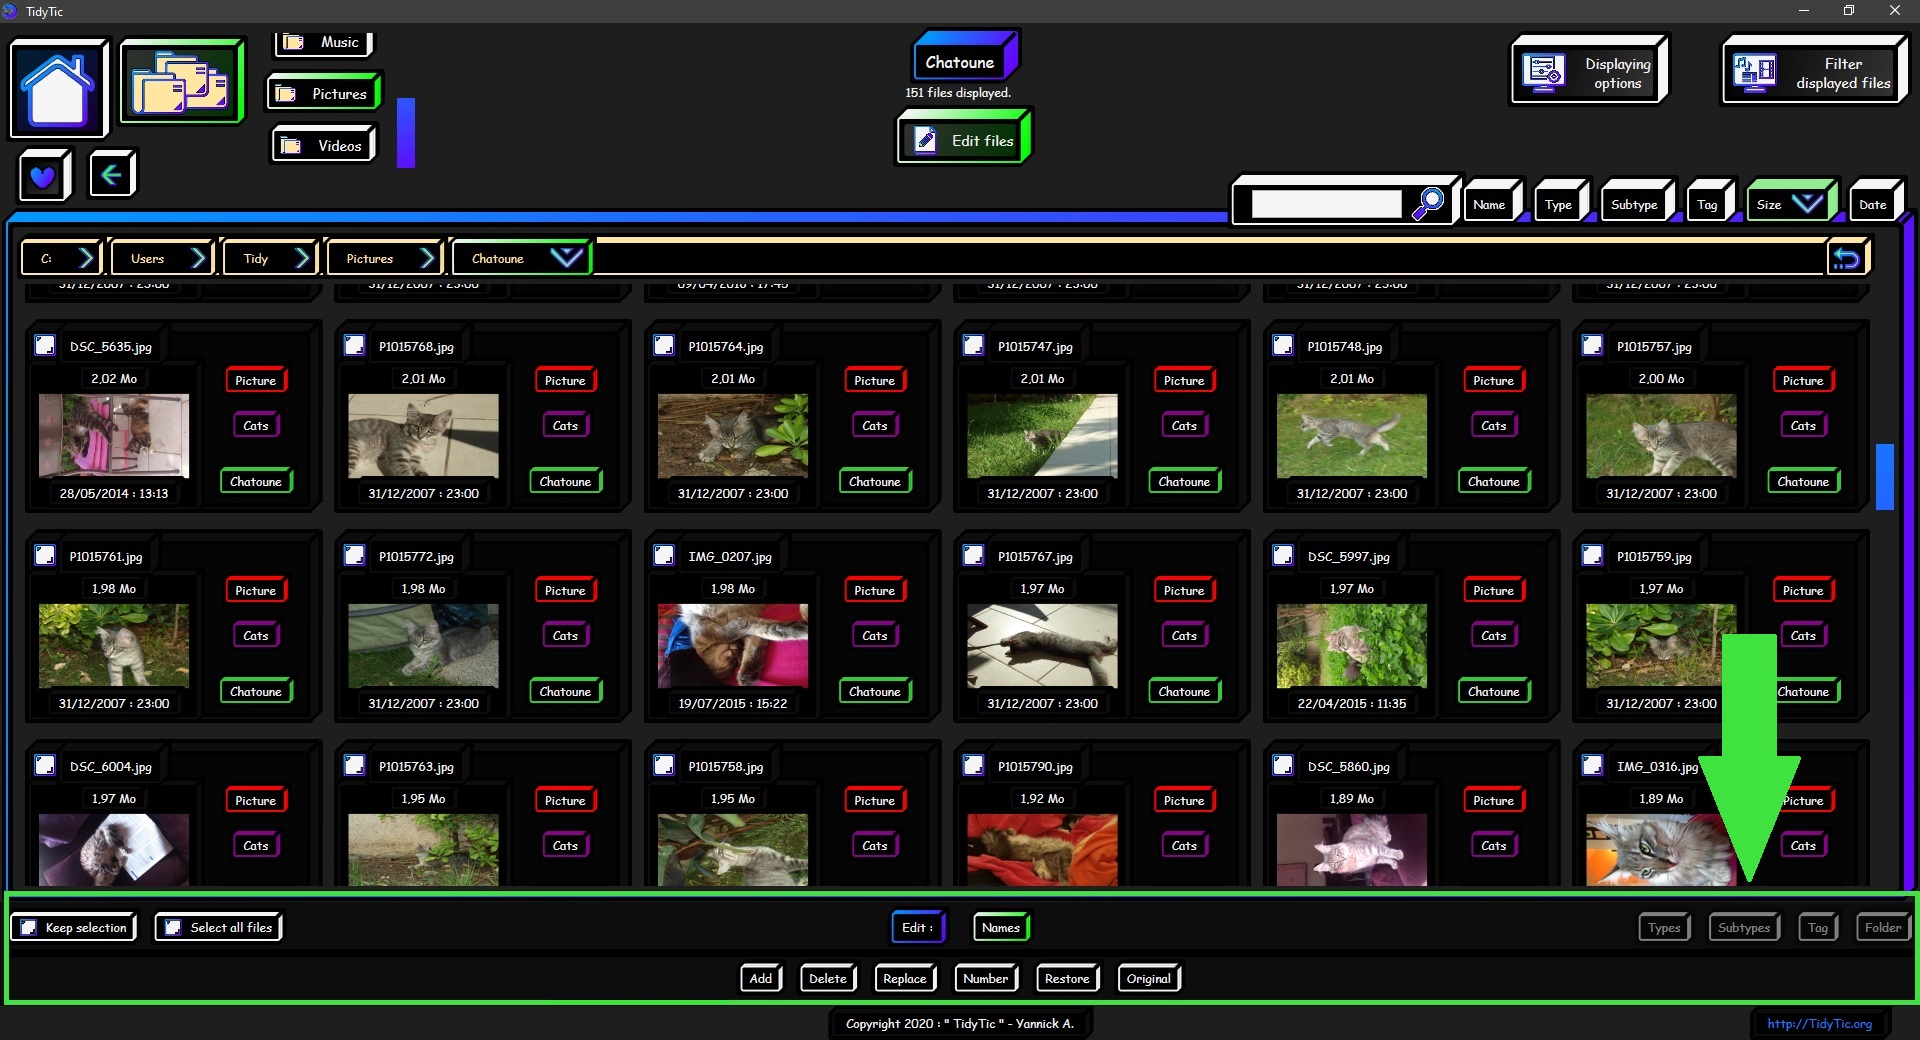
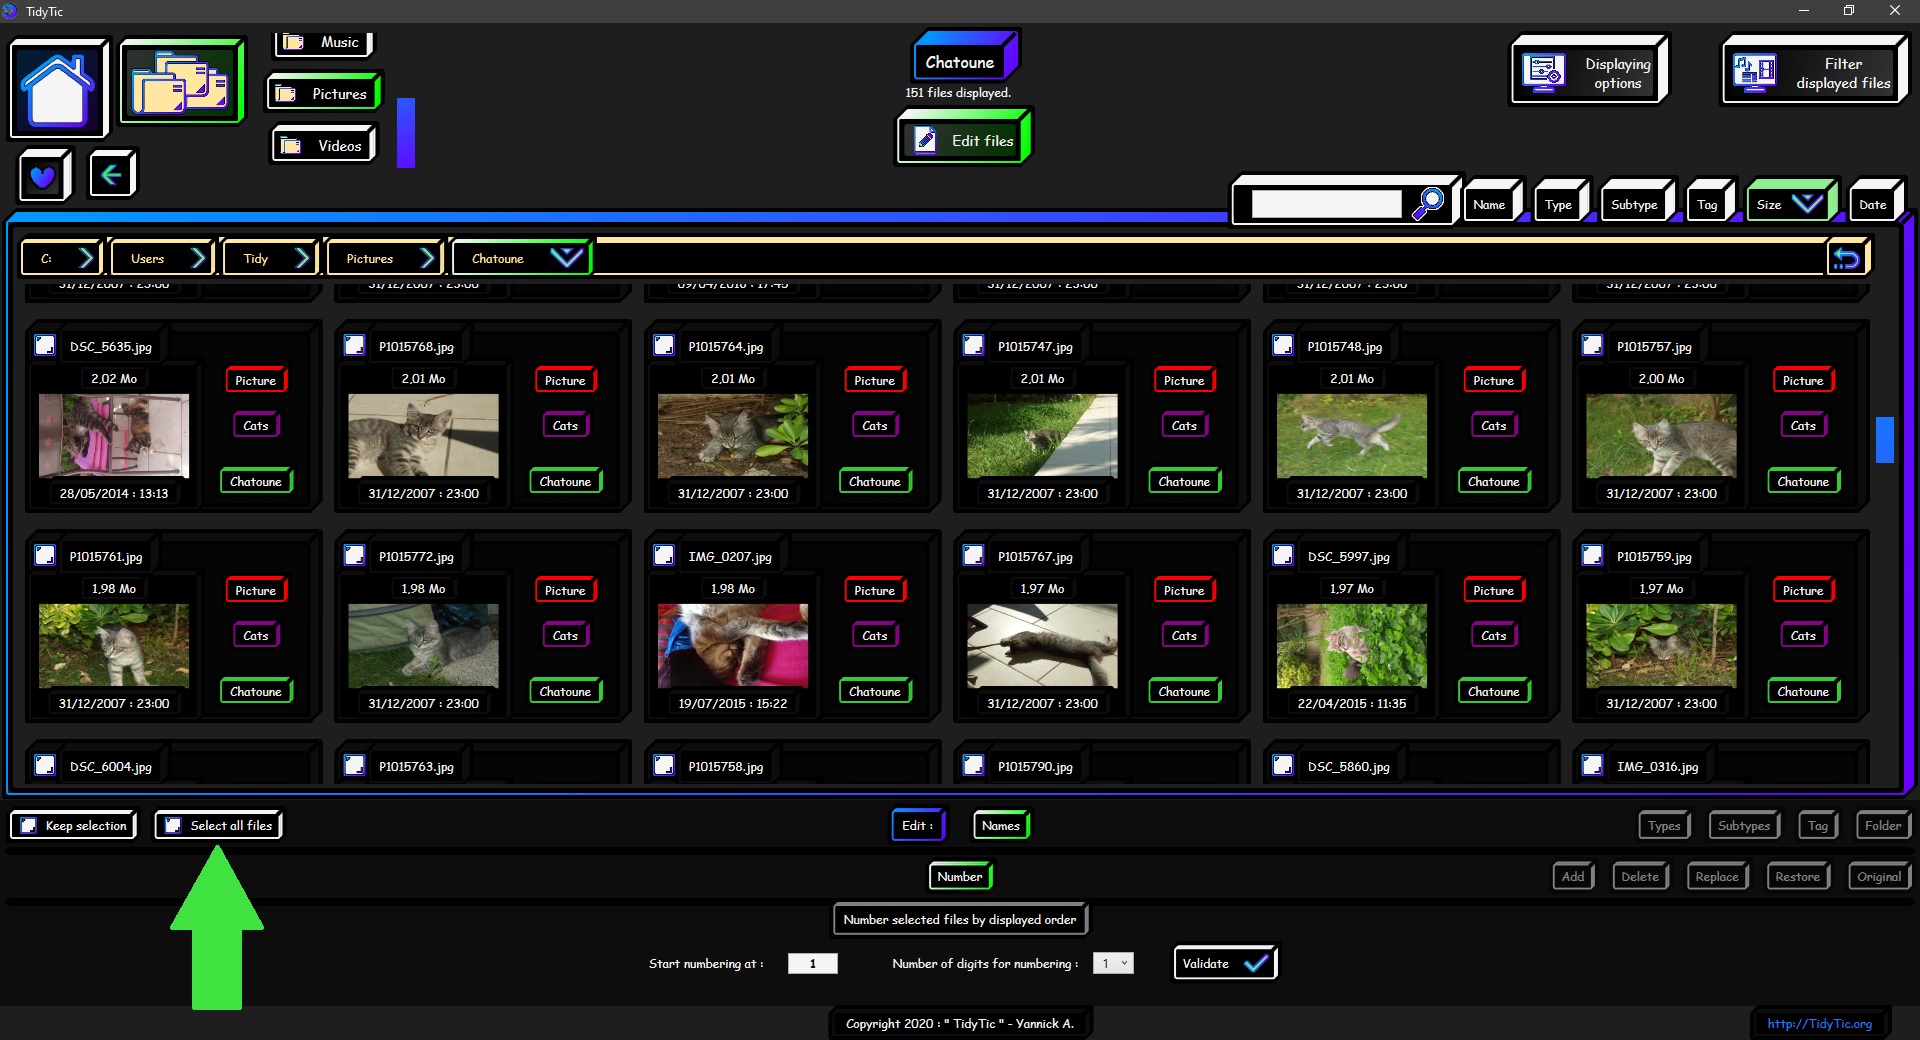
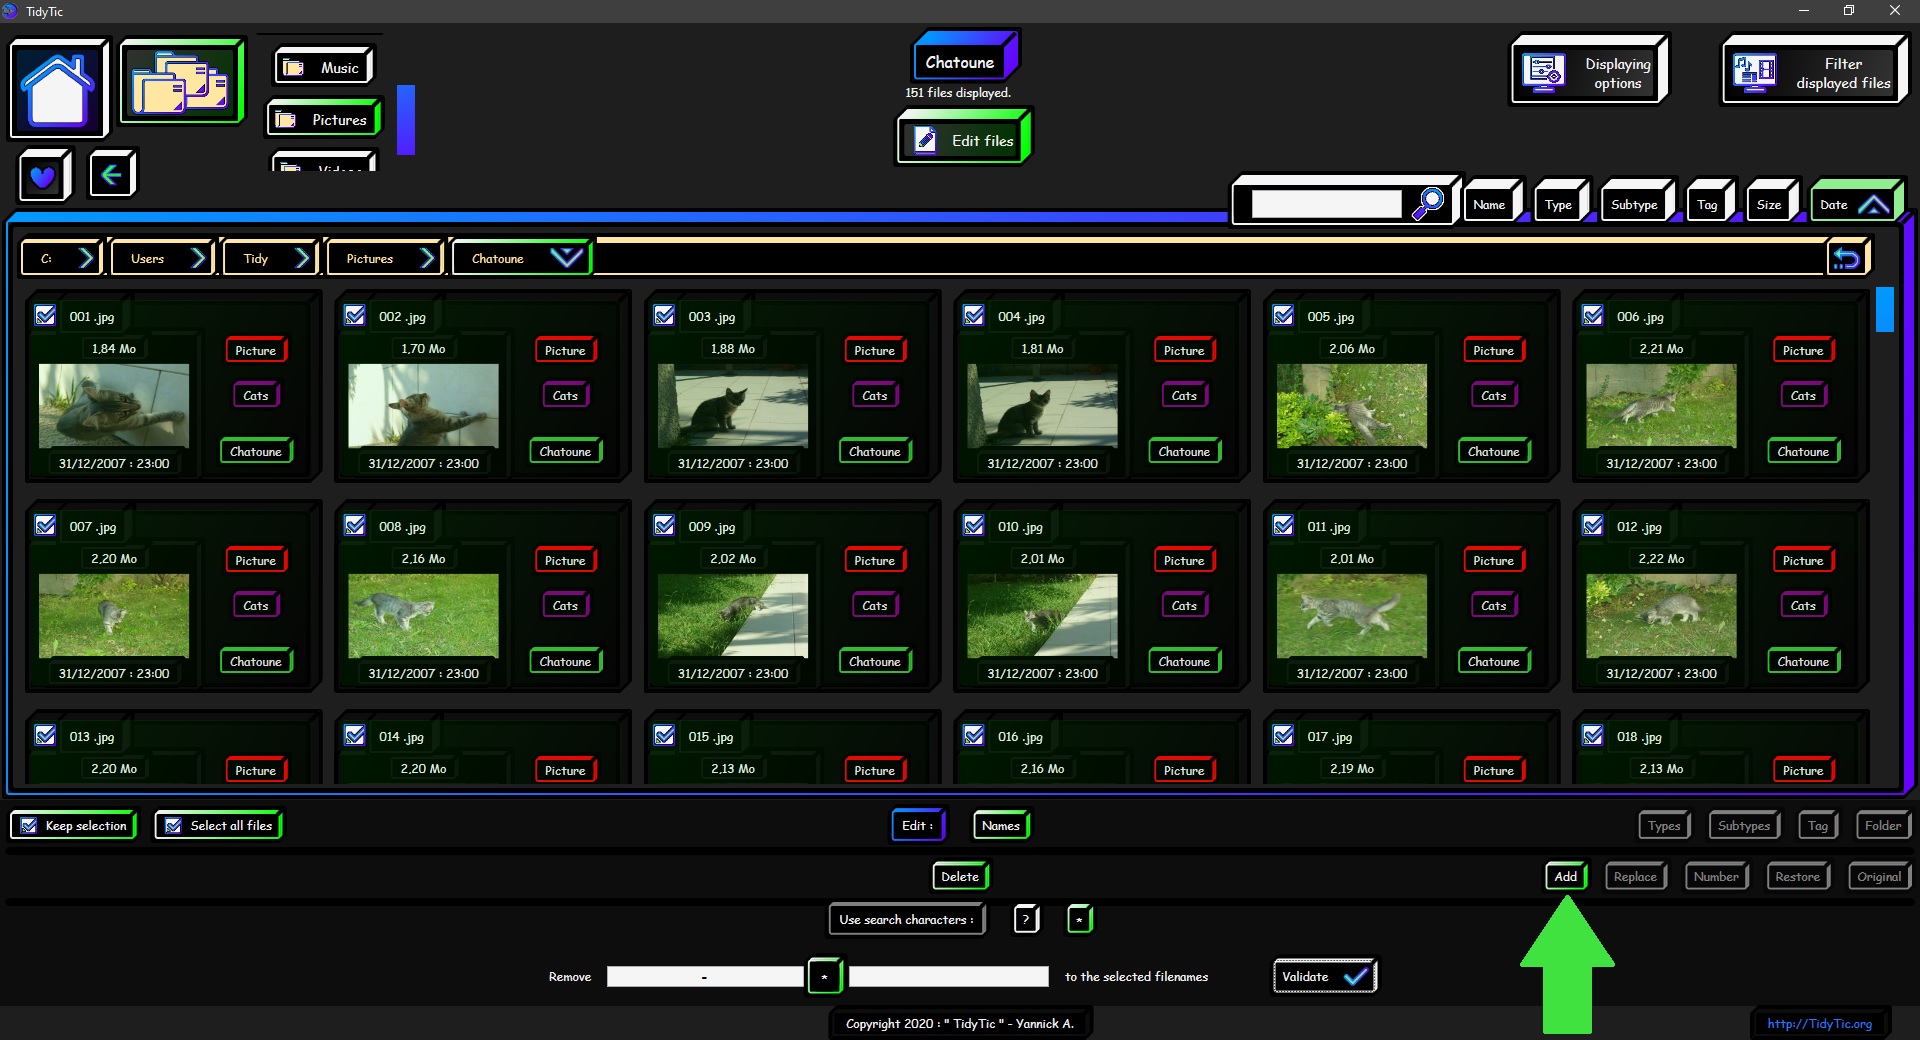
So I'm going to select all files in the folder.
I click on the available button "Select all files".
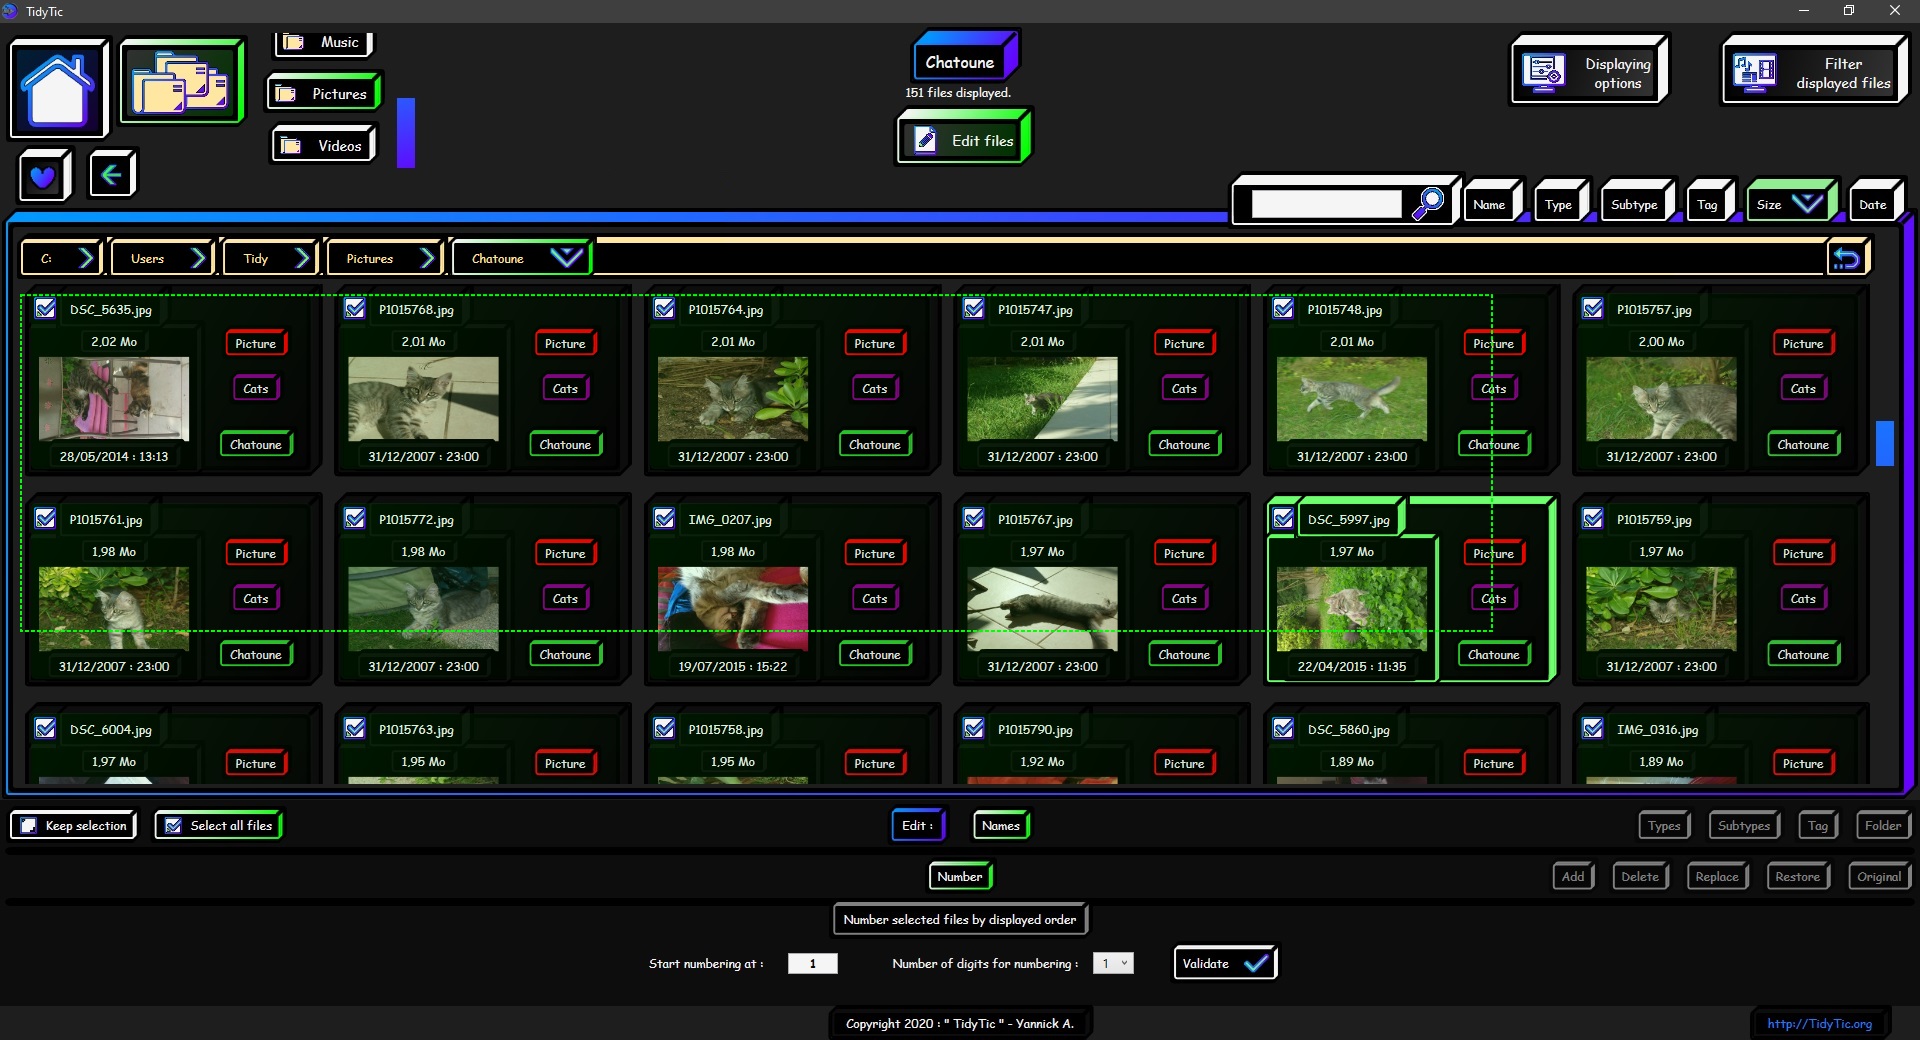
You can easily see that files are selected thanks to the "checkbox" icon of each file which will now be checked.
The selected files have also overlay with a green veil to distinguish them from unselected files.

In this example I can simply select everything at once because the folder contains only files that I want to modify.
If I had files that I did not want to select / modify, I could have used the "Filter displayed files" function to hide these unwanted files and then use the "Select all files" button.
(see the tutorial: "View your files in TidyTic :" for more information)
The keyboard / mouse controls you use on Windows are also present in TidyTic:
Left click + drag to bring up a selection rectangle for example.
The Windows keyboard shortcut "CTRL + A" is also available in TidyTic and it are simply linked to the "Select all files" button which both have the same function.
You can also click on each file independently to select / deselect it, even if that remains the longest method.
The shortcut "SHIFT + click" in Windows also works the same way on TidyTic : Select all files between the last file selected and the file on which you do the "SHIFT + click".
The files in TidyTic are automatically deselected after each action performed, in order to avoid a mistake (launch the same action twice in a row for example).
If you want to keep files selected even after a action because you have several actions to do on them you can use the "Keep selection" button on the left in the modification menu.
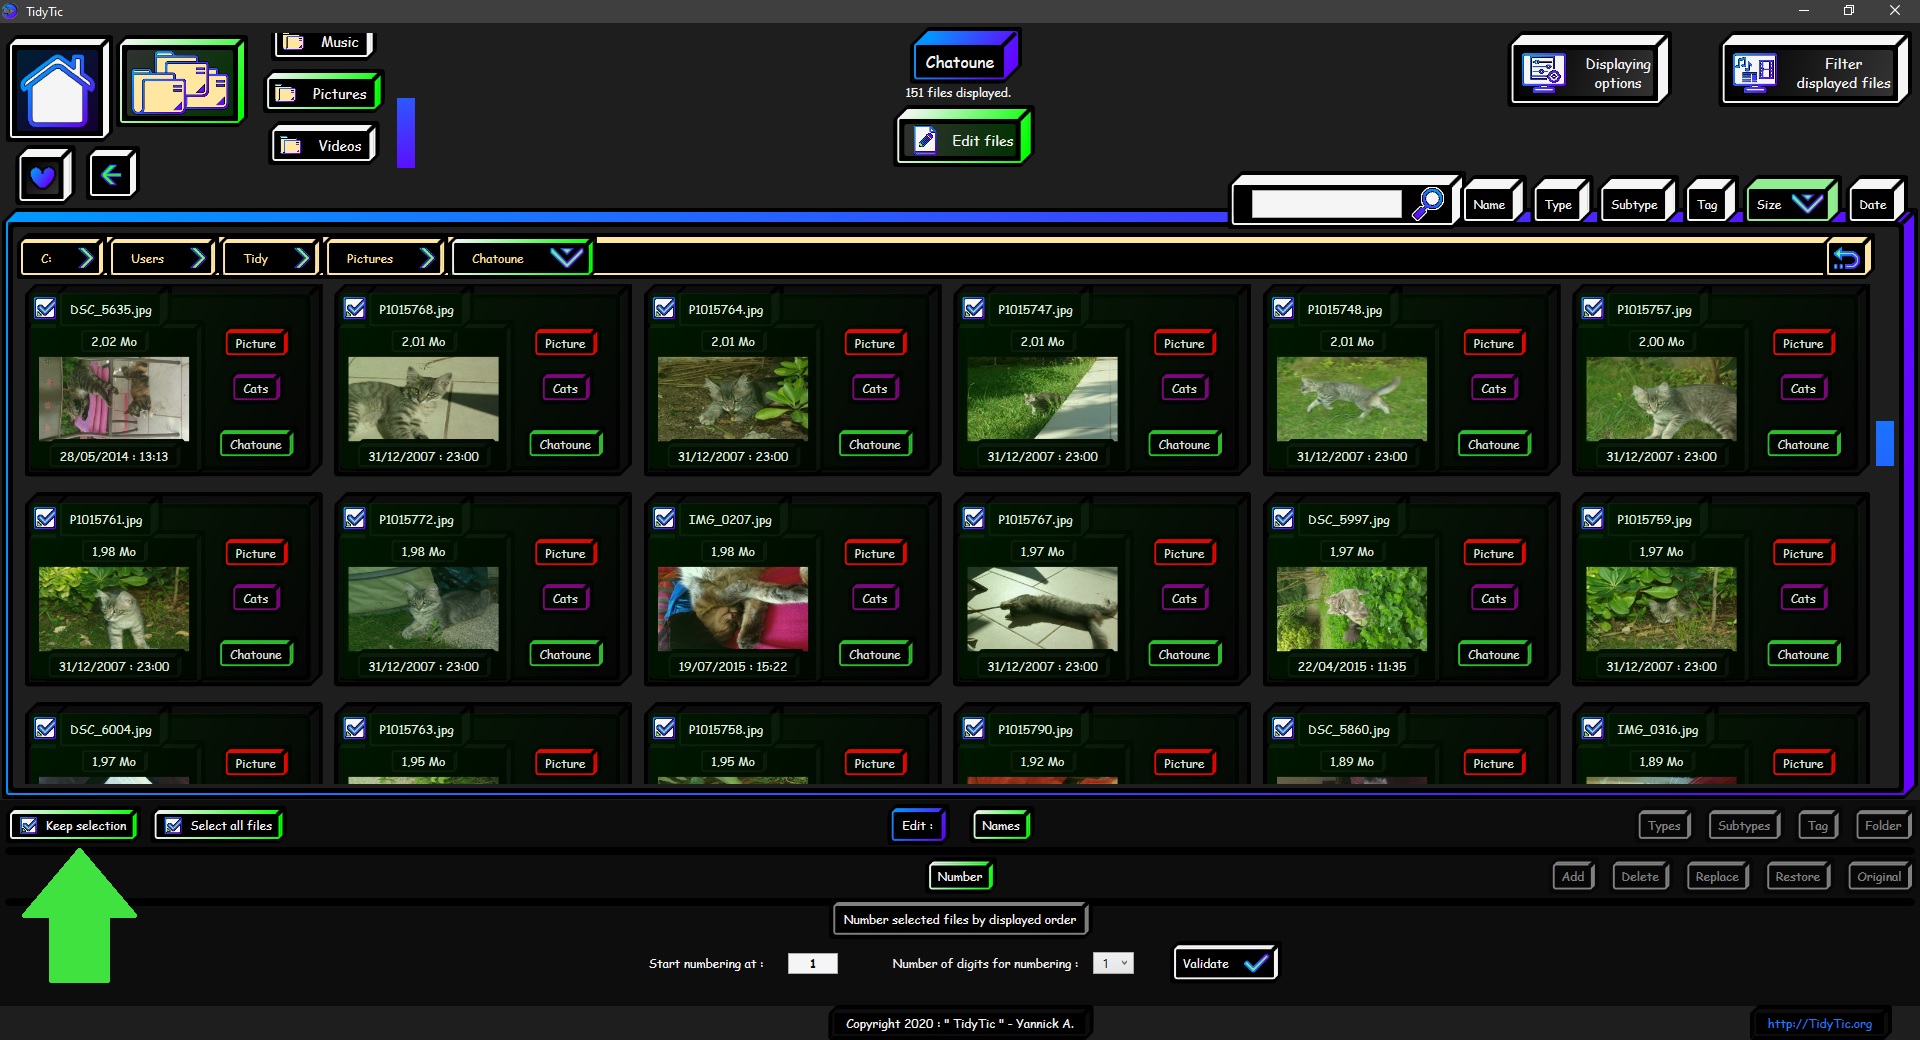
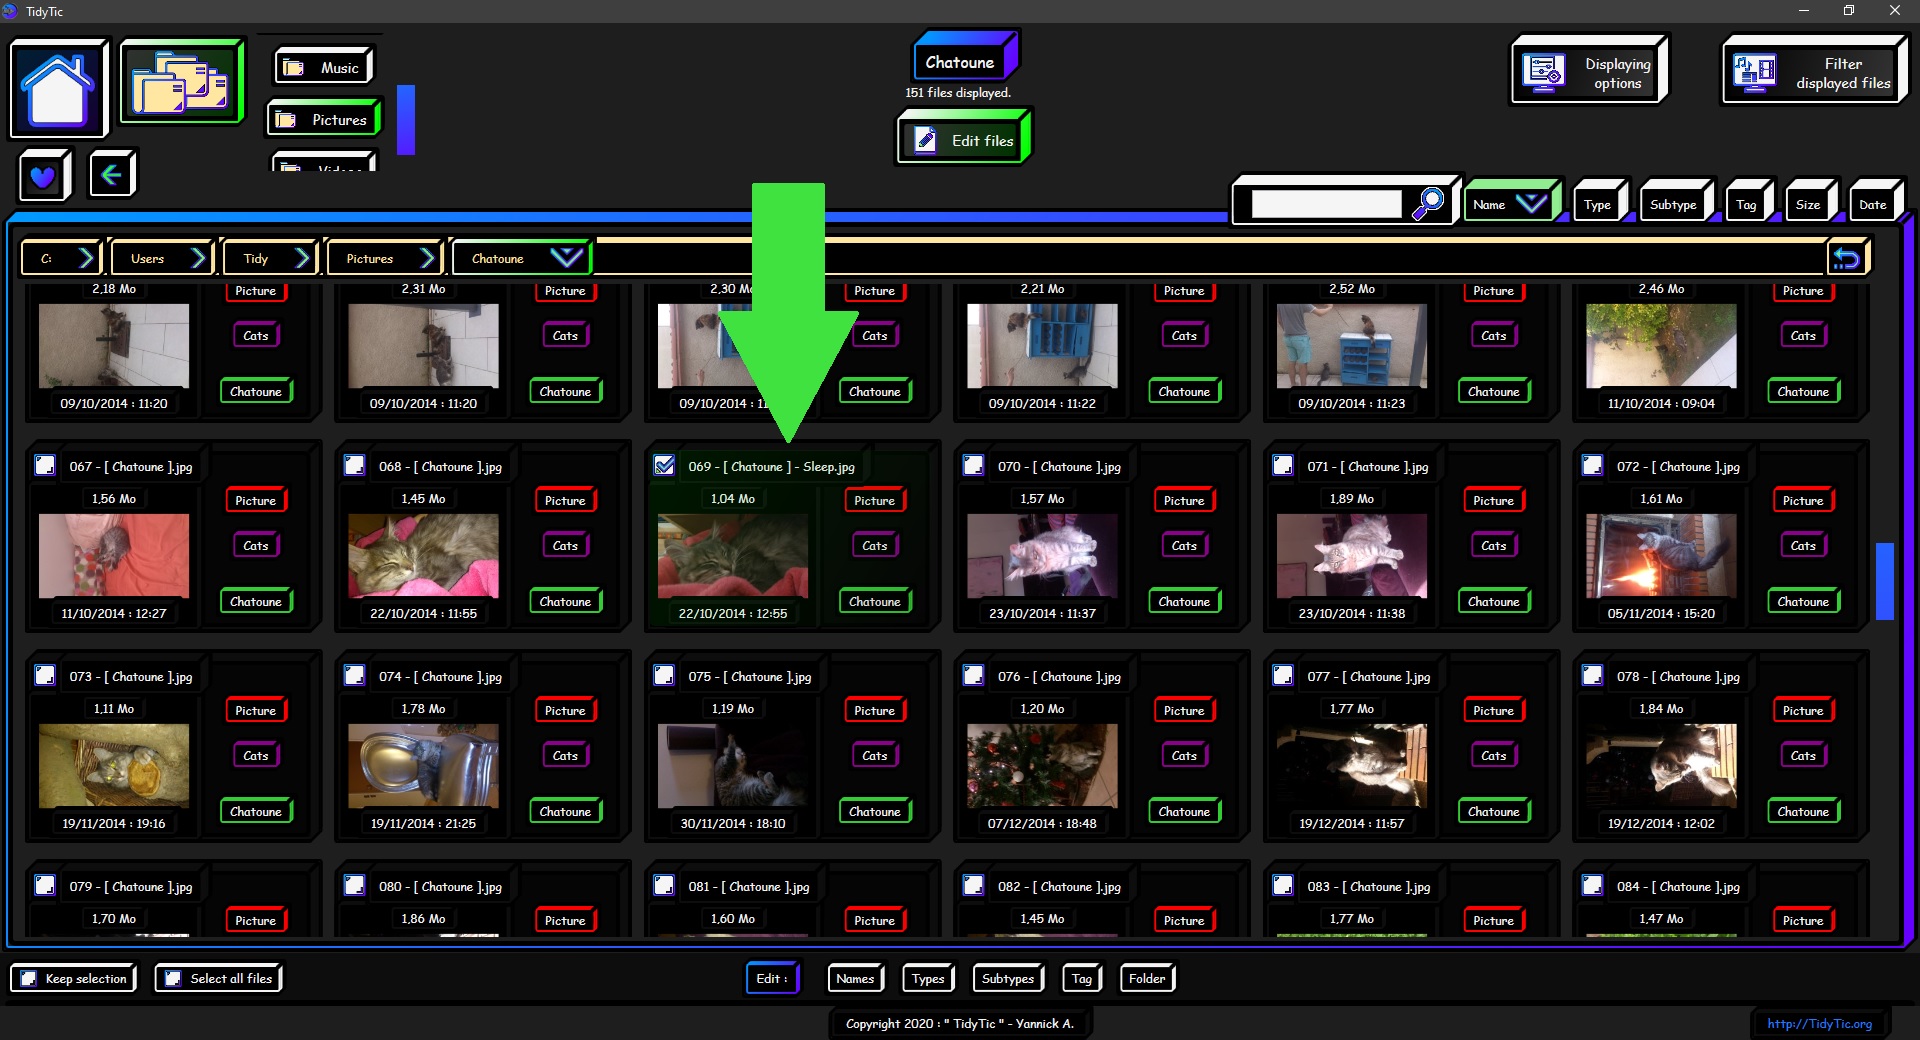
This is my case here, because I will clean up names after I number them. So I activated this button.
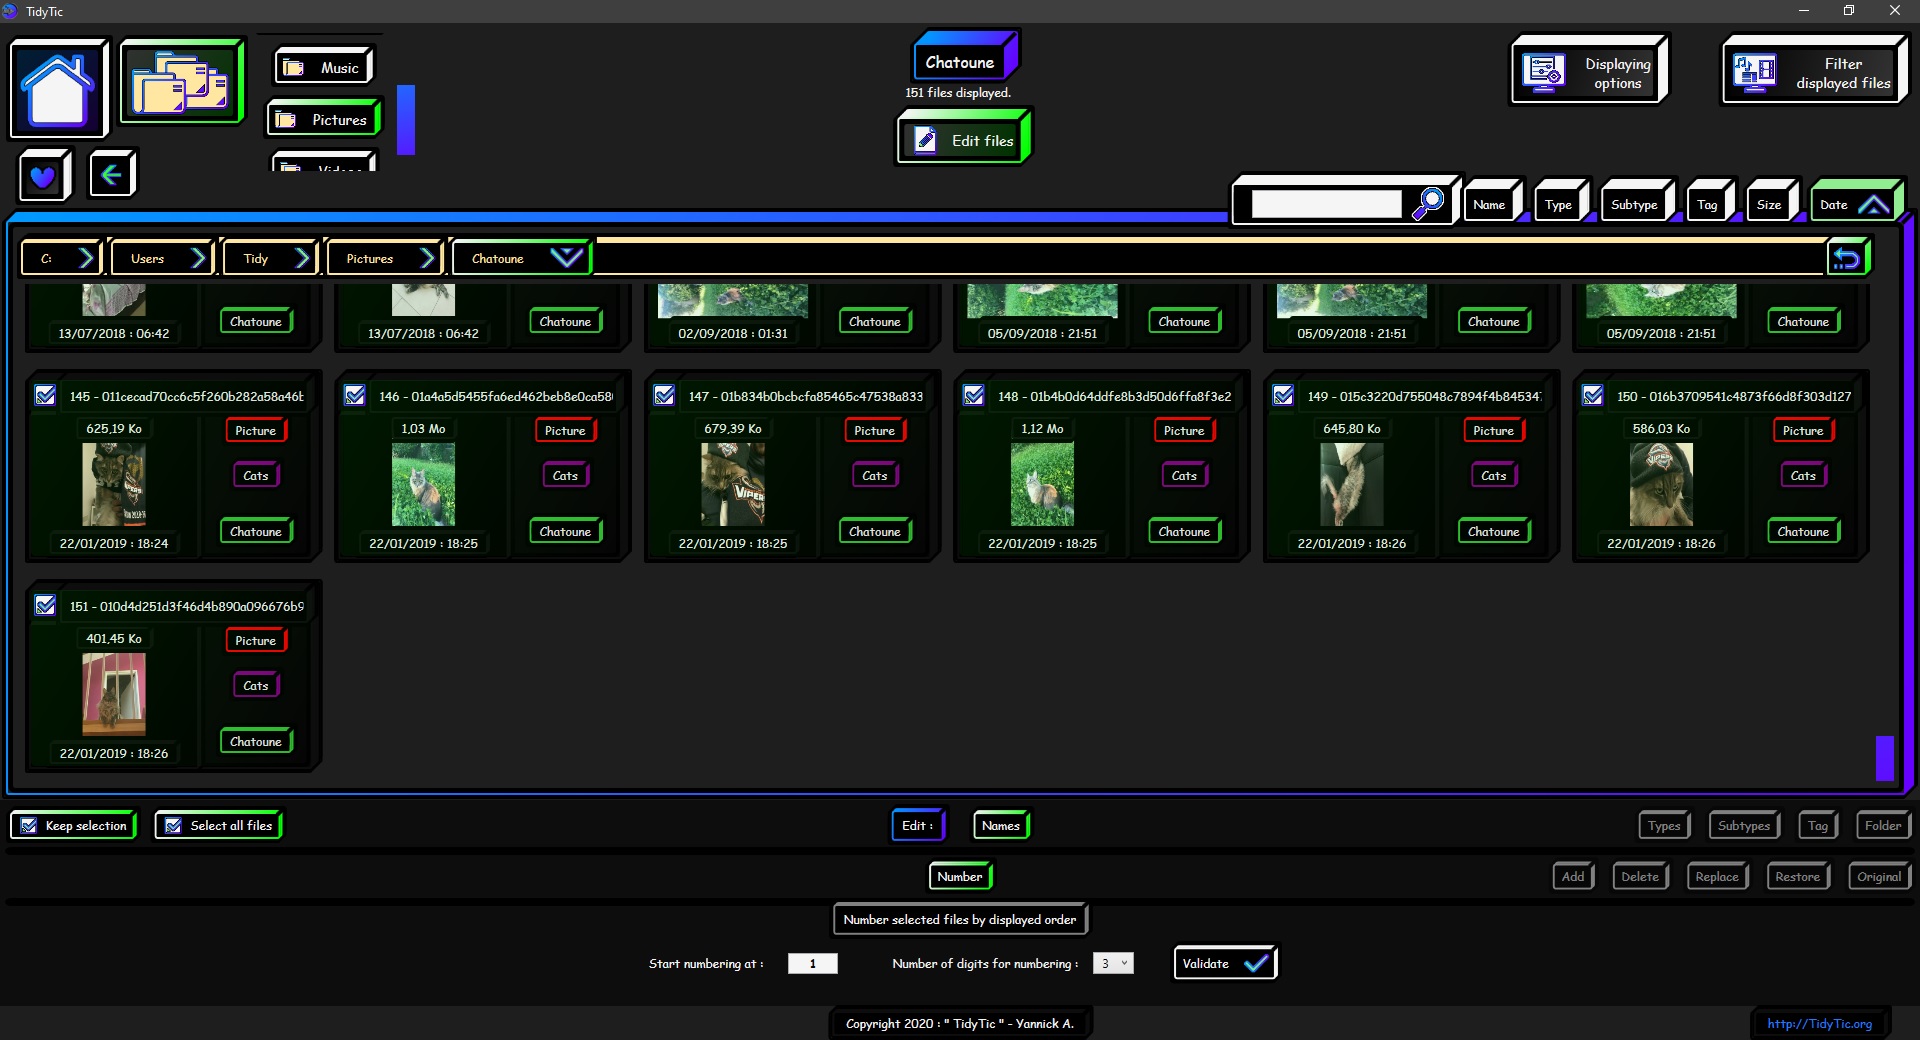
I will also sort all files by date simply by clicking on "date" in the top menu so that the numbering is done from the oldest photo to the most recent (Numbering by display order).
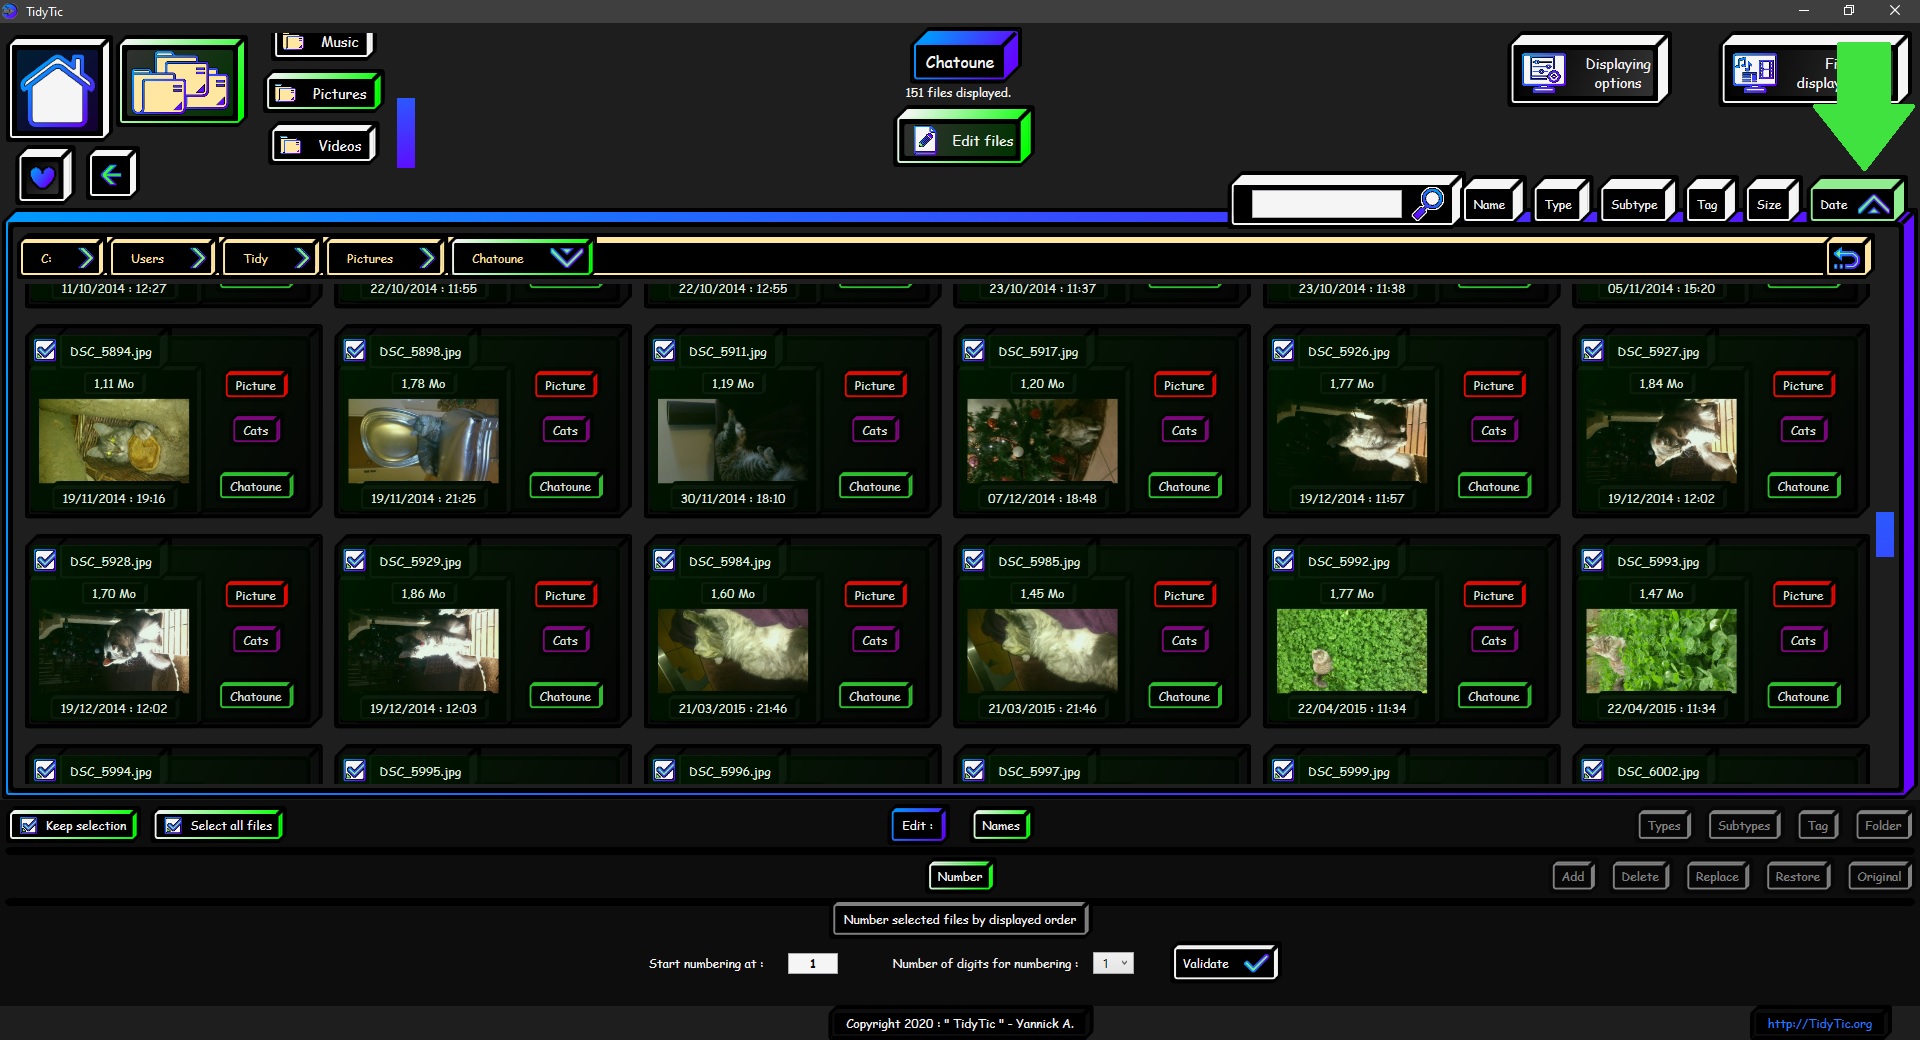
It only remains for me to choose the options for the numbering action :
At what number start numbering.
How many digits will be visible in the numbering (1 or 01 or 001 etc).
Here I will start at 1 because these are the first photos available of Chatoune, there is no older one.
If I add new photos later I can start higher, in this example it would be 152 because I already have 151 photos.
I will however choose 3 digits for the numbering, again because I have 151 photos, this will allow me to have up to 999 photos of Chatoune which will start with 001 until 999.
So Windows, TidyTic or any other software will be able to sort them correctly by name.

Once the action launched we can see that the software starts to rename all my files by adding "001 -", "002 -", etc at the beginning of each file name.
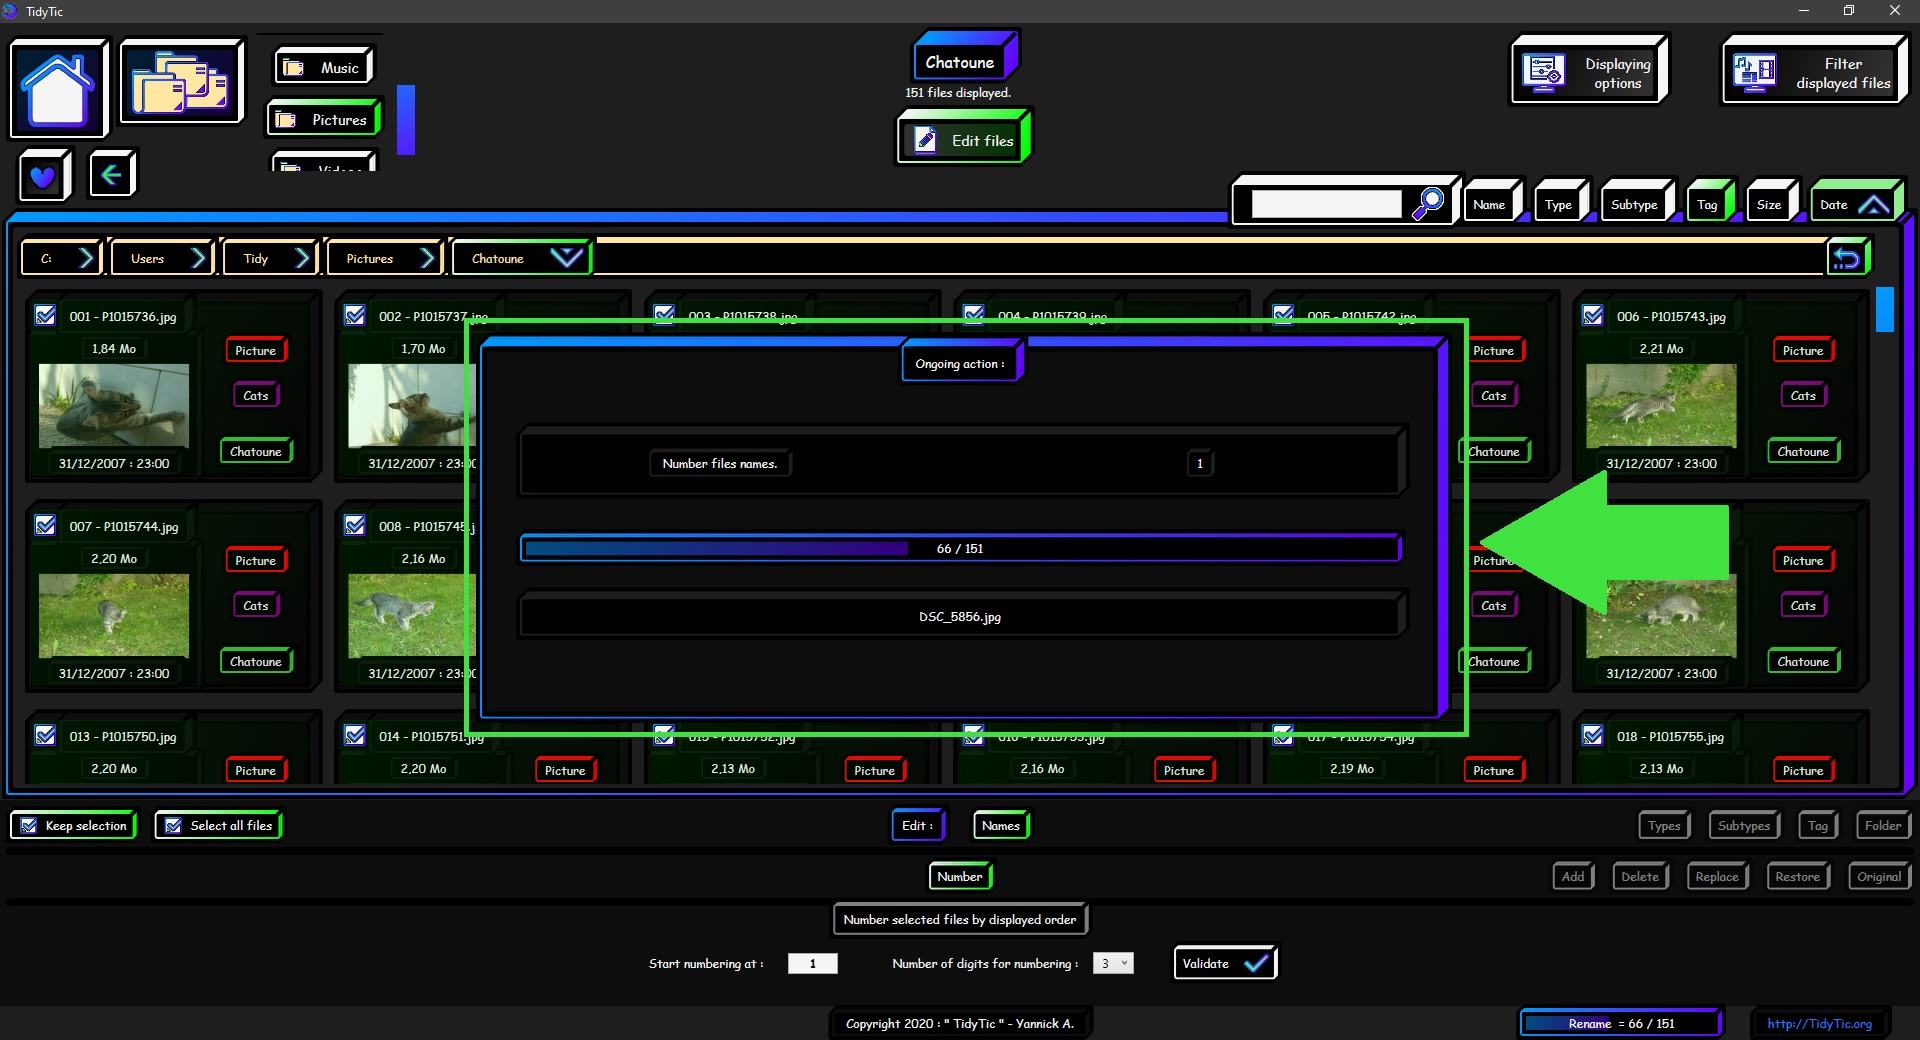
You also have a message at the bottom telling you that an action is in progress on your files.
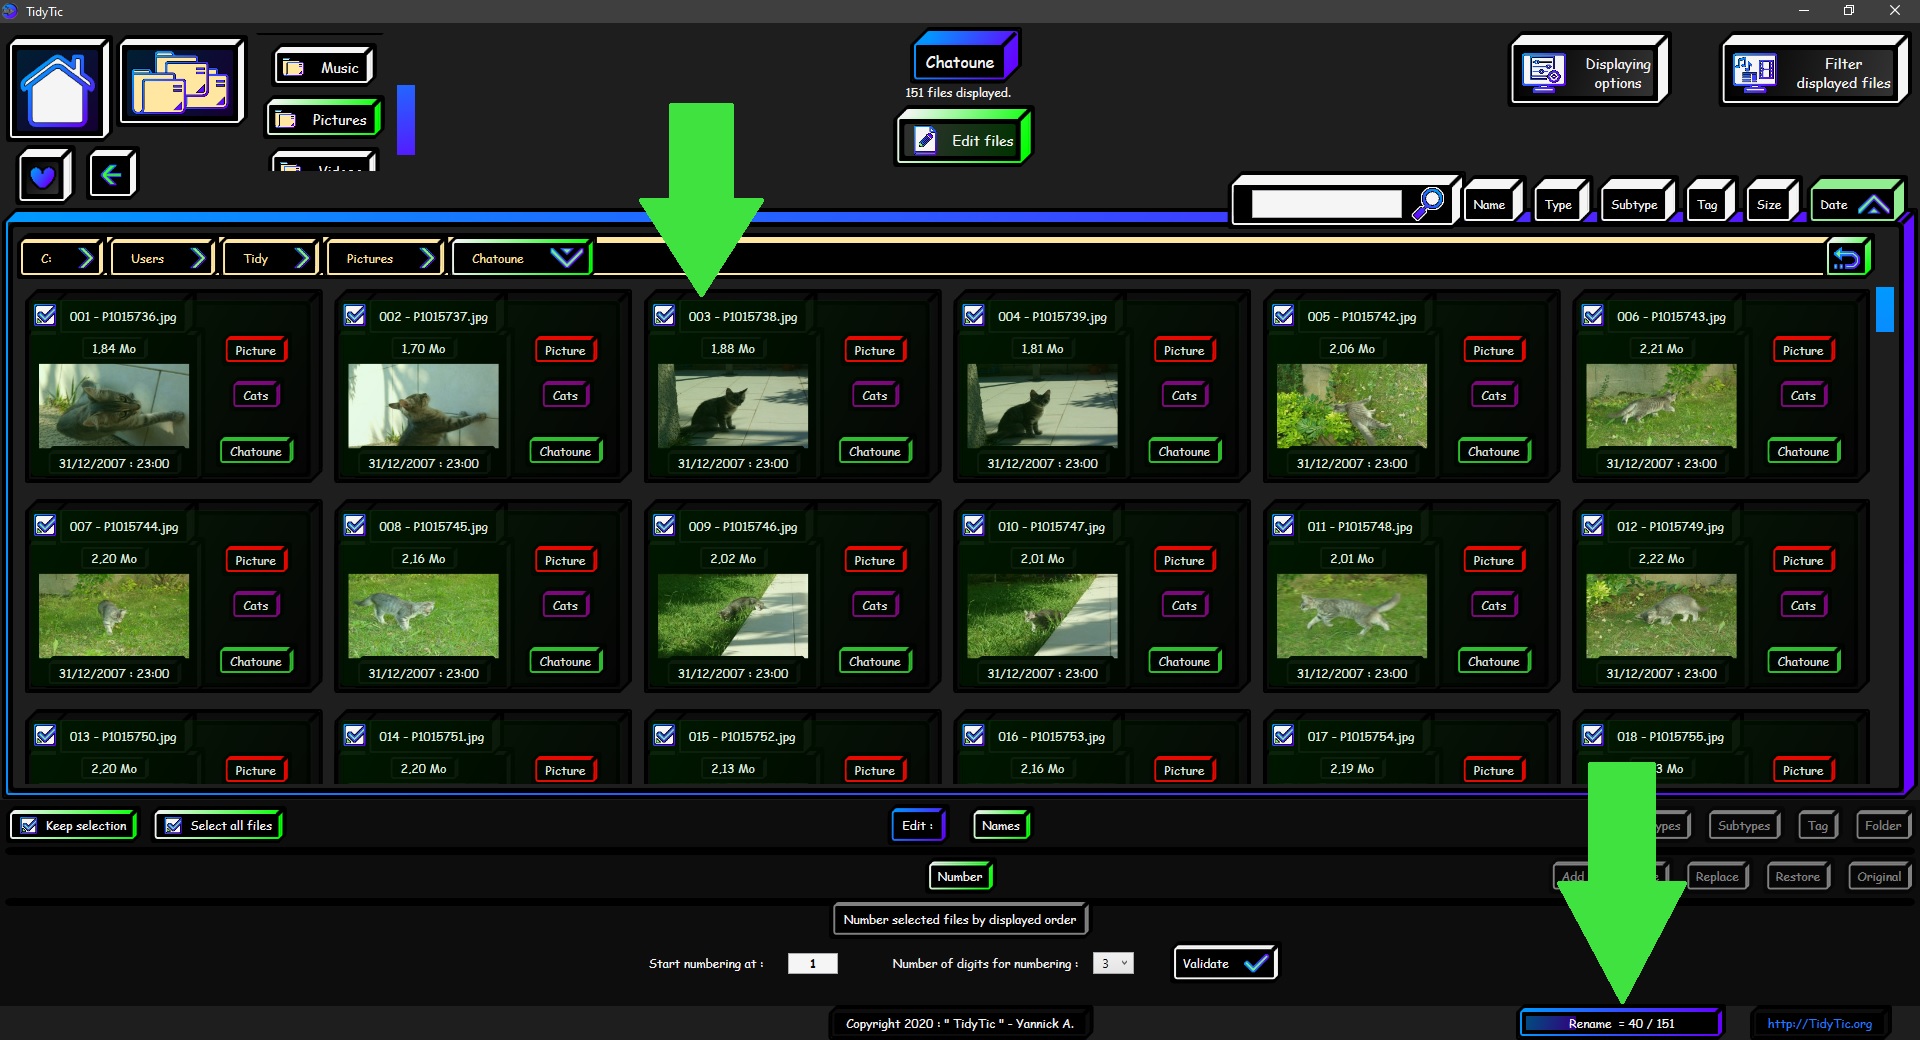
If you click on this message, a window will appear with the details of the action in progress : type of action, number of files remaining, file currently modified, etc.
I now have all my files numbered by date, from 001 to 151.
I still have to delete everything that was already in file names that I am not interested to keep.
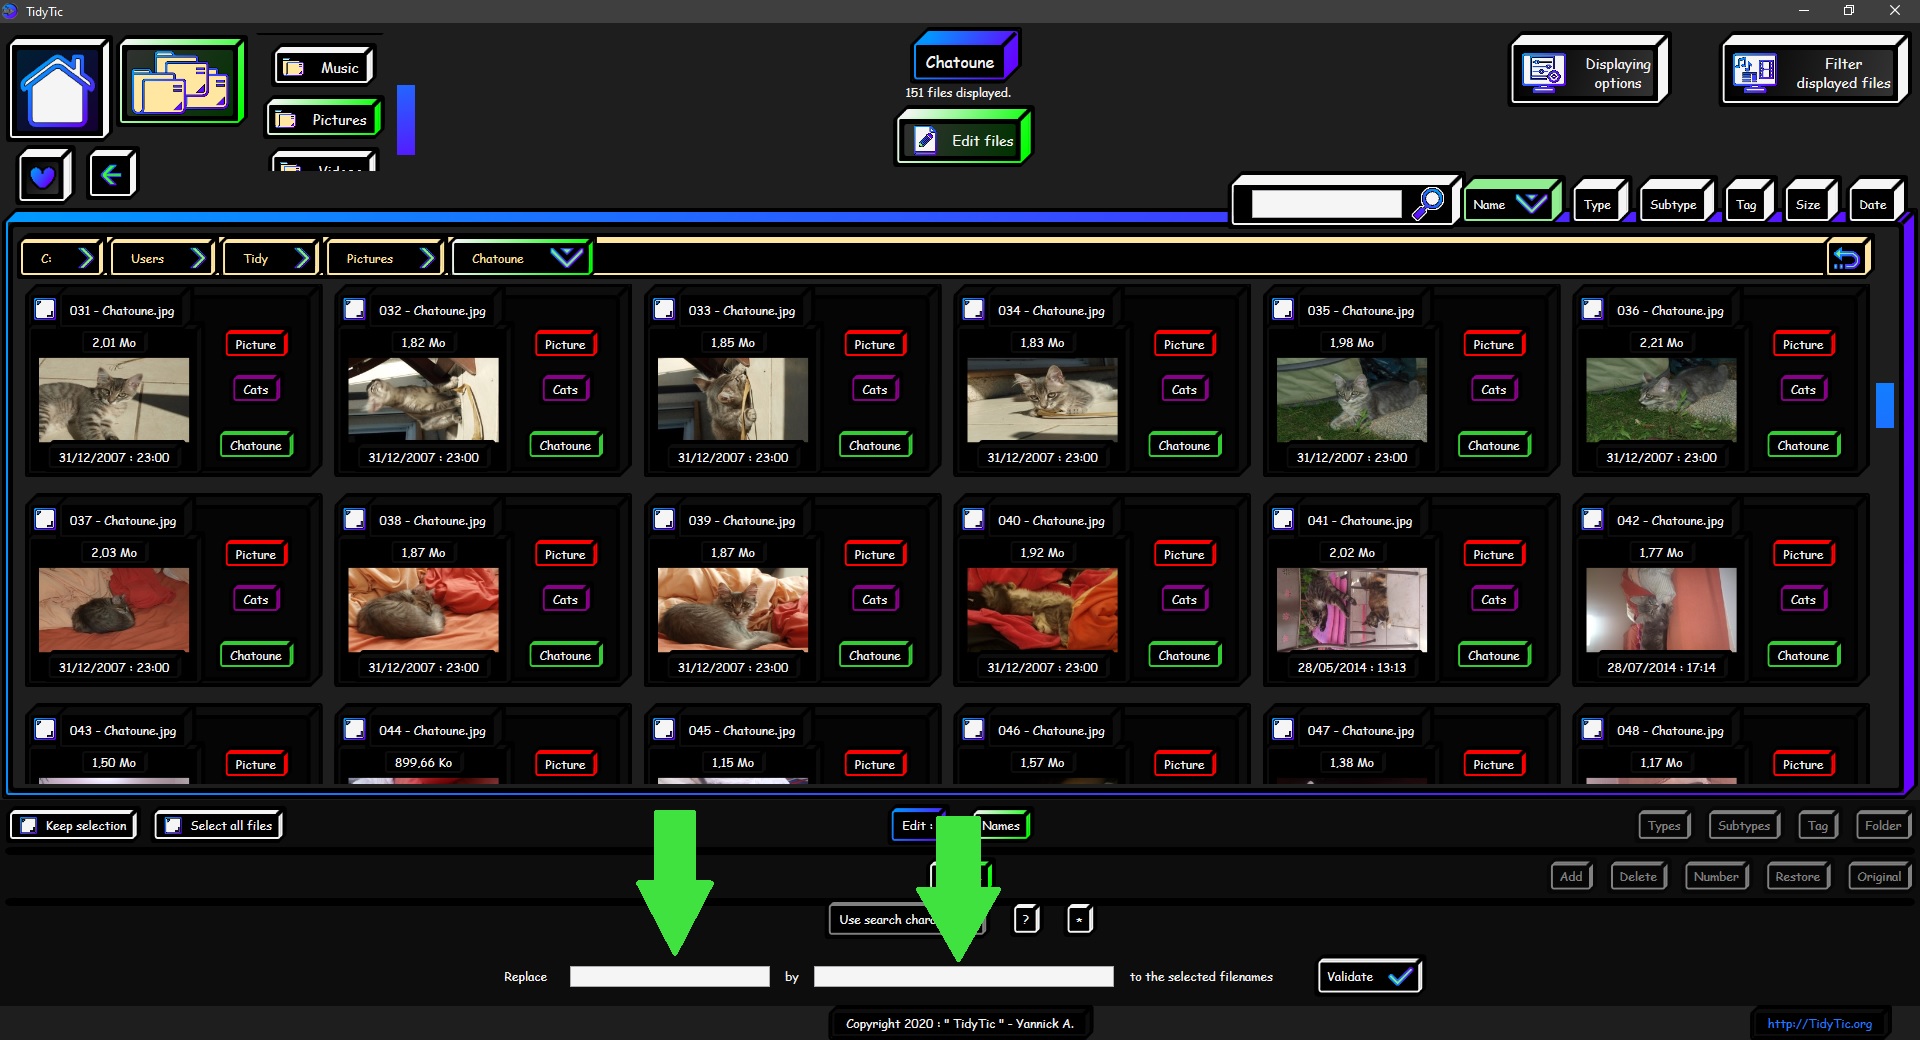
For this I will change the renaming option and choose "Delete".
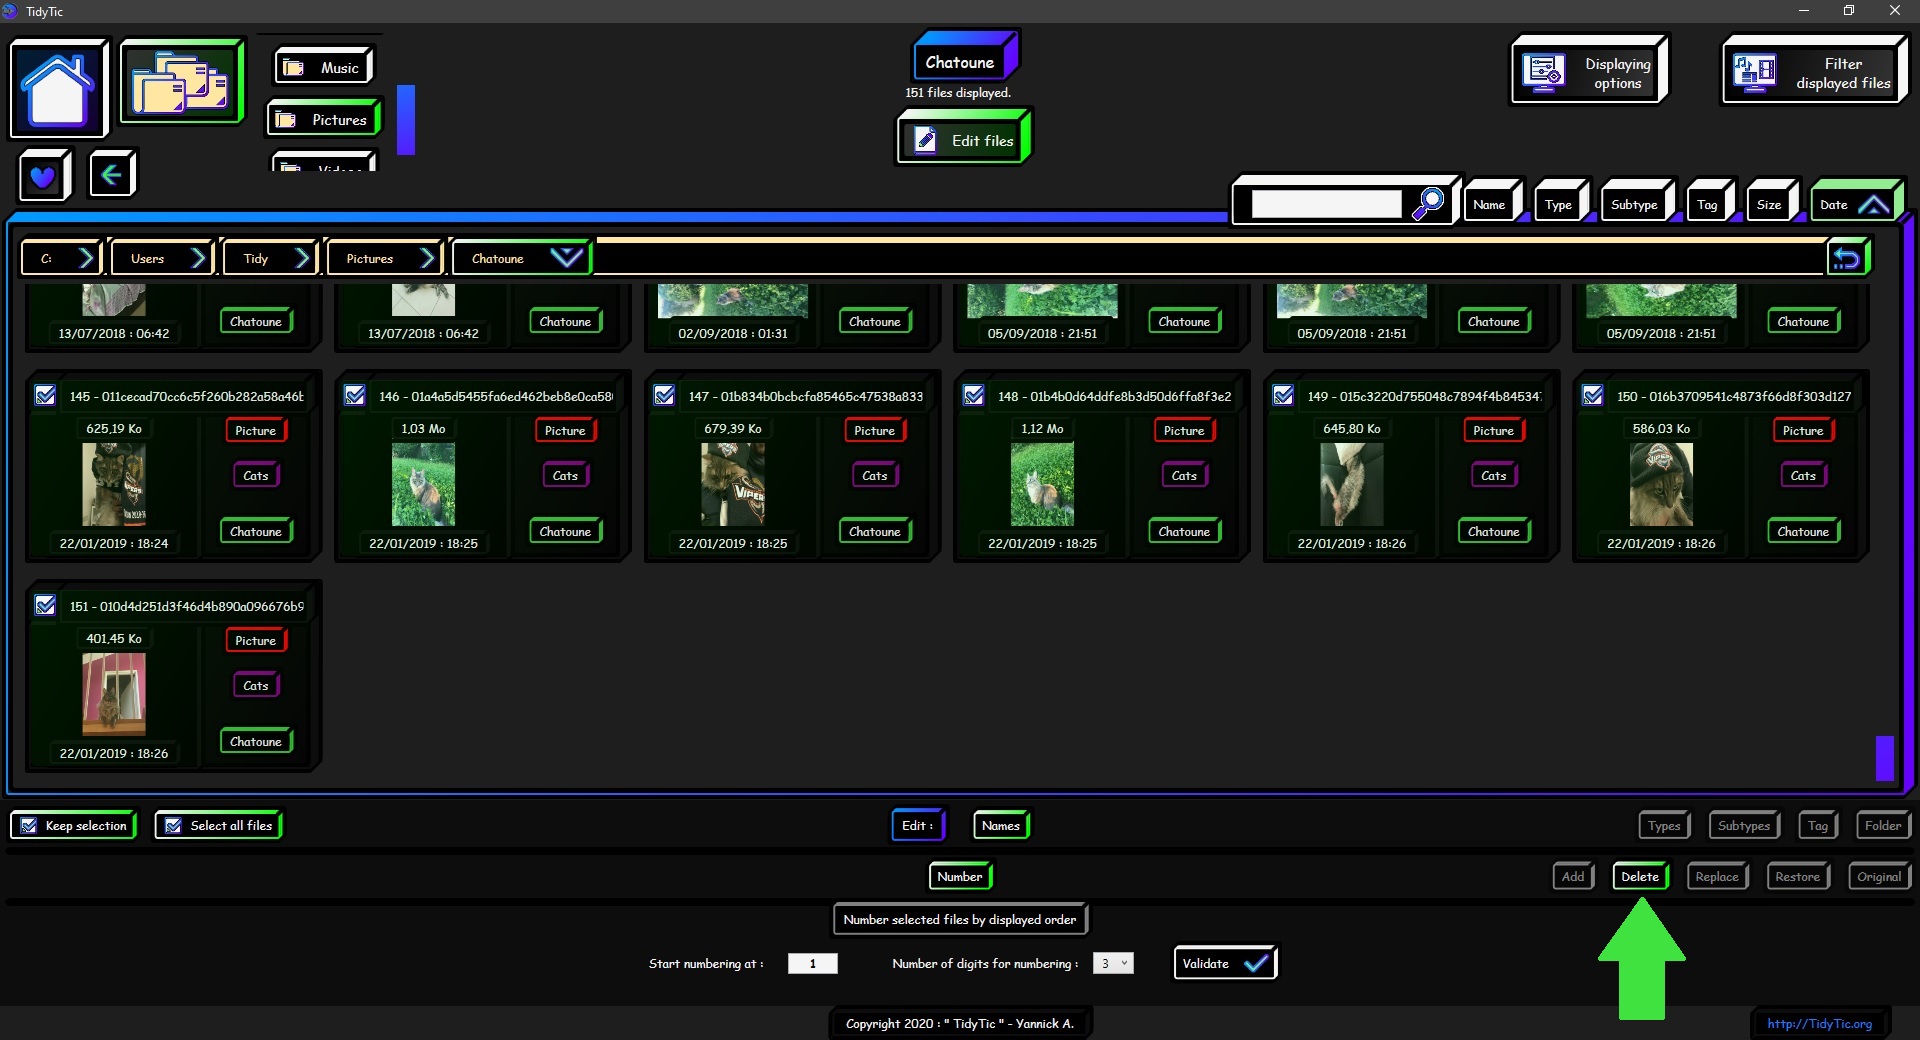
This menu allows you to delete the character string, which you will indicate, from the name of the selected files. Leaving the rest of name unchanged.
Please note, upper and lower case are taken into account.
If you ask to remove Hello from files name, the software will not remove the hello found in the name.
But there is a slight complication here, the deletion will only be carried out if the character string indicated corresponds exactly to what the software finds in the name.
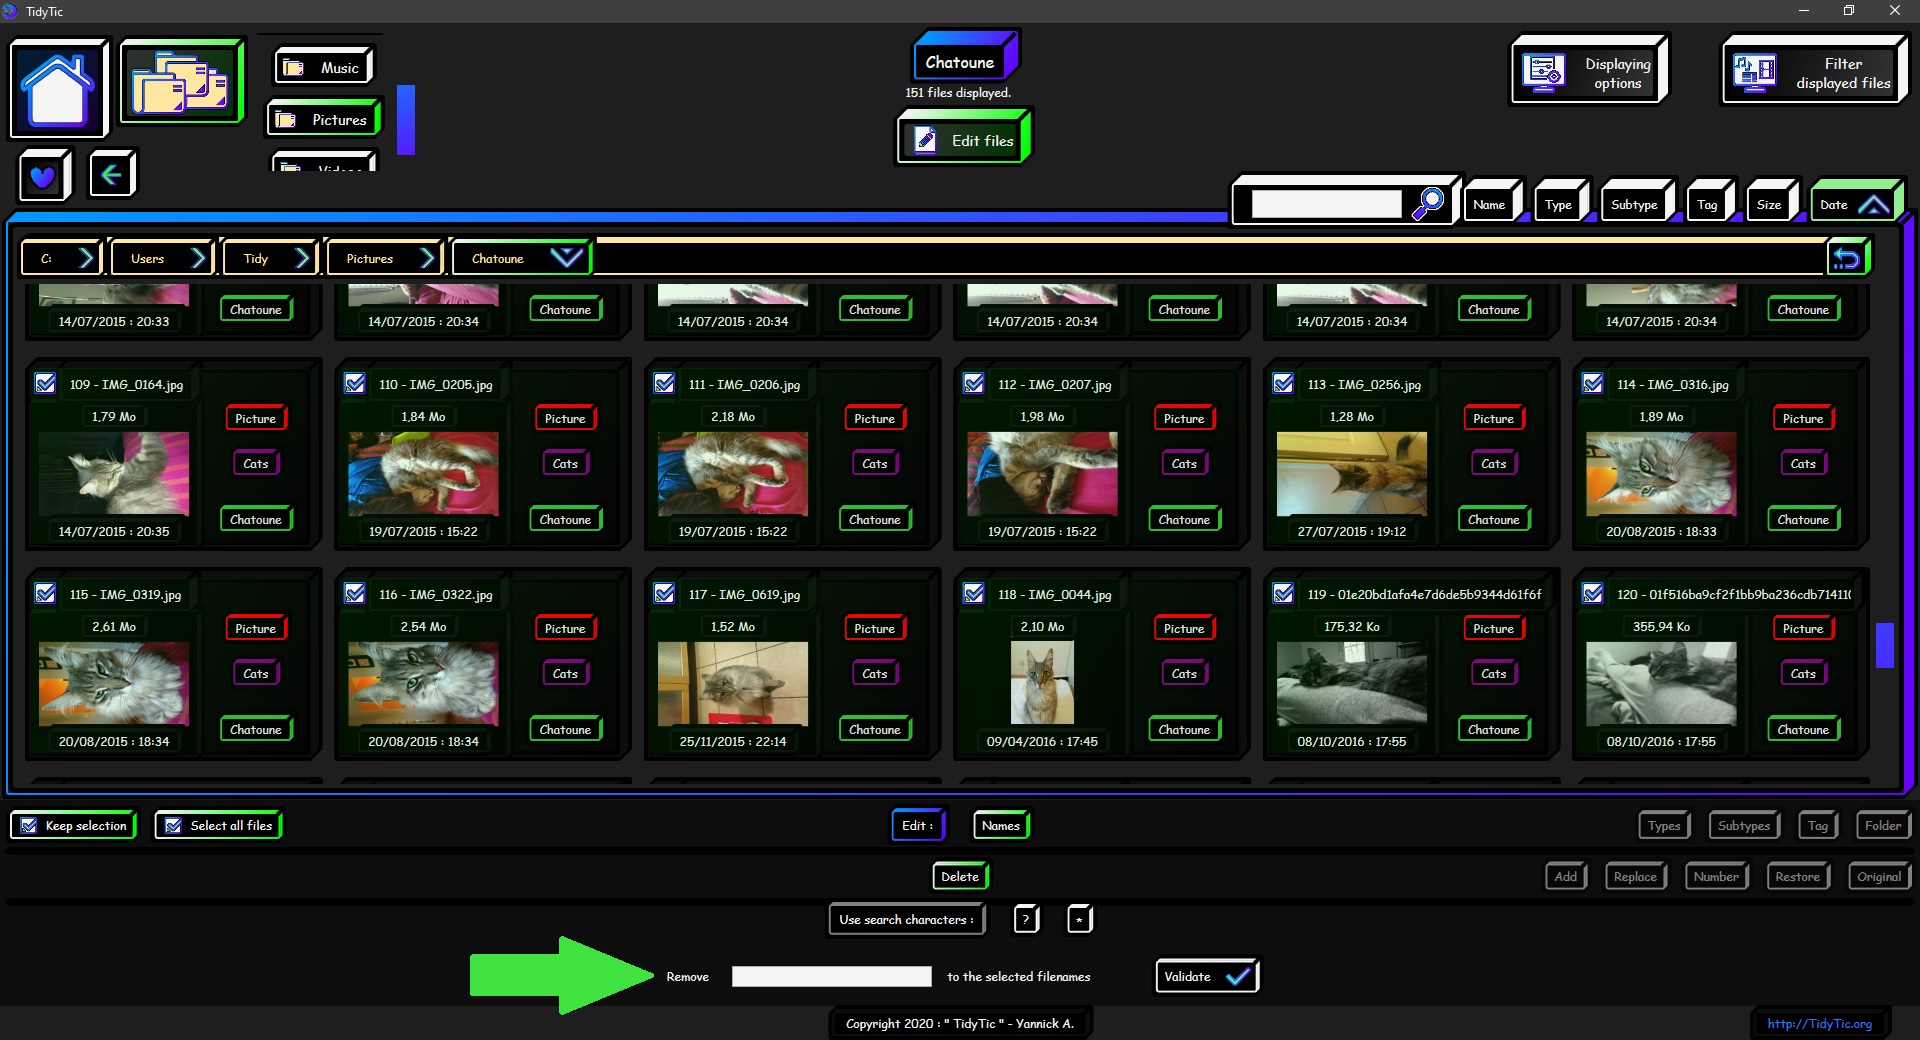
However here what I want to delete from the name of my files is almost random : "IMG_E0703", "DSC_5985" etc.
If I had to indicate everything each time it would mean renaming my files one by one and would be extremely long.
But TidyTic has a very powerful tool in this kind of case : the search characters.
The use of these search characters is proposed to you in the title of the "delete" option for name.
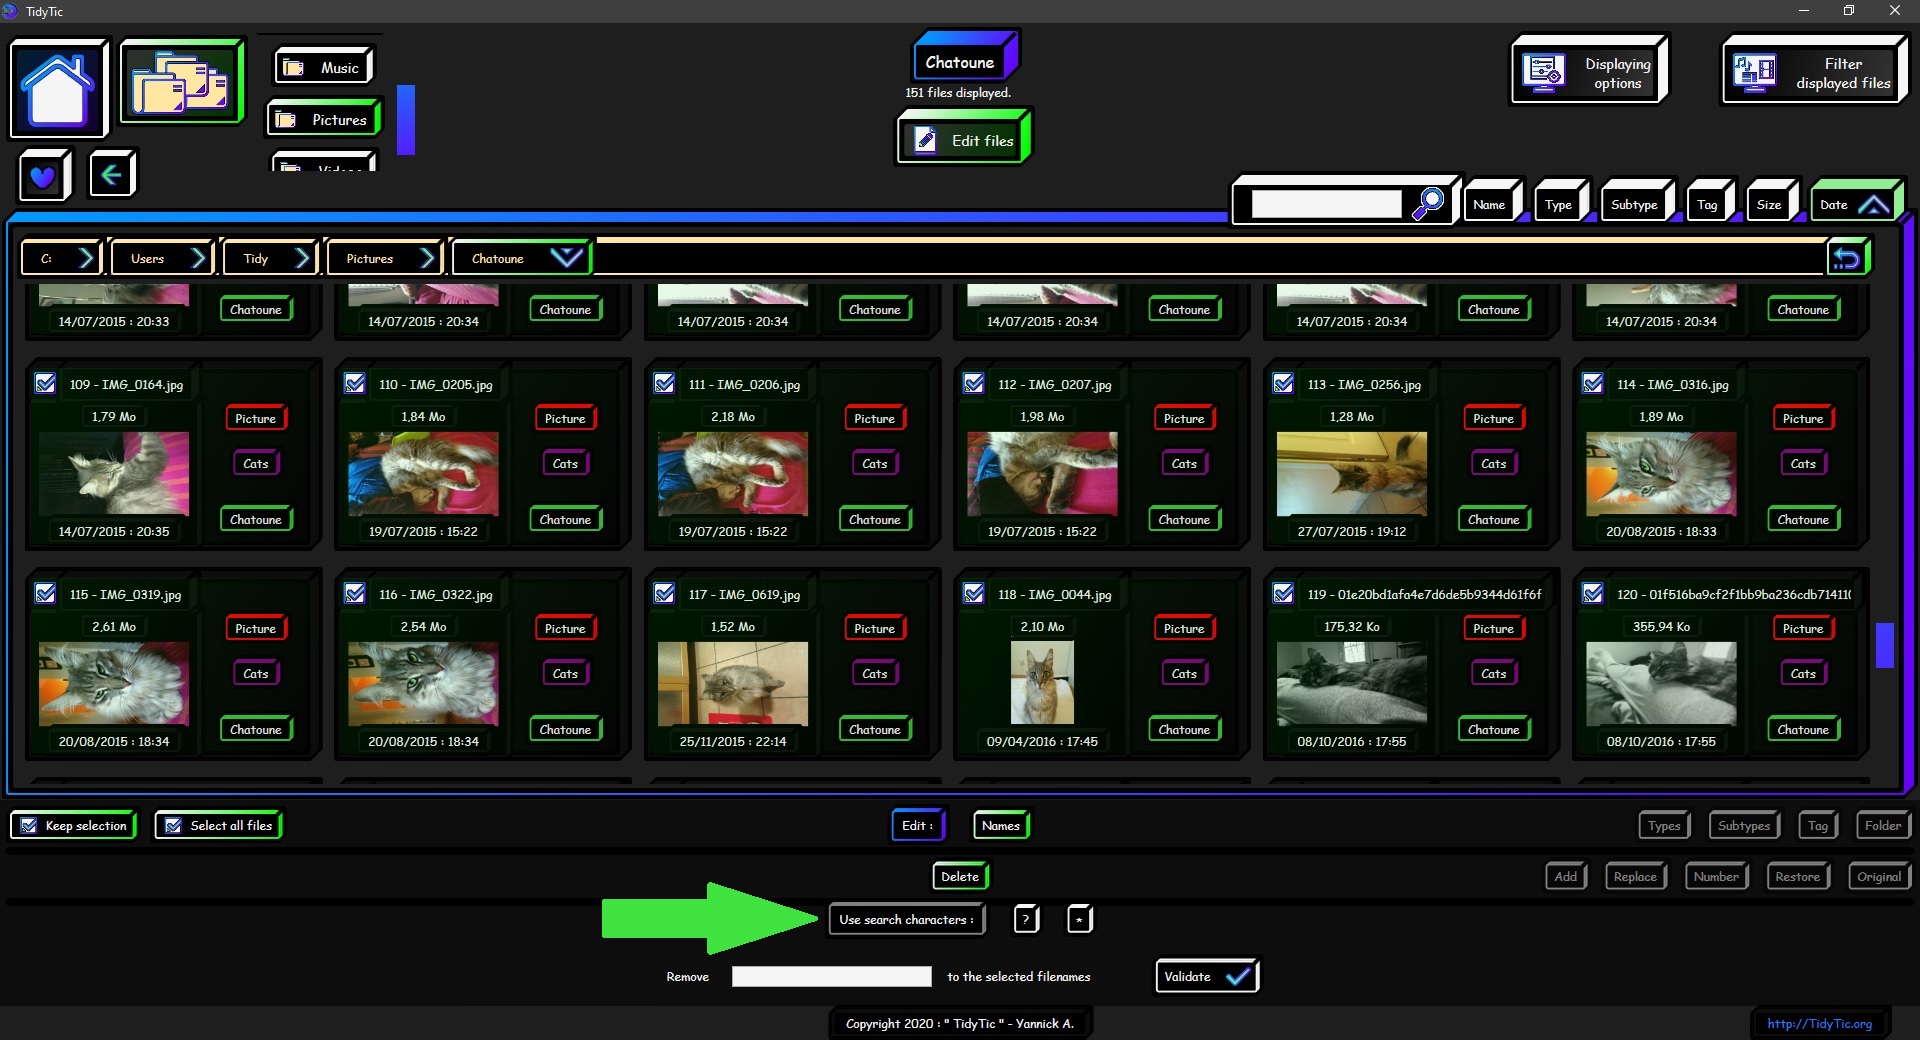
You have two search characters available and therefore two possible buttons :
- The character *
- The character ?

If you leave the mouse for a few seconds above these buttons a quick description will tell you how they work.
 ____
____ 
Here I will give a little more detail on how they work with examples.
Some of you will already know it because it is a function commonly used in informatique.
(Also sometimes called "regular expressions" or "generic characters")
The character ? :
This character is used to replace any letter / number / punctuation character, but only one.
Some examples to understand:
If you ask the software to delete ?ello in the name of the files it will react in this way :
01- Hello.jpg will become 01- .jpg
01- hello.jpg will become 01- .jpg
01- 5ello.jpg will become 01- .jpg
01- lello.jpg will become 01- .jpg
01- catlello.jpg will become 01- cat.jpg
01- 5ellocat.jpg will become 01- cat.jpg
01- llo.jpg on the other hand will not change and will remain 01- llo.jpg because even if ? replace anything, the rest ello is not found in the name.
01- Hell.jpg will not change either and will remain 01- Hell.jpg because as for the example above ?ello is not found in the name, it lacks an o.
I could still continue the list of examples but I think you must have understood the idea.
This character will be very useful if for example you want to remove a word from a file name and sometimes it starts with an upper case and sometimes a lower case.
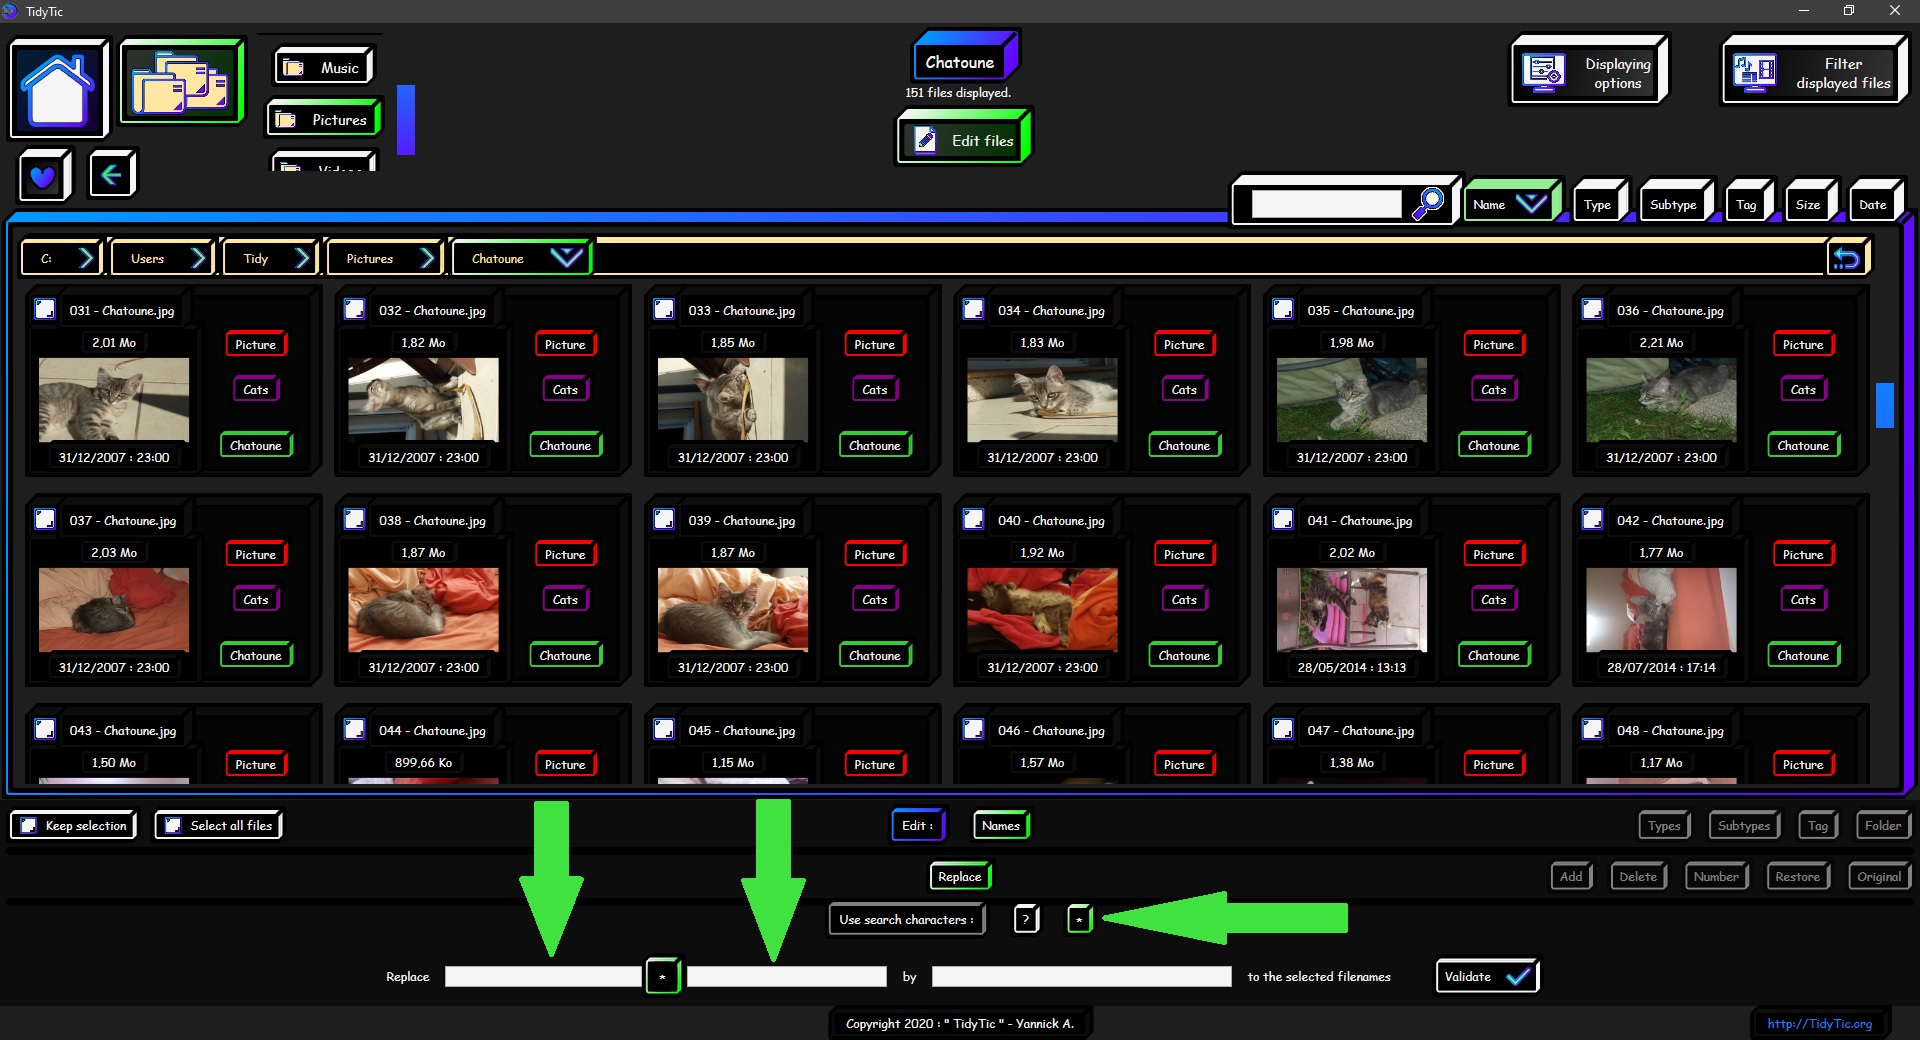
The character * :
This character allows you to replace any string of letters / numbers / punctuations, of any size.
Some examples :
If you ask the software to delete a string of characters that begins with p and ends with r in the name of the files.
You will write p in the 1st box and r in the 2nd box so p*r.
The software will react this way :
01- pair.jpg will become 01- .jpg
01- painter.jpg will become 01- .jpg
01- pairpair.jpg will become 01- .jpg
01- p123456789r.jpg will become 01- .jpg
01- painter-painter.jpg will become 01- .jpg
01- paaaiiiirrrr-12345.jpg will become 01- -12345.jpg
01- p12345.jpg however will not change and will remain 01- p12345.jpg : There is no r in the name, so the search does not match.
01- 12345r.jpg however will not change and will remain 01- 12345r.jpg : There is no p in the name, so the search does not match.
It is this character that I will use to clean the photos name of Chatoune.
For information : ? and * are among the characters prohibited in file names by Windows, so there is no risk of this conflicting during your modifications.
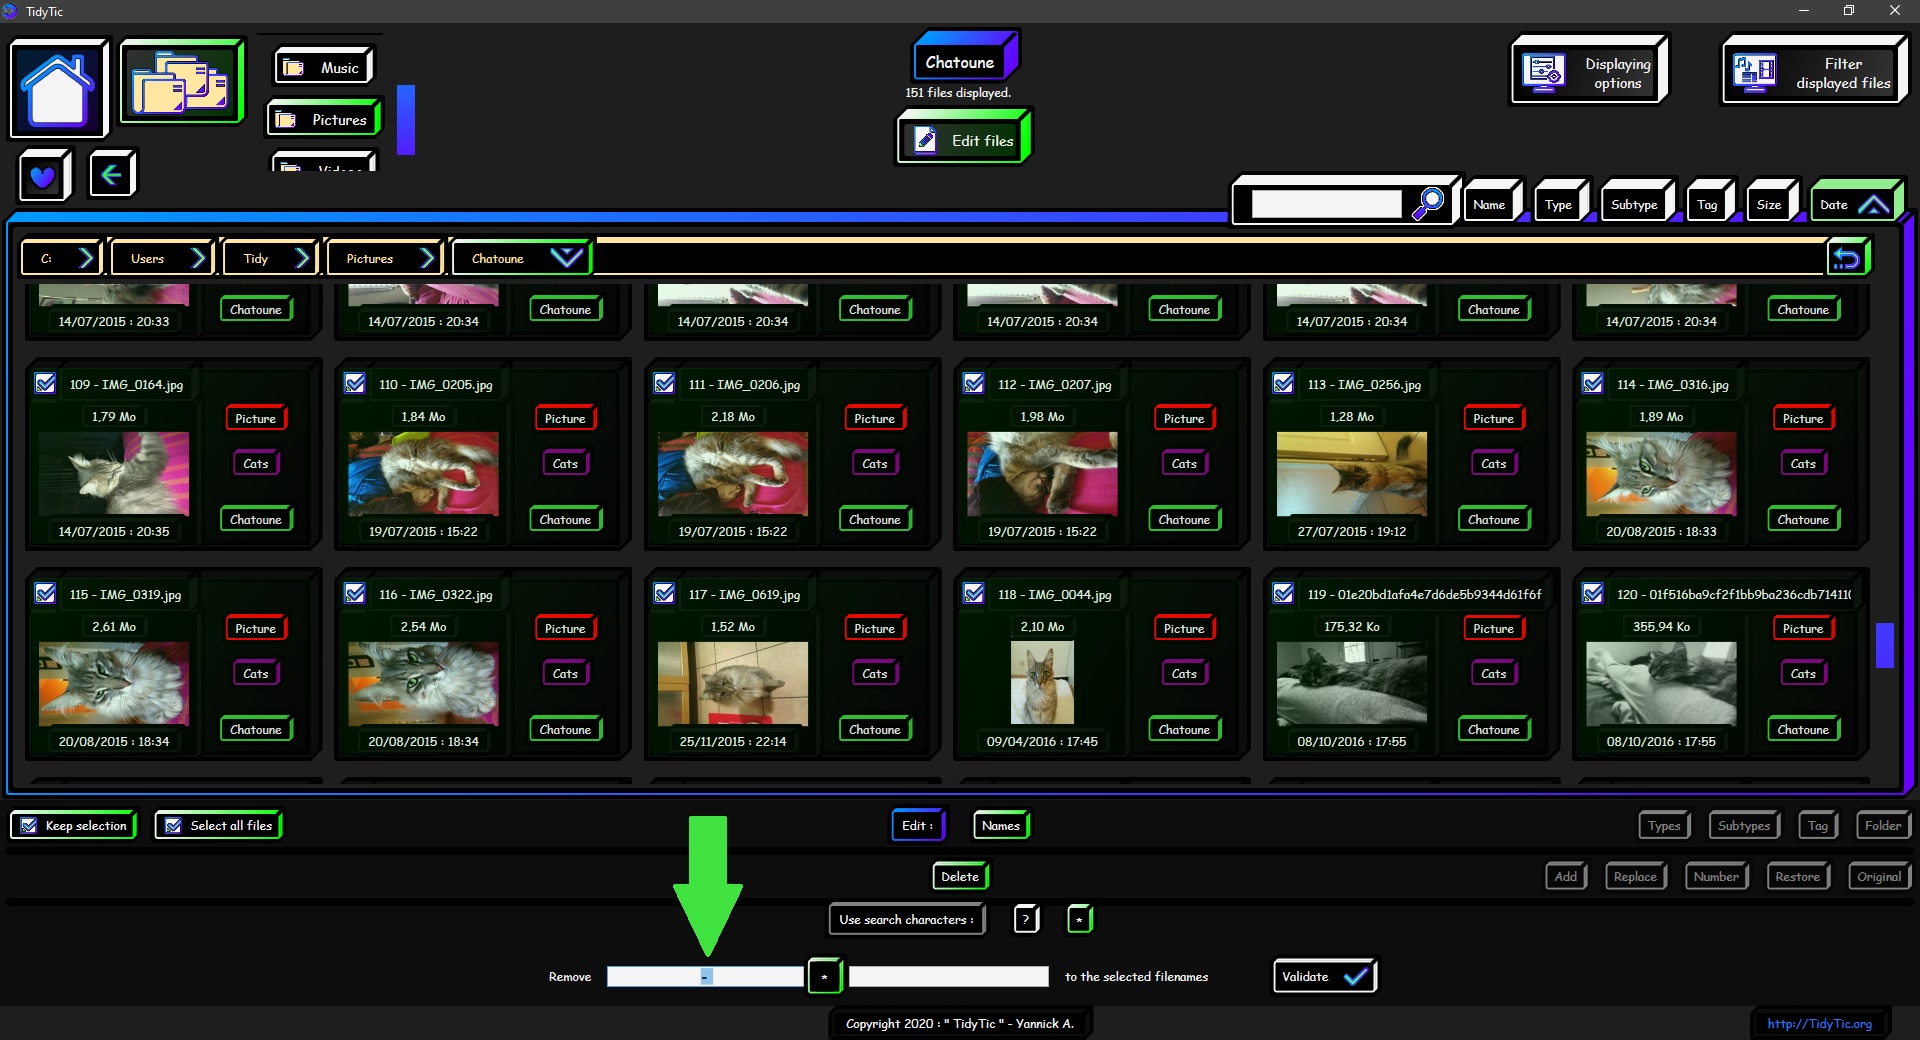
Let's go back to our concrete example, so I'm going to activate the search characters * just by clicking on the button.
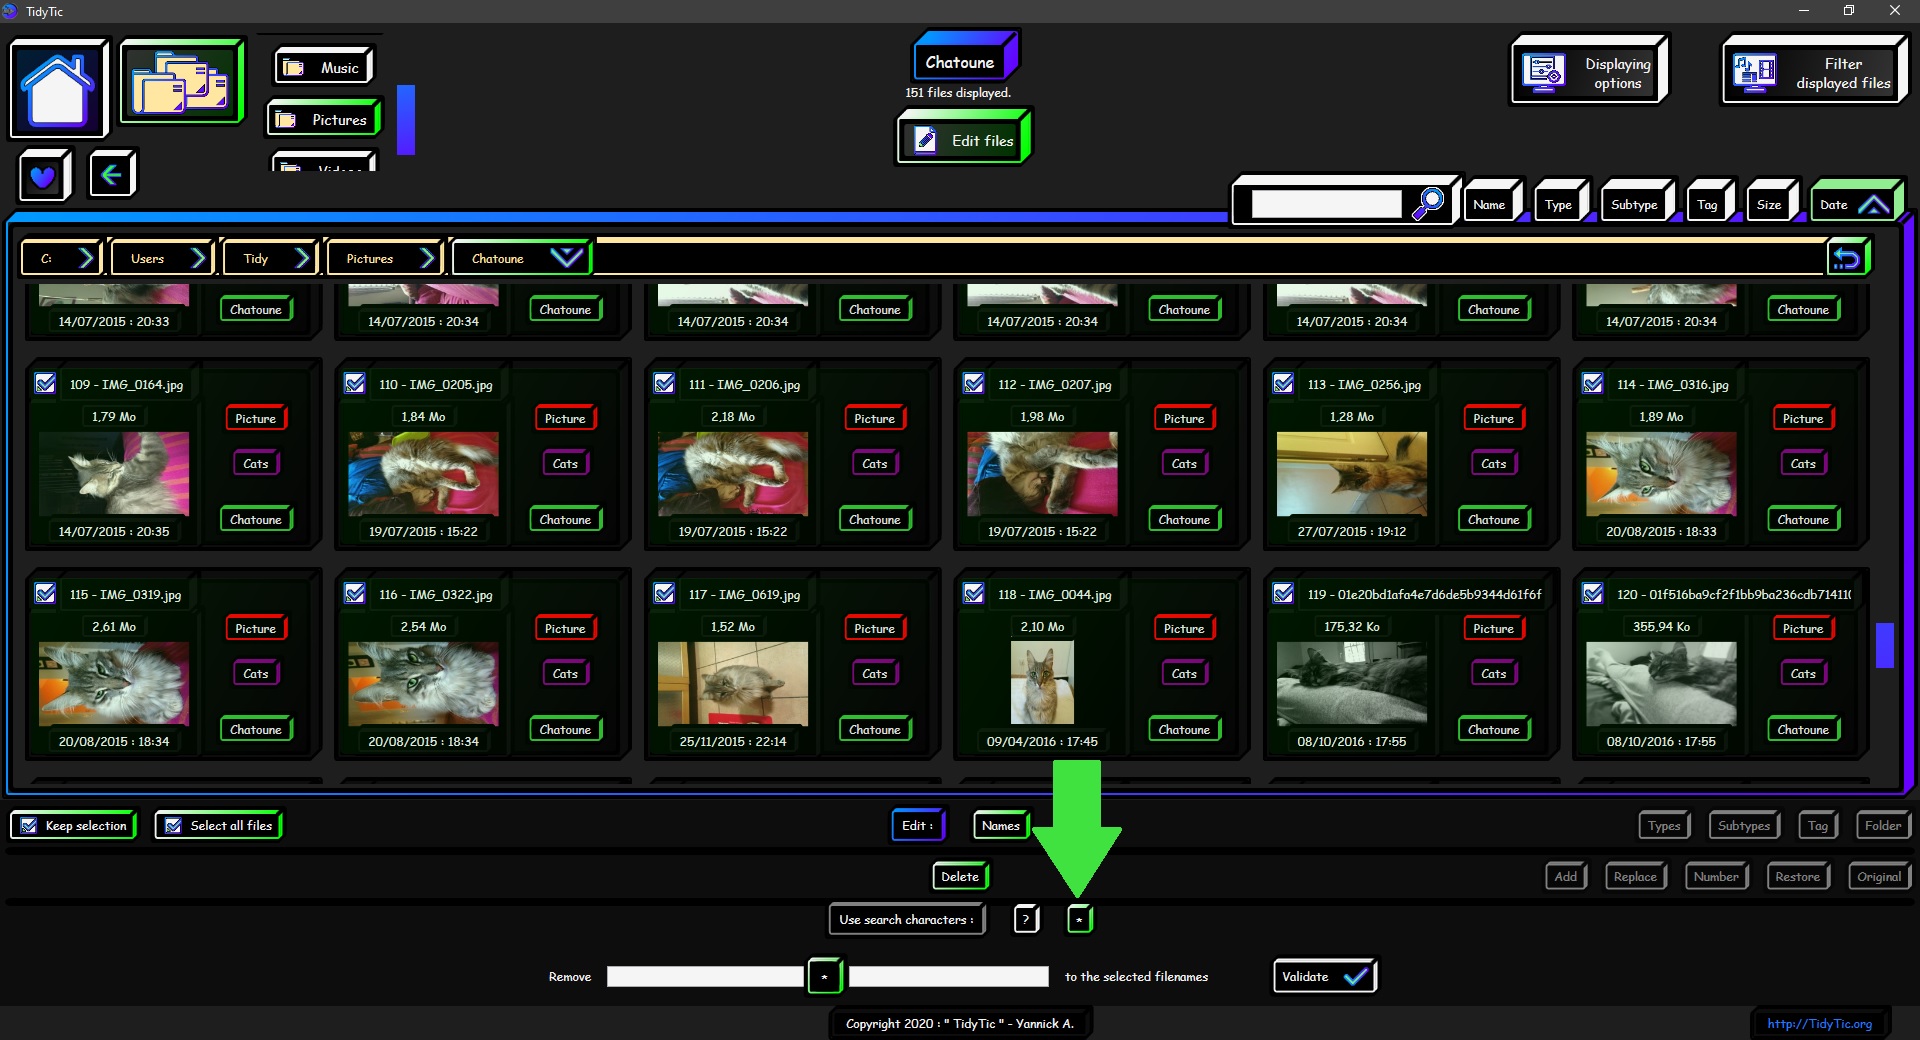
You can see on the screenshots above that now the delete option offers me two boxes to fill, corresponding to the string of characters it will search before and after the search character *.
Here I am only going to fill the first box with "- " and therefore ask him to delete "- *" which will give me the following transformations:
040 – P1015737.jpg will become 040 .jpg
075 – DSC_5911.jpg will become 075 .jpg
094 – IMG_0026.jpg will become 094 .jpg
etc
I just have to validate the action and watch TidyTic clean all names at once.
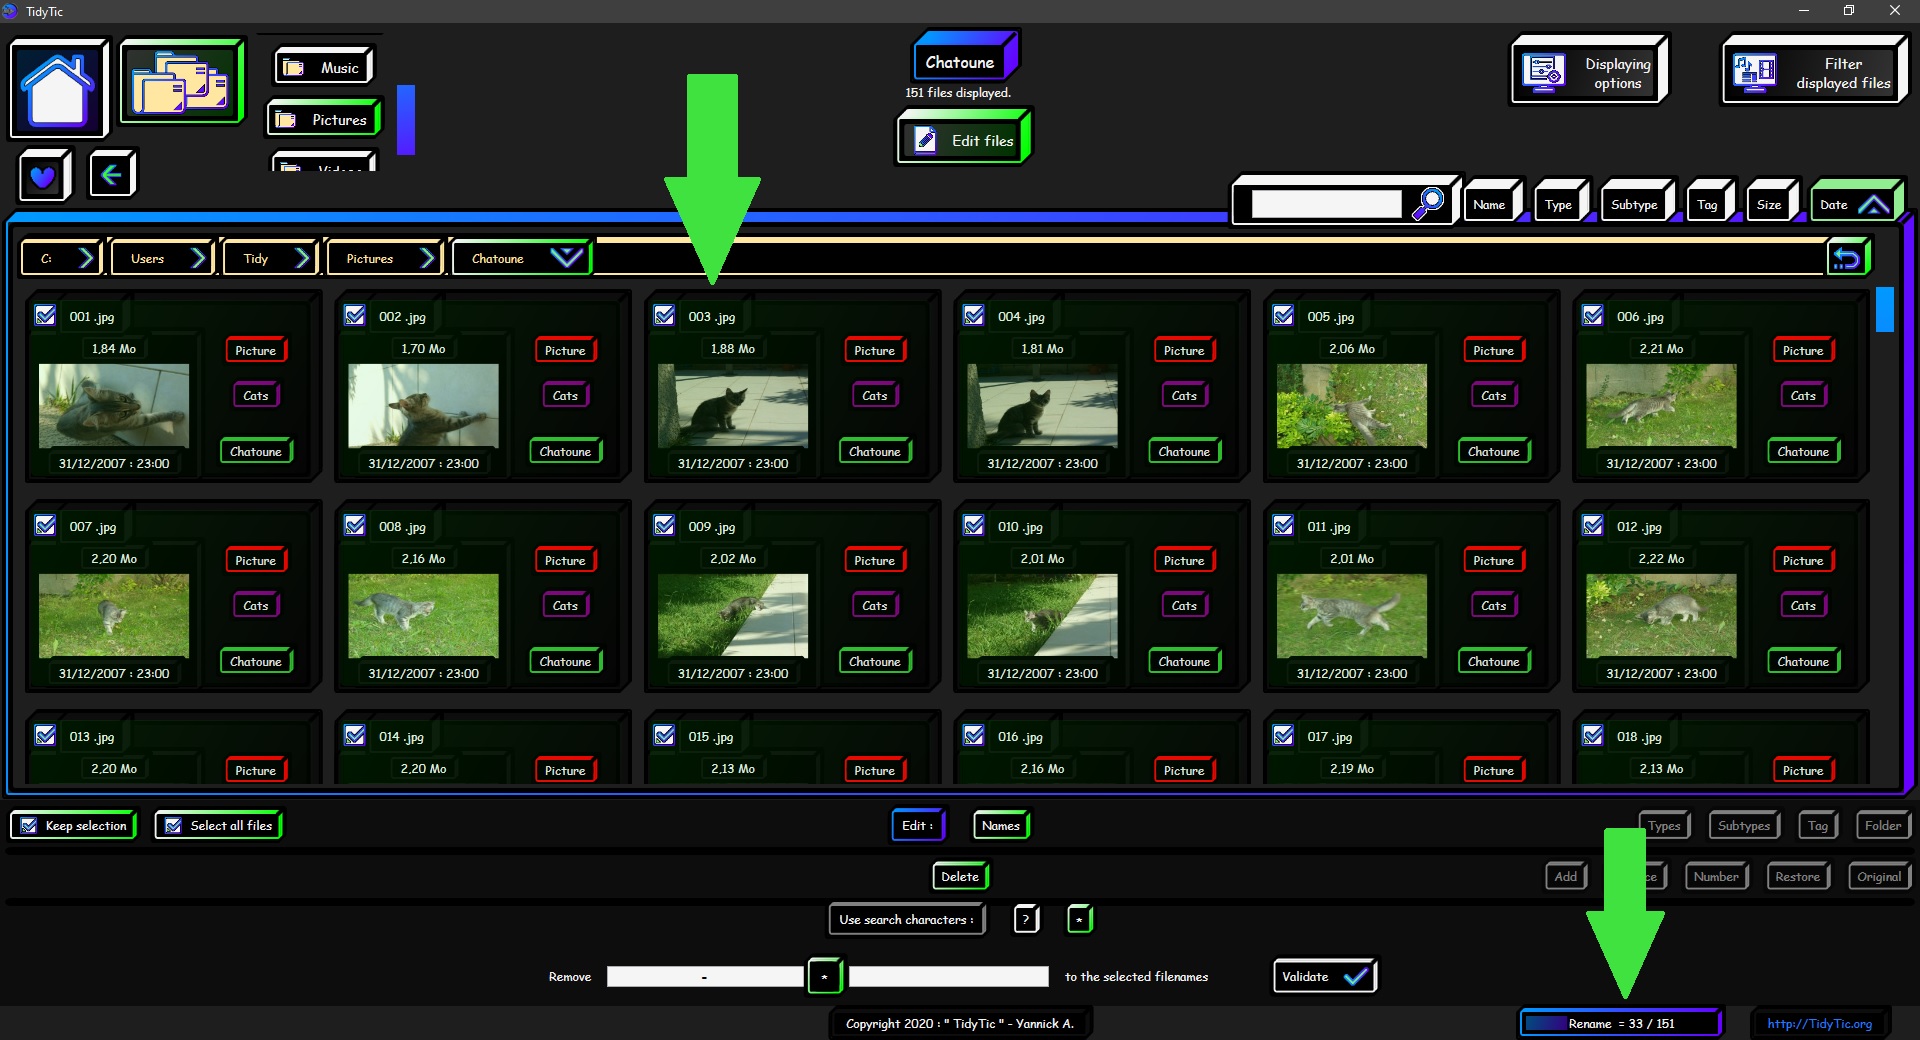
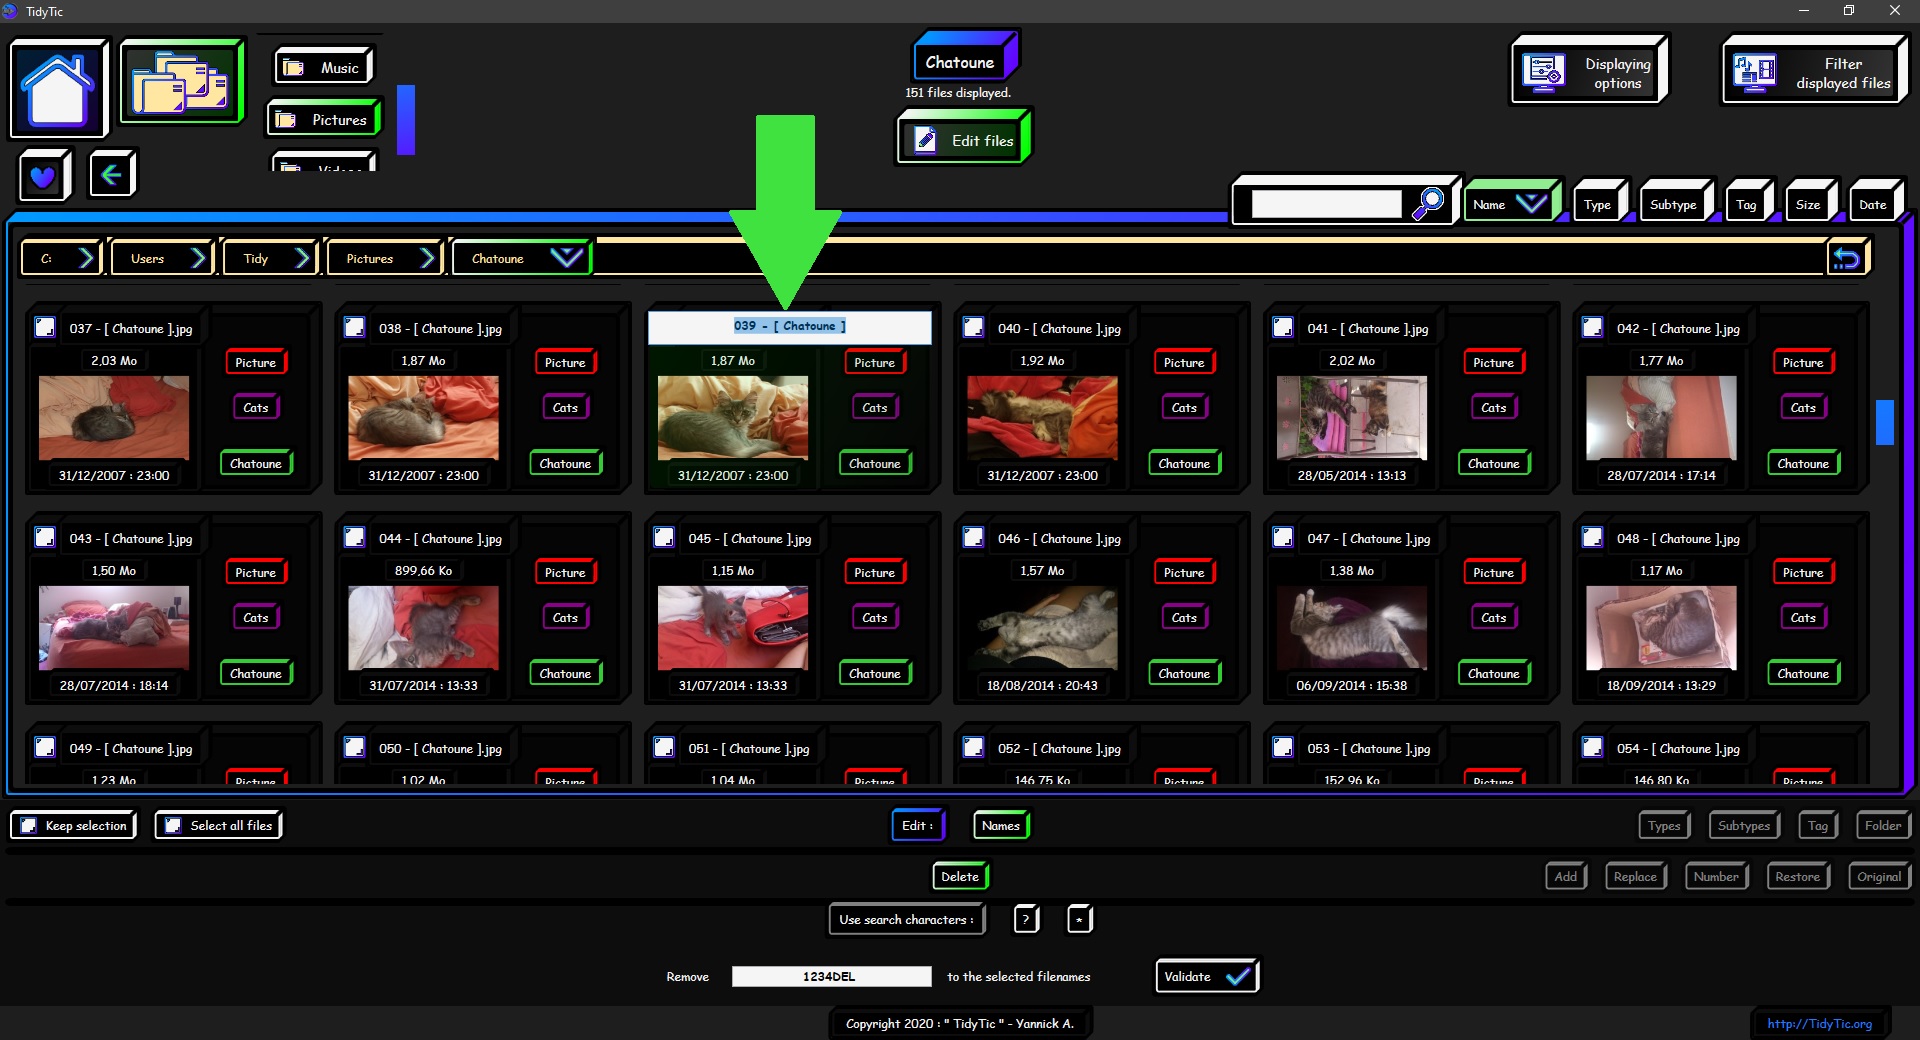
We almost arrived at the desired result, I already have files name clean and numbered according to the date of photos.
To get to the final result, I just have to add the name of the cat in the files.
For this I will go to the name modification option : "Add".
This "Add" option is really very easy to use : a box allowing you to write what you want to add in file name.
And a choice of option: Add at the beginning or at the end of file name.
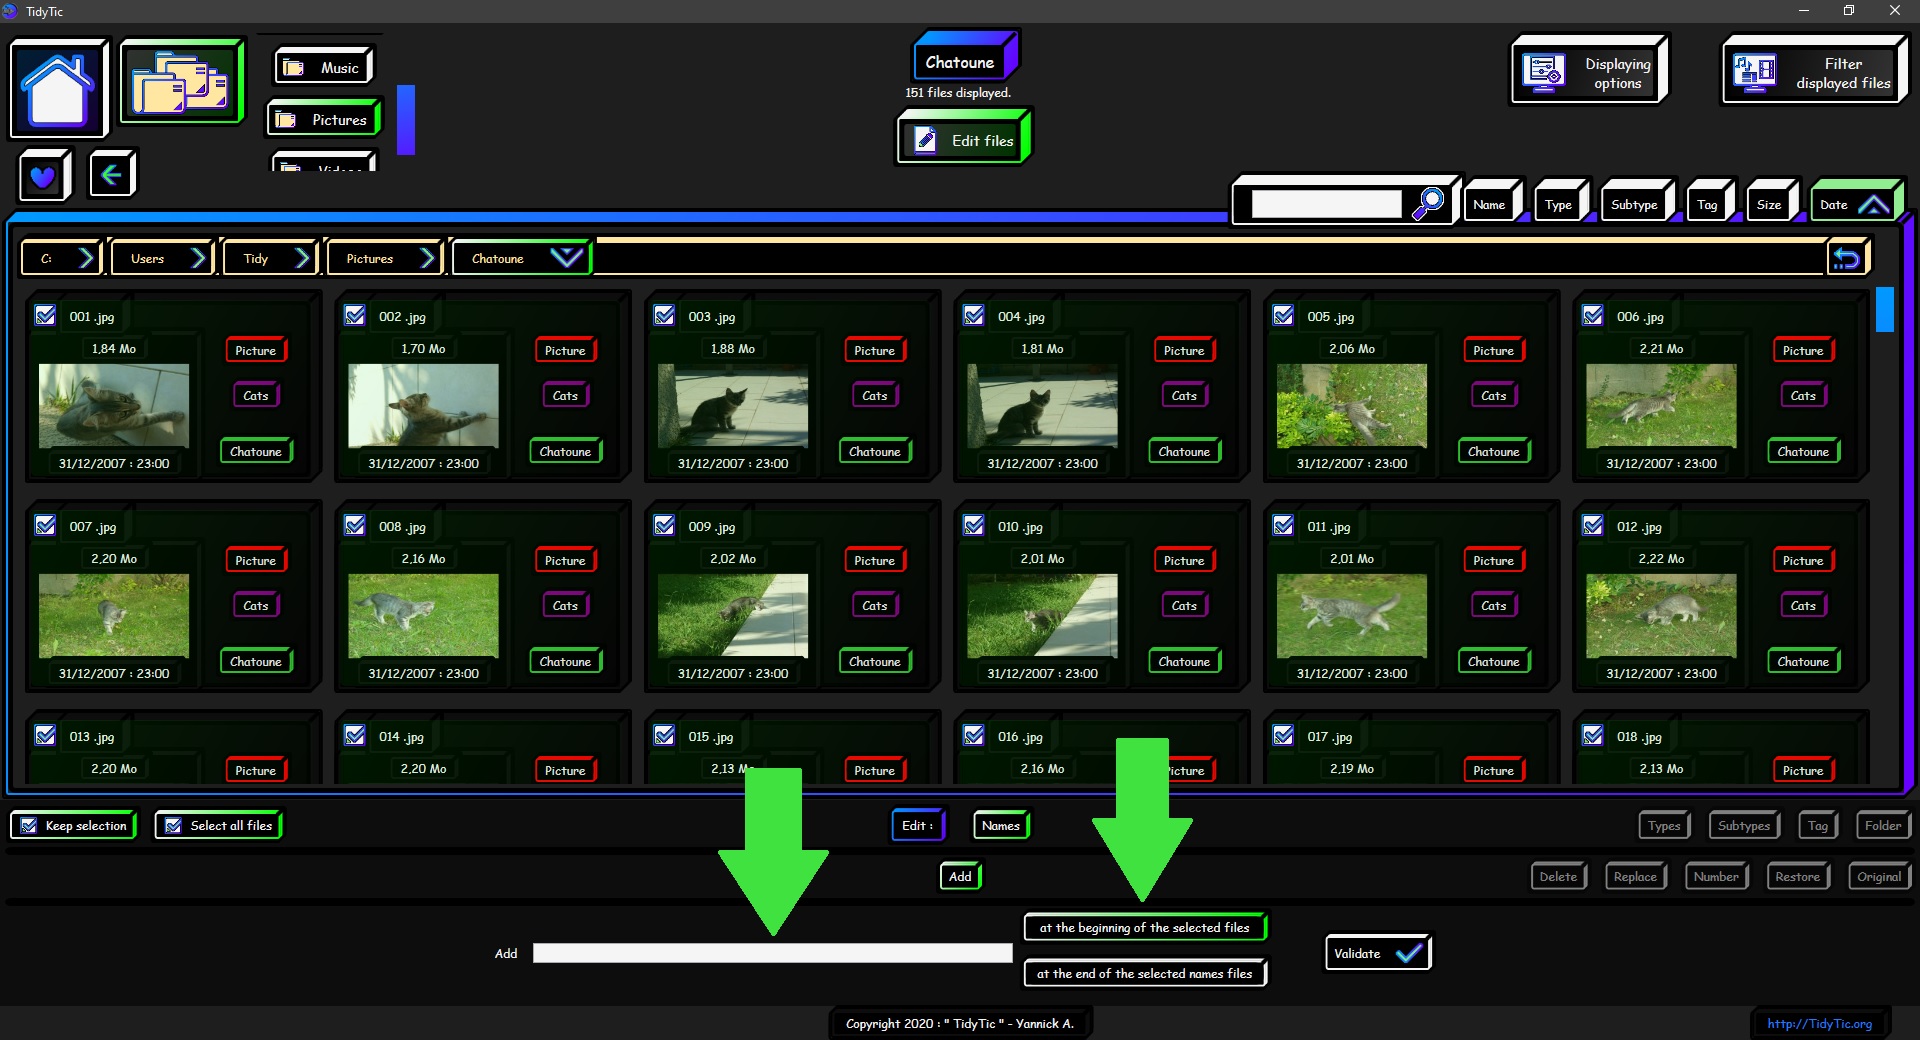
Here I will simply add "- Chatoune" at the end of the name of each file.
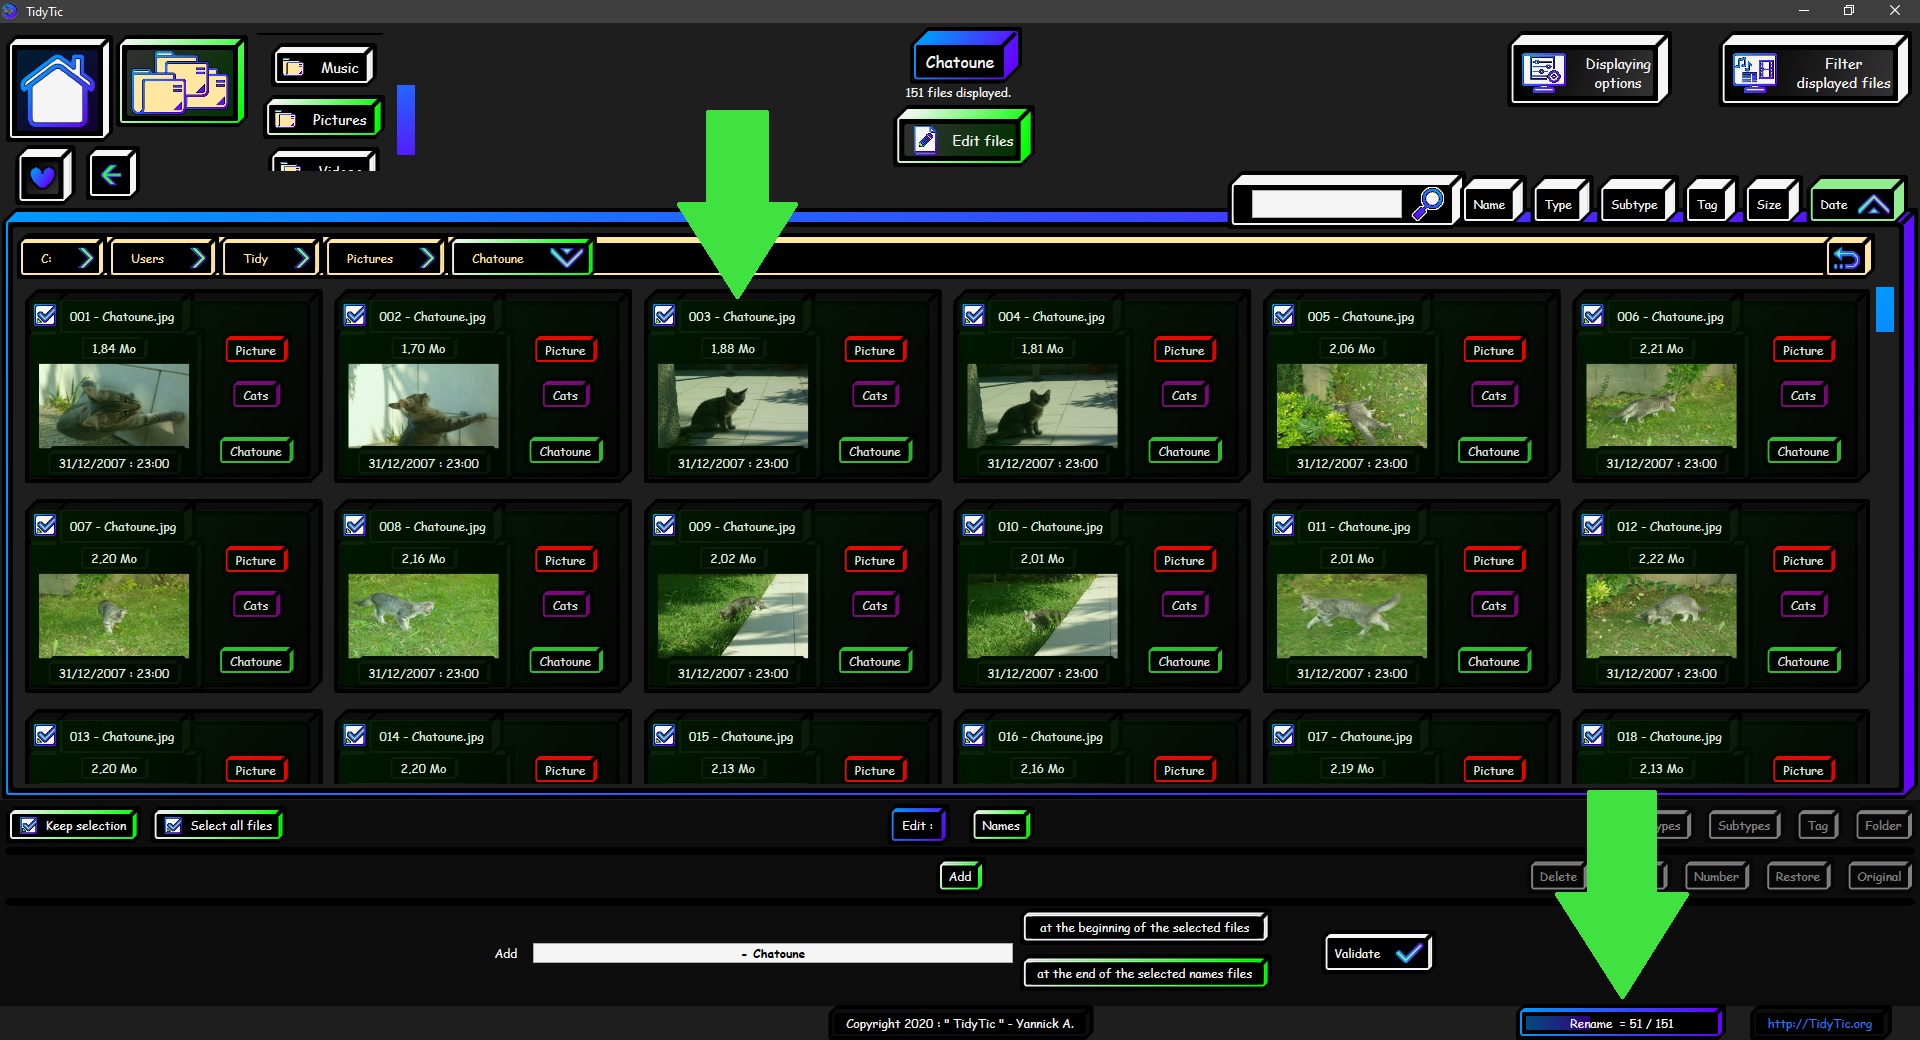
And now, I have my 151 photos of Chatoune perfectly renamed as I wanted:
In chronological order and with only the name of the cat in file name.
I just have to deselect files and close the "Edit files" mode.
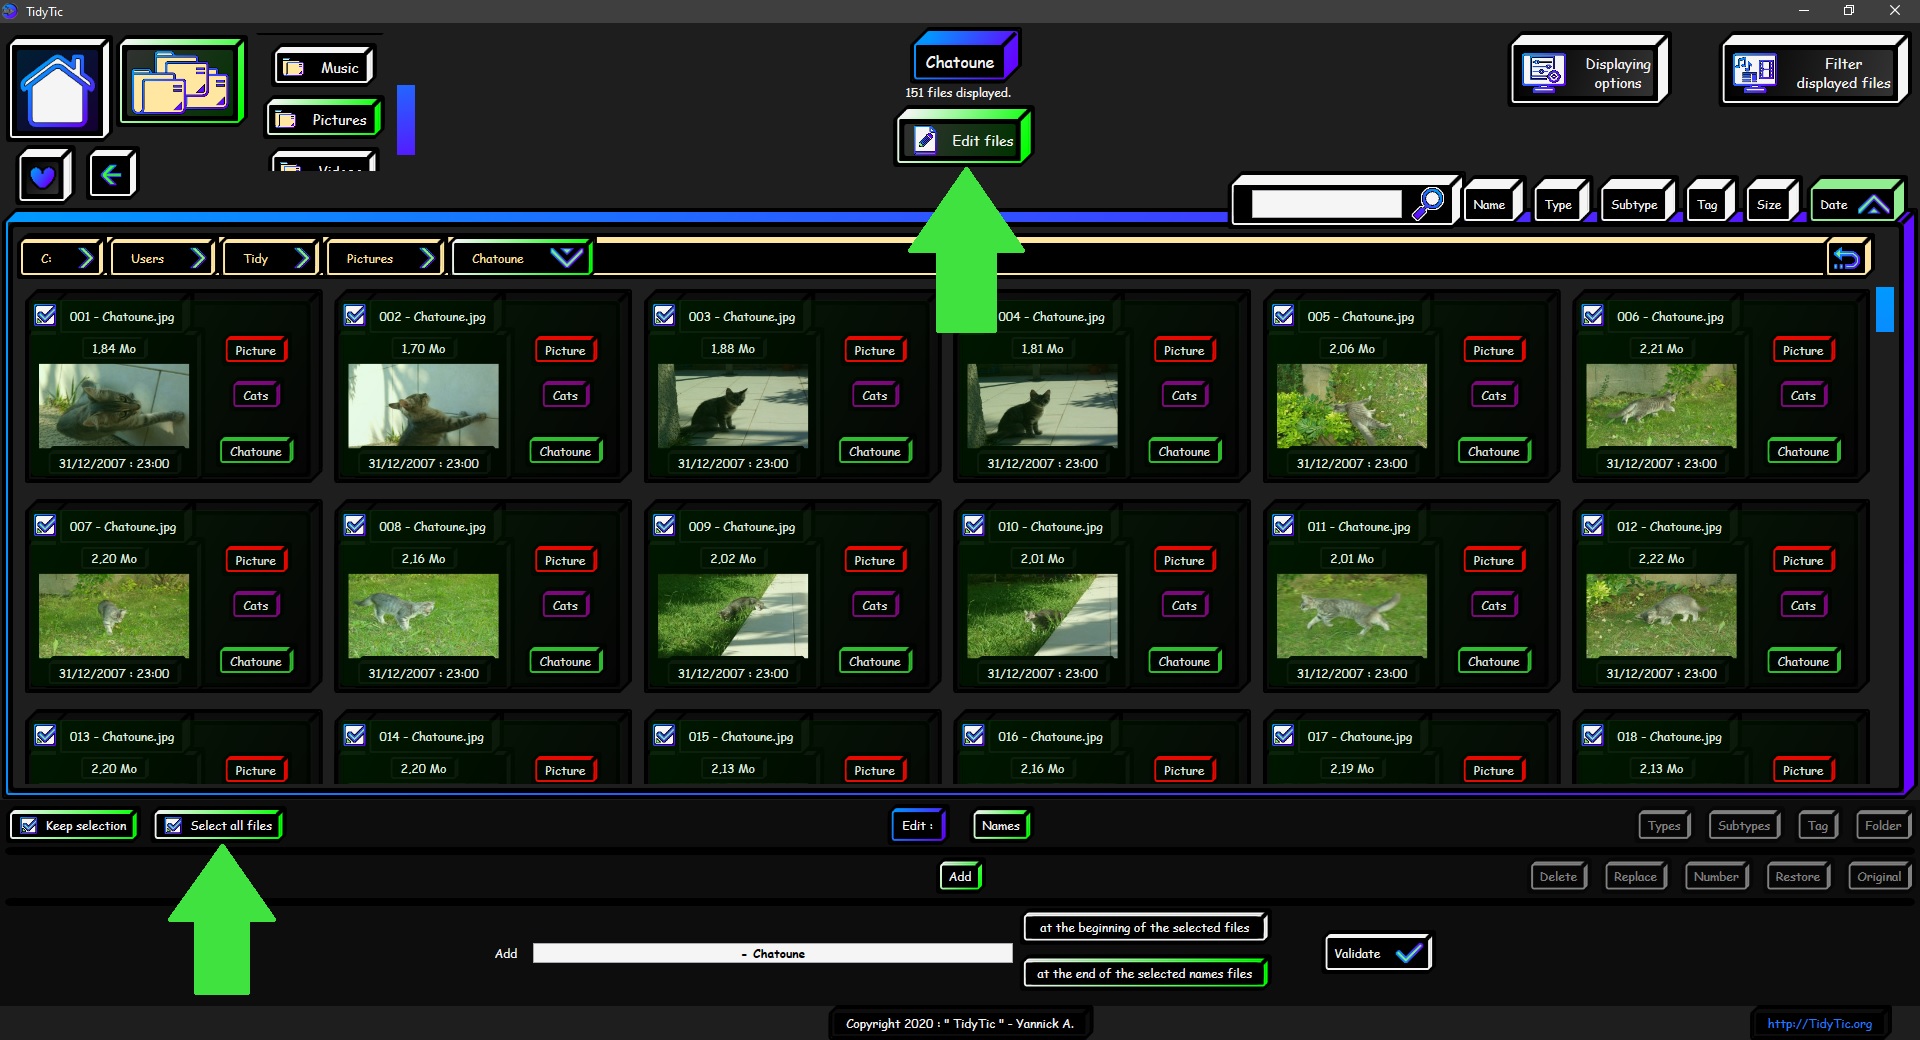
As you can see in the screenshot below, the file names correspond to my original goal.
Now even sorted by names the photos remain sorted by date and the names are much more understandable than before.
So I can for example very easily find them through a search by name.
This example turned out to be particularly long because I detailed each of the actions, interfaces and options available.
But in concrete, the modifications described above take less than 5 minutes, even on a not very efficient PC, and are carried out very easily in a few actions :
- Show only files I want to modify. By having them in a sub-folder or by using the filters for example.
- Sort files by date, so that the numbering corresponds to the date of file (this is not required, it is only if this is the order you want).
- Open the "Edit files" menu and select all files.
- Go to the "Name" option, then choose the "Number" option.
- Start file numbering.
- Go to the "Delete" option.
- Delete everything that is part of old name thanks to the search characters. So in this example ask TidyTic to delete "- *".
- Go to the "Add" option.
- Add cat name at the end of file name.
And there you have it, in less than 10 lines you have the instructions to rename hundreds of files very cleanly.
It will only take you a few minutes, surely less time than it took you to read this tutorial.
But you have to learn to do it ^^.
The rest of this tutorial should be much faster since I already explained most of the interface.
I still have three functions regarding the renaming to explain to you.
Let's stay on our example with the photos of Chatoune.
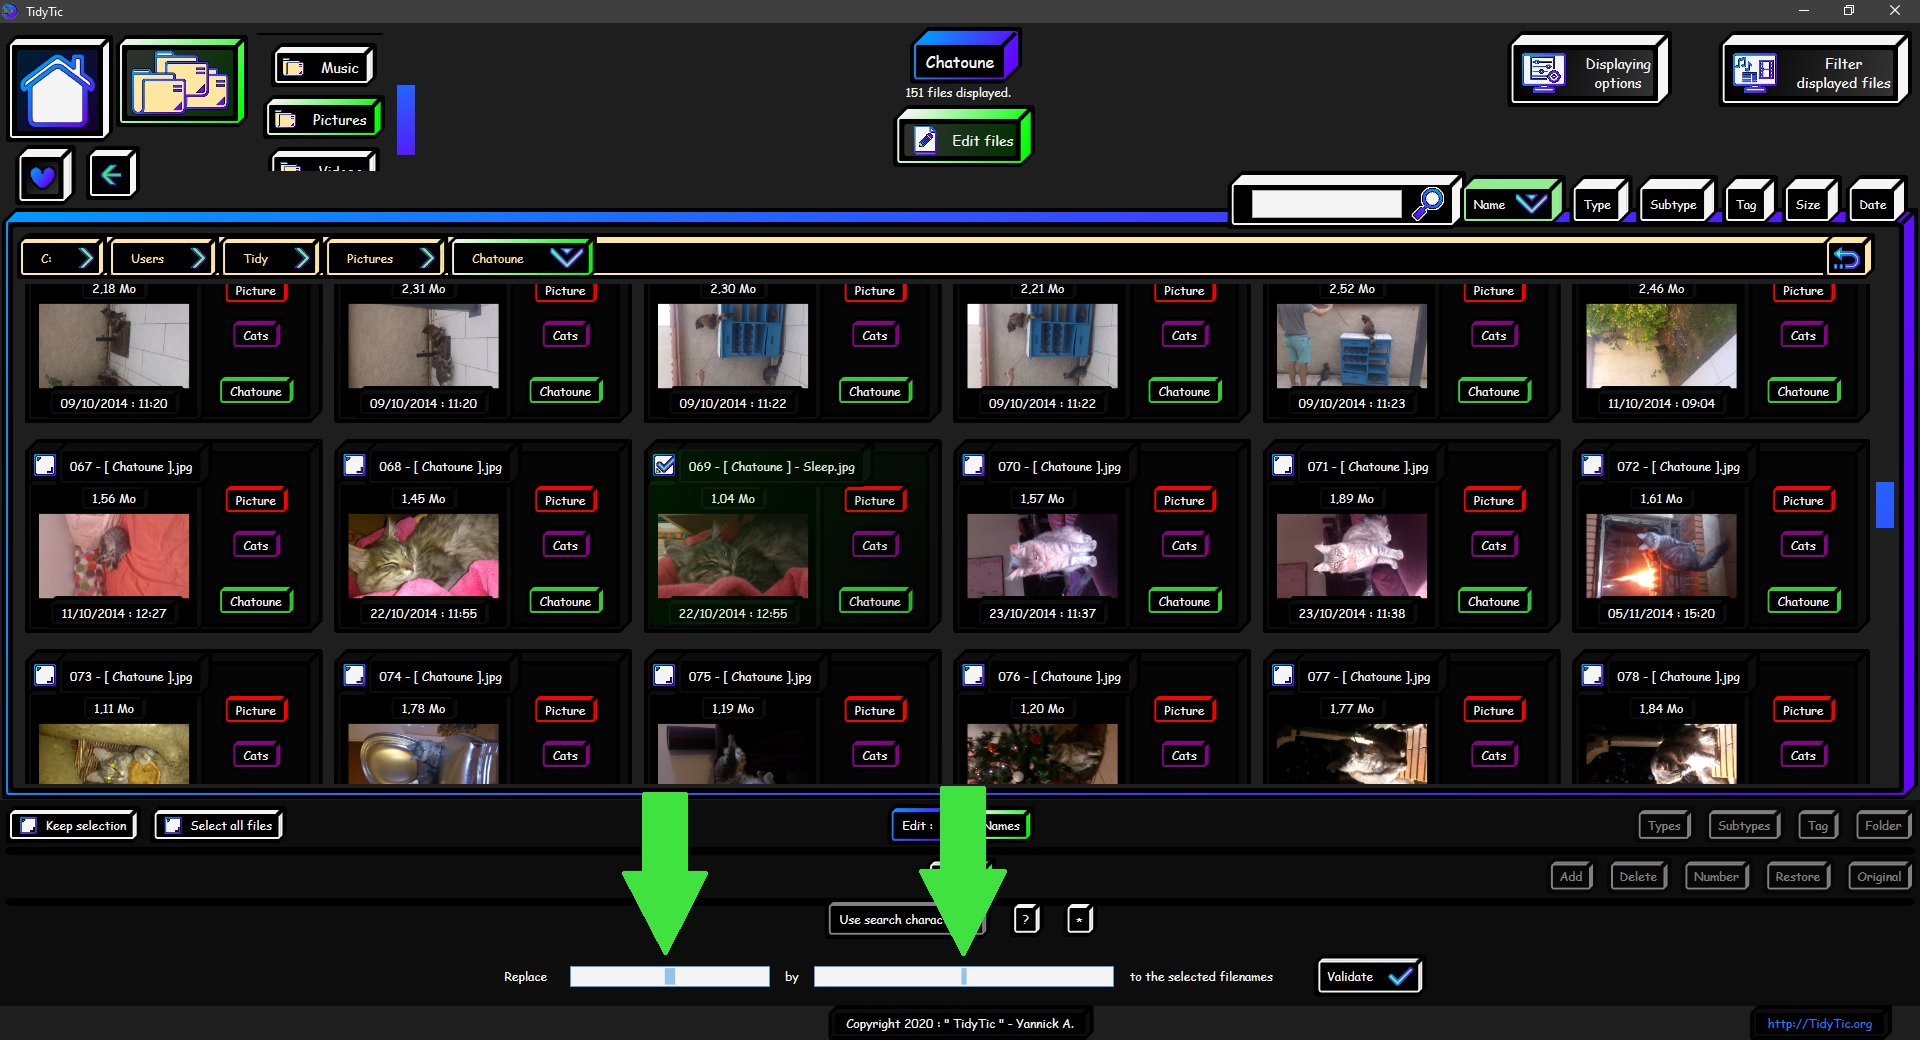
But this time in "Edit Files" menu we will select the "Name" option then choose "Replace".
In the third line of the "Edit files" menu of the "Replace" option, you will see two boxes to fill.
The 1st box corresponding to what you want to remove from files name.
And the 2nd what you want to put instead.
As with the "Delete" option, you have possibility of using search characters to help you.
I will not come back to it because functionality is exactly the same as for the "Delete" option.
Except for one detail : here it is the 1st box of "Replace" option which will be divided in two to allow you to use these search characters.
In example above, I could have used the "Replace" option with the search characters to delete what was left of the old file names and put "- Chatoune" instead.
This would just have saved me from having to change options to also use the add function. Everything would have been done during the same action with the "Replace" option.
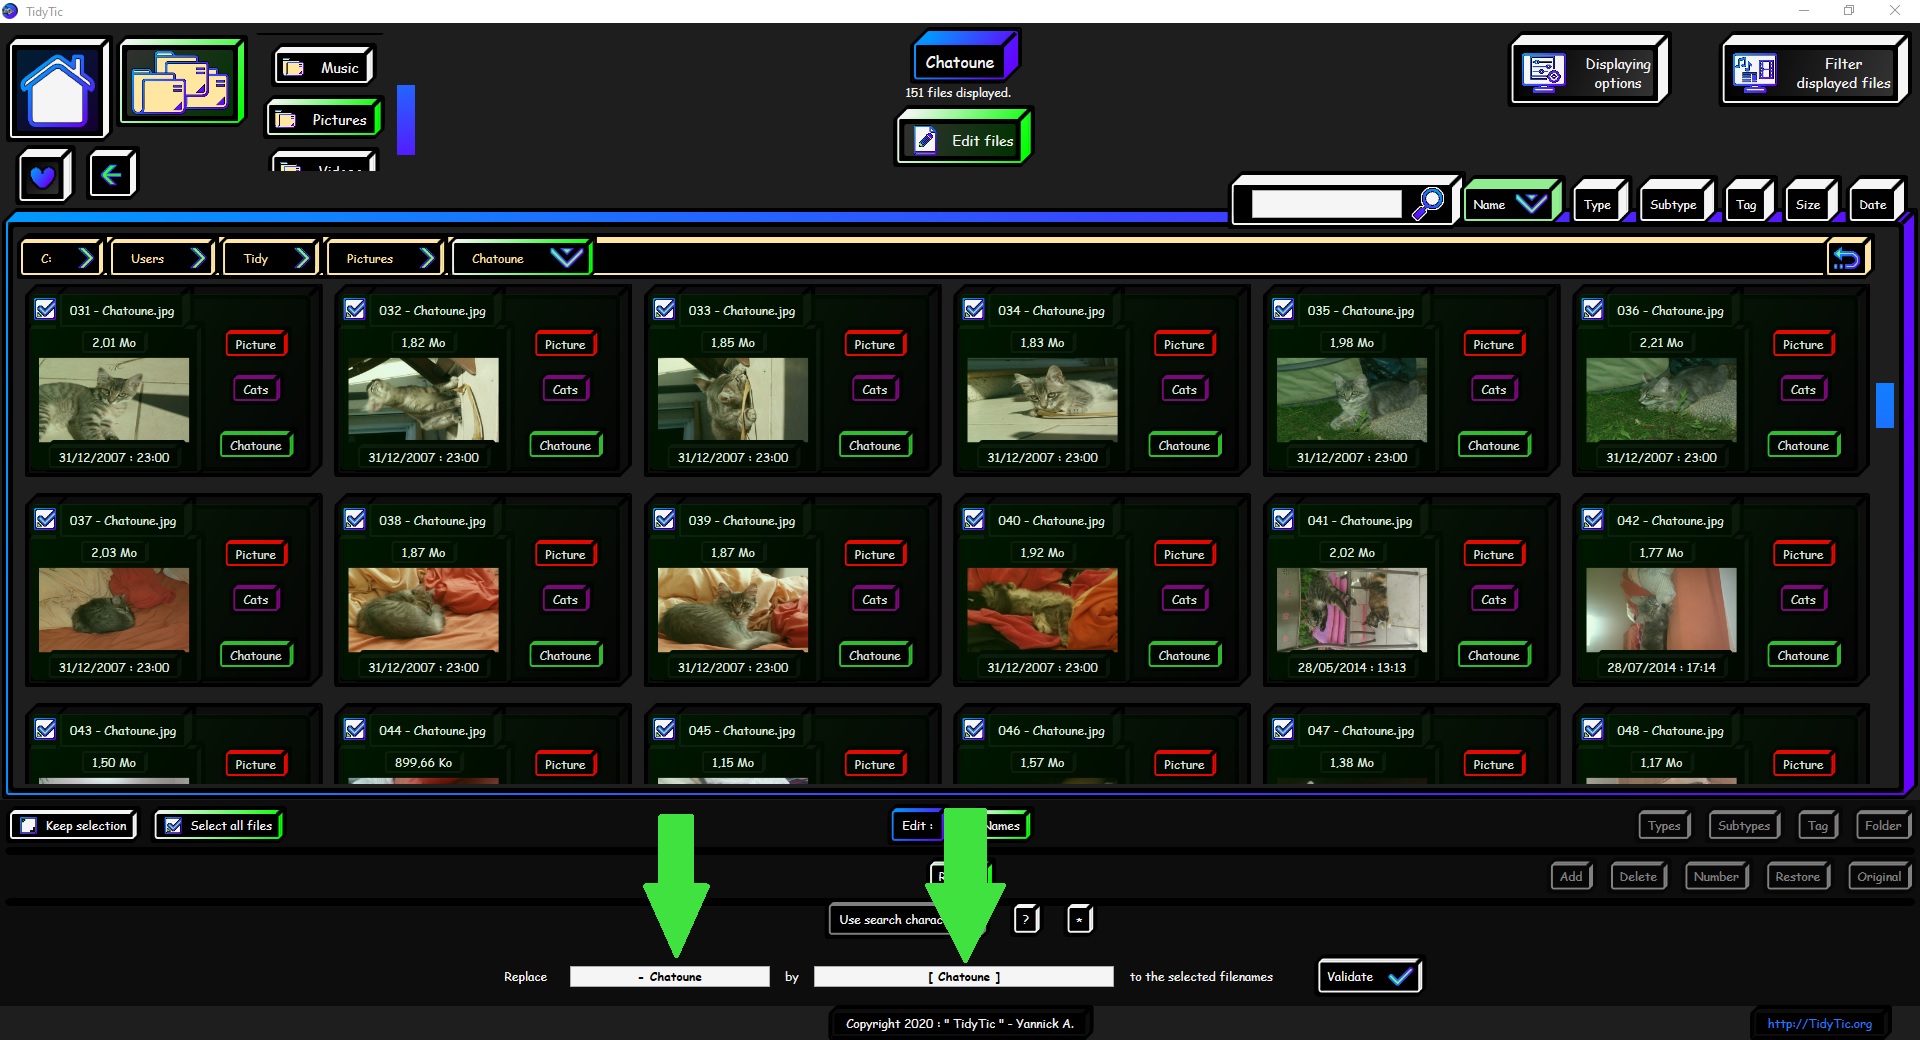
For the example of the "Replace" function, let's say that finally having "- Chatoune" written in the name no longer suits me.
I would prefer to have "[ Chatoune ]" without the dash.
The names of files being clean, I will be able to do it without the search characters and ask TidyTic to simply replace "- Chatoune" by "[ Chatoune ]".
Once the action has started I just have to watch the software change all names.
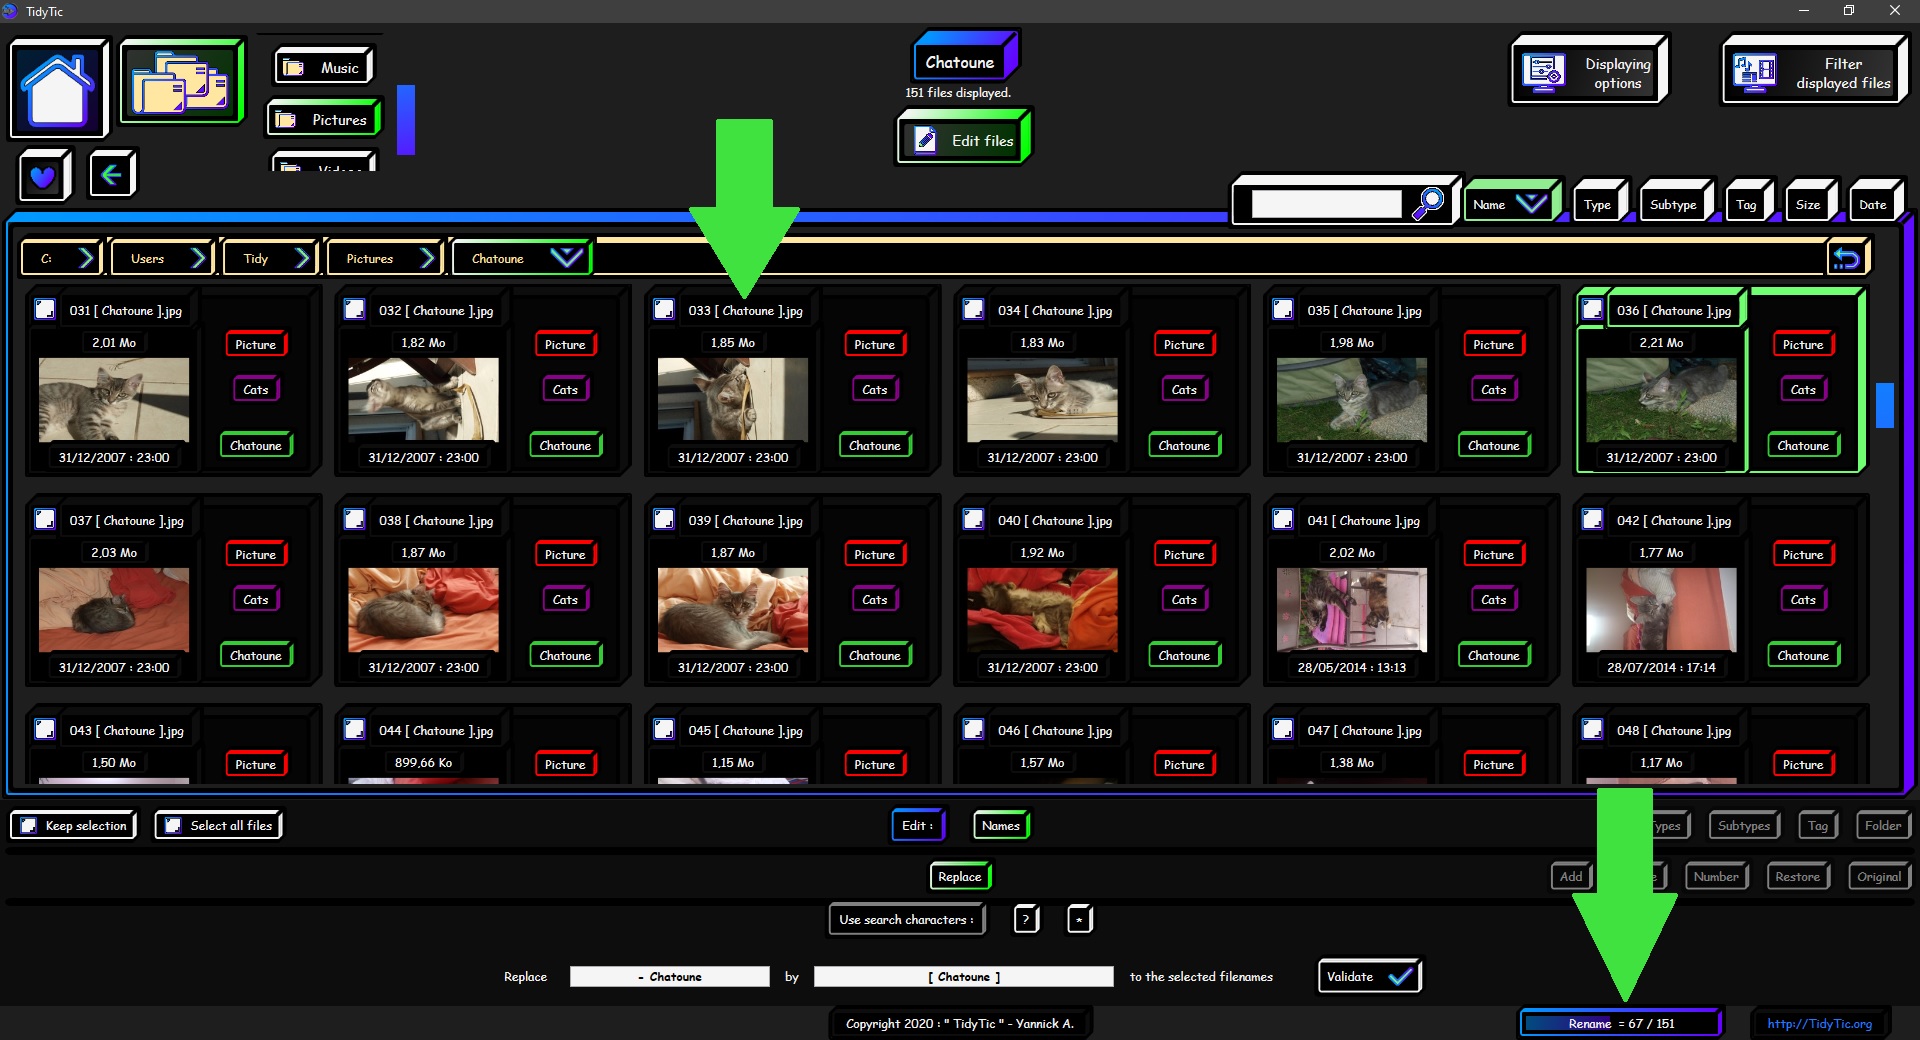
The "Replace" function can really does a lot, especially when used with search characters.
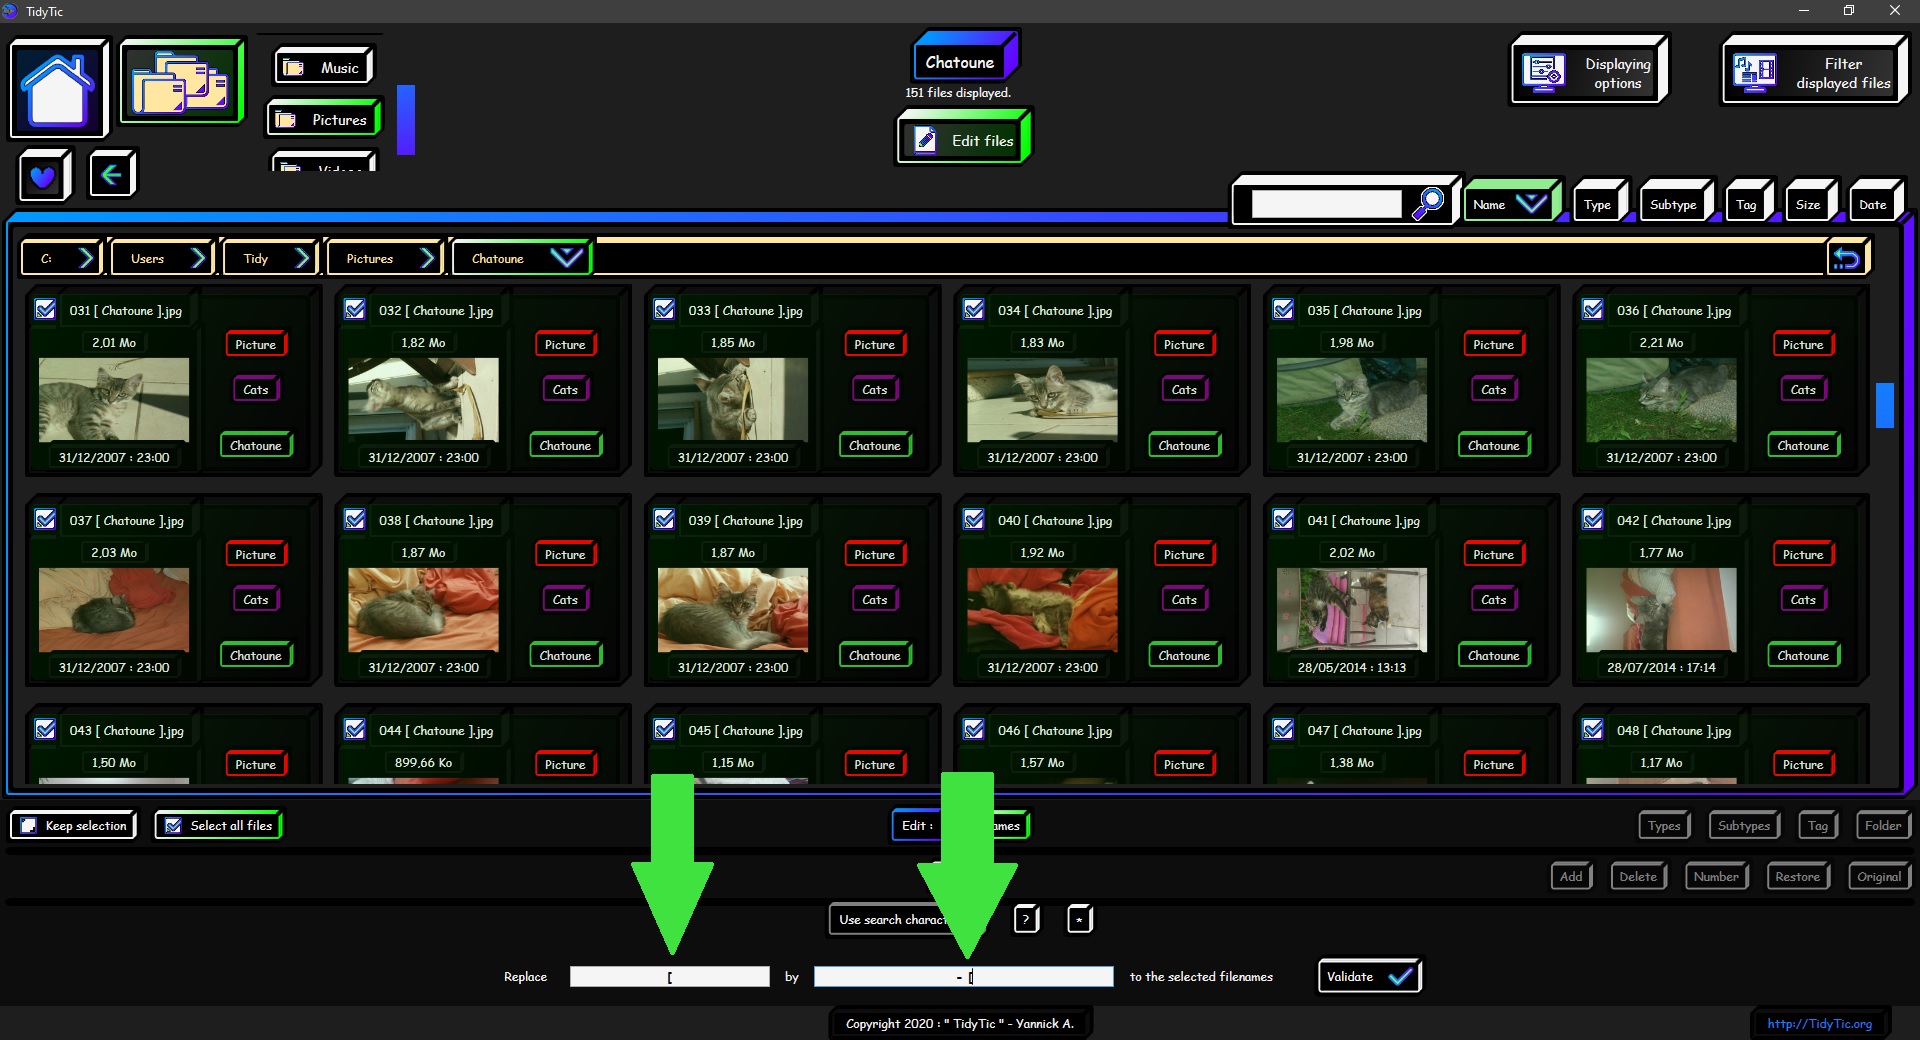
For example, I would now like to add the dash between the number in the name and [ Chatoune ].
To go from "001 [Chatoune].jpg" to "001 – [Chatoune].jpg".
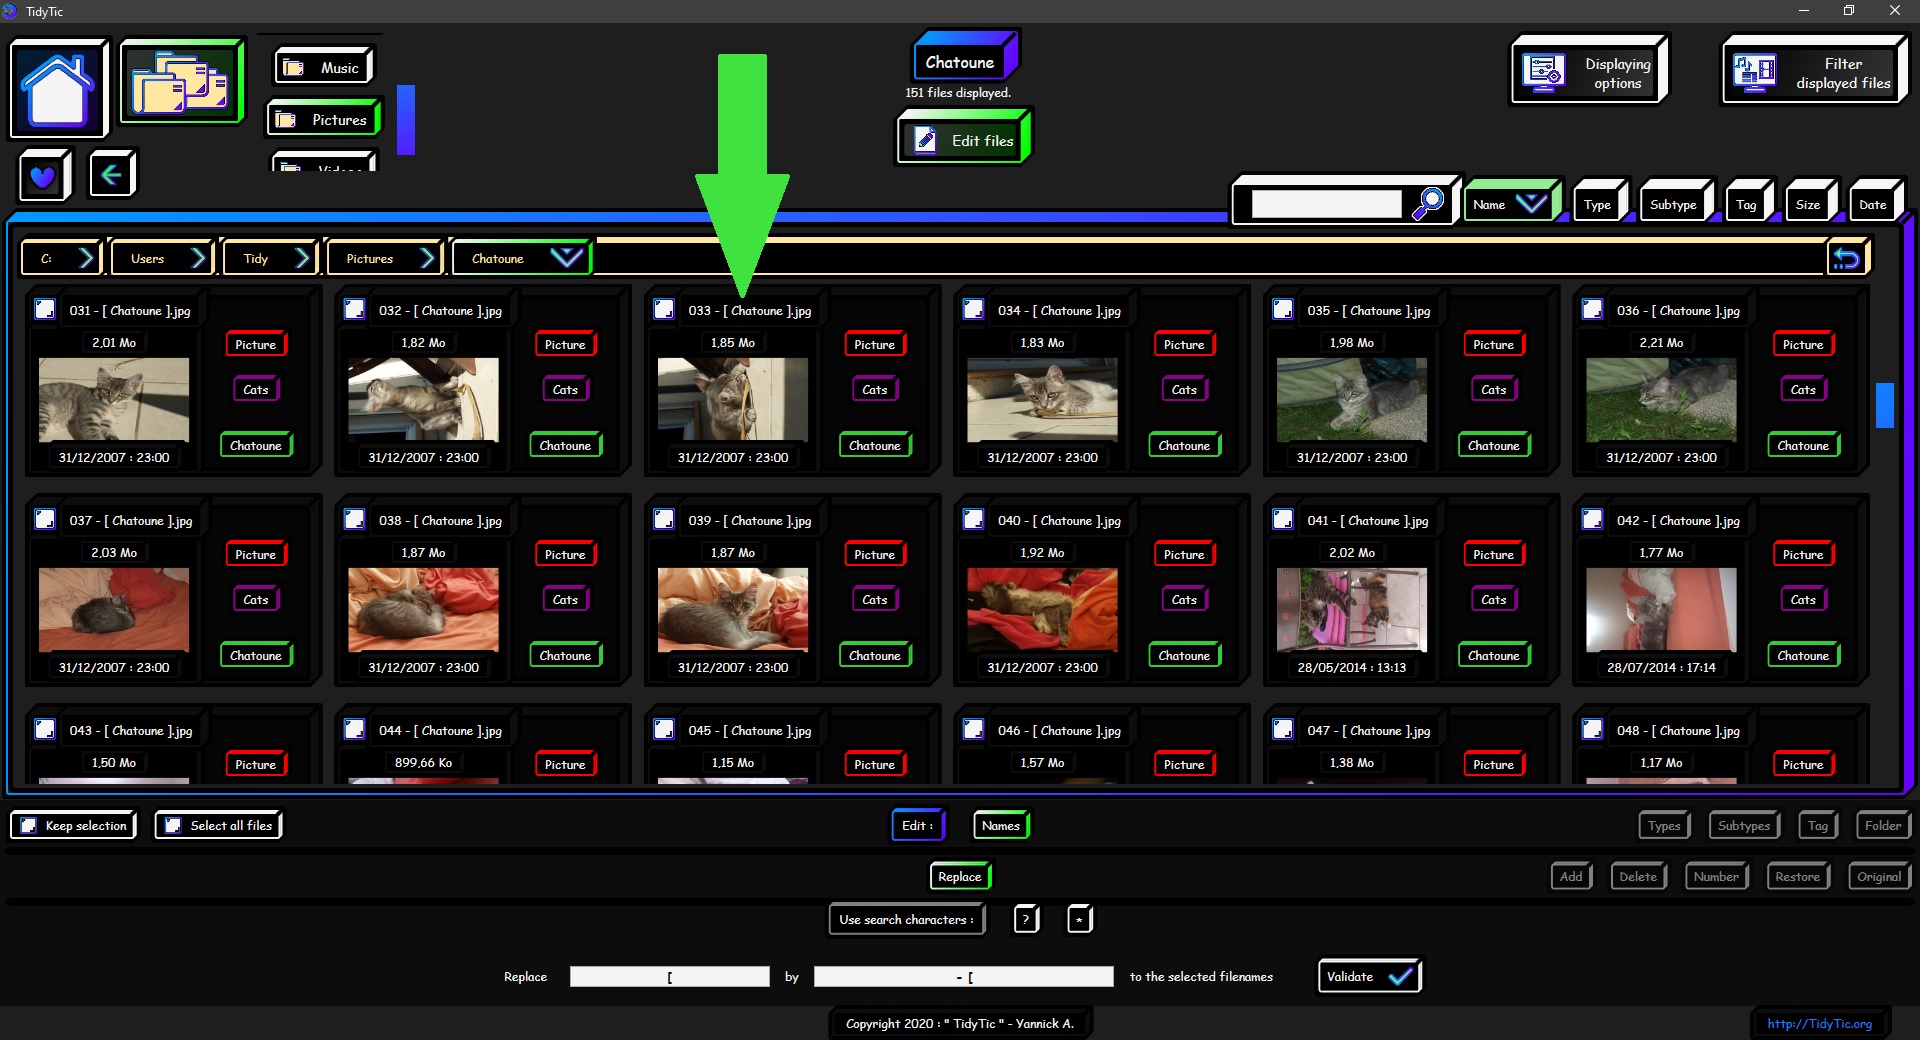
I just have to tell TidyTic to replace "[" with "- [".
Once action is done we can see that I now have a dash between the number and the hook.
I still have to explain the "Restore" function to you.
This option are simple because it has no options.
The principle is to restore the name of the file as it was when TidyTic scanned it for the 1st time.
Very handy if for example you have deleted important information that was in file name.
Or if you made a mistake with the search characters.
This allows you to be able to make any mistake in the software without fear that action is irreversible.

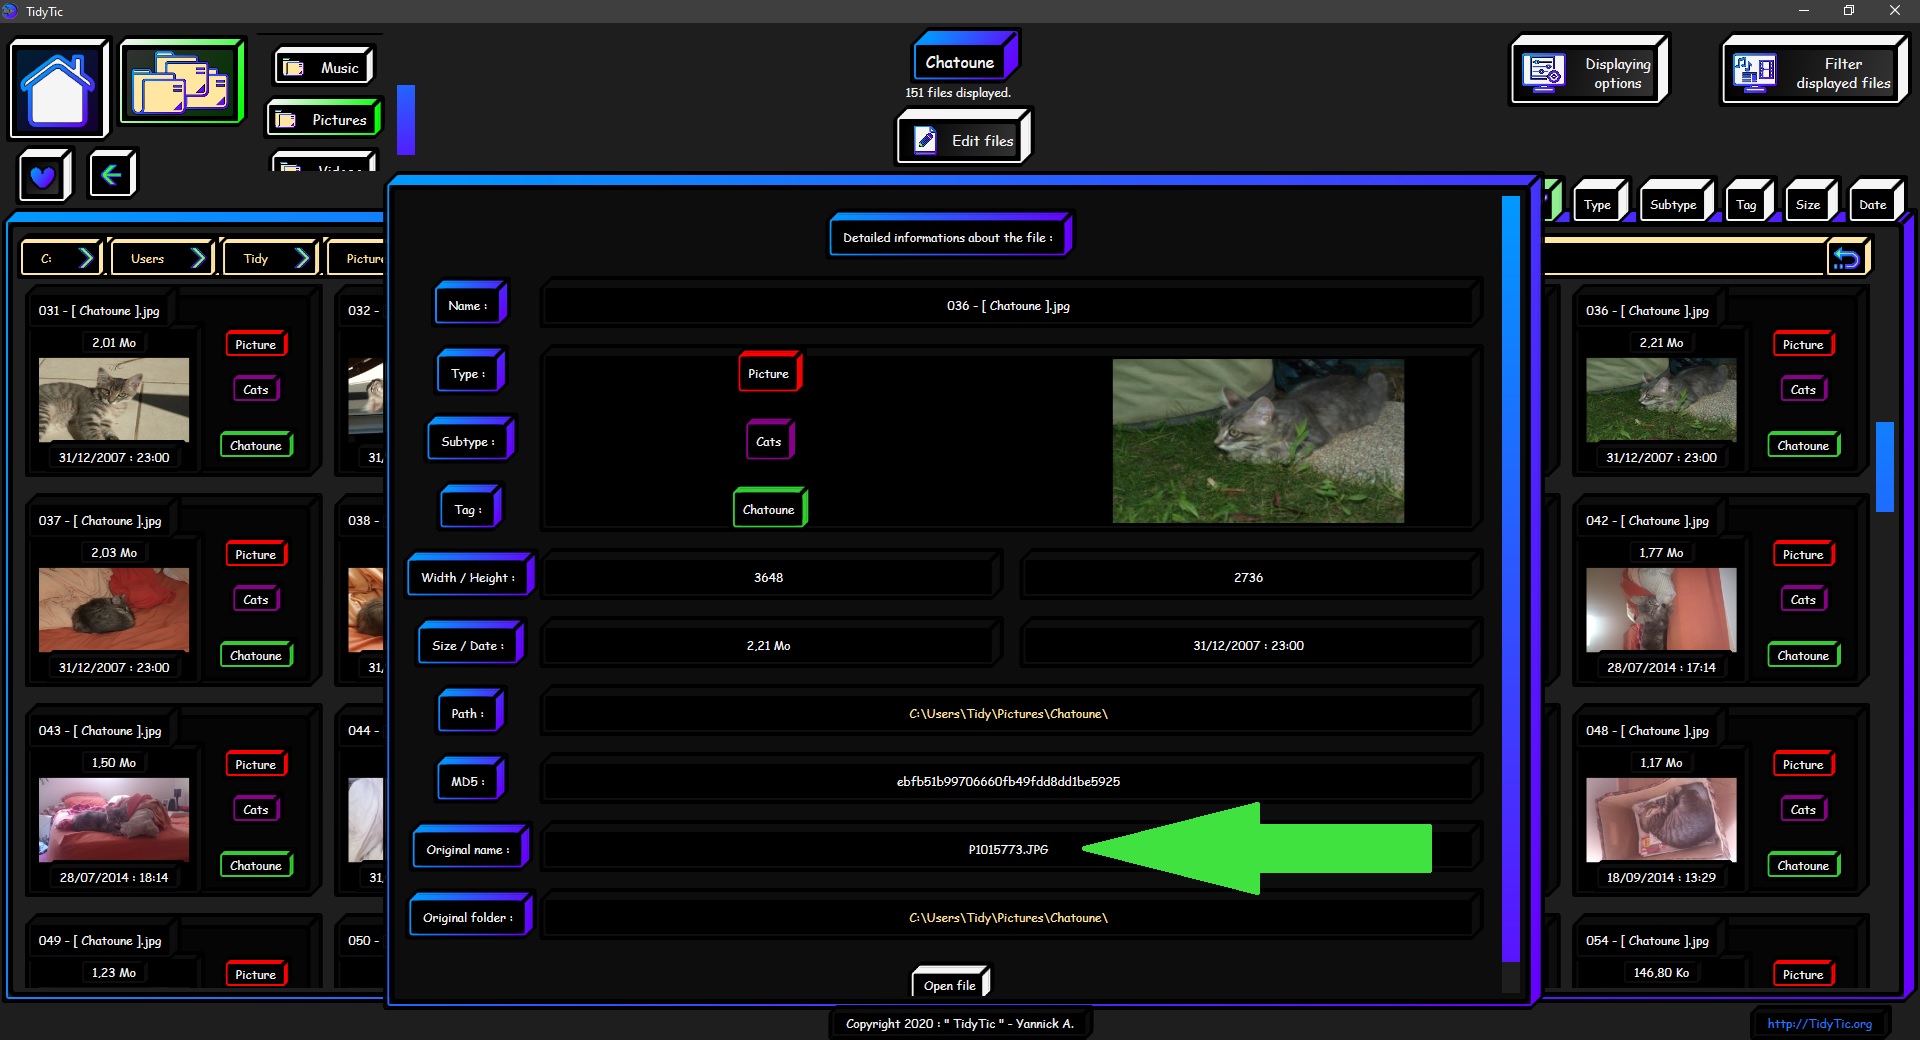
To find out original name of your files, simply deactivate the "Edit files" mode to return to normal browsing mode.
Then you just have to double right click on the file.
This will bring up the detailed information window of file which contains original name in addition to a lot of information.
It only remains to explain to you the last function of "Name" option of the "Edit files" mode :
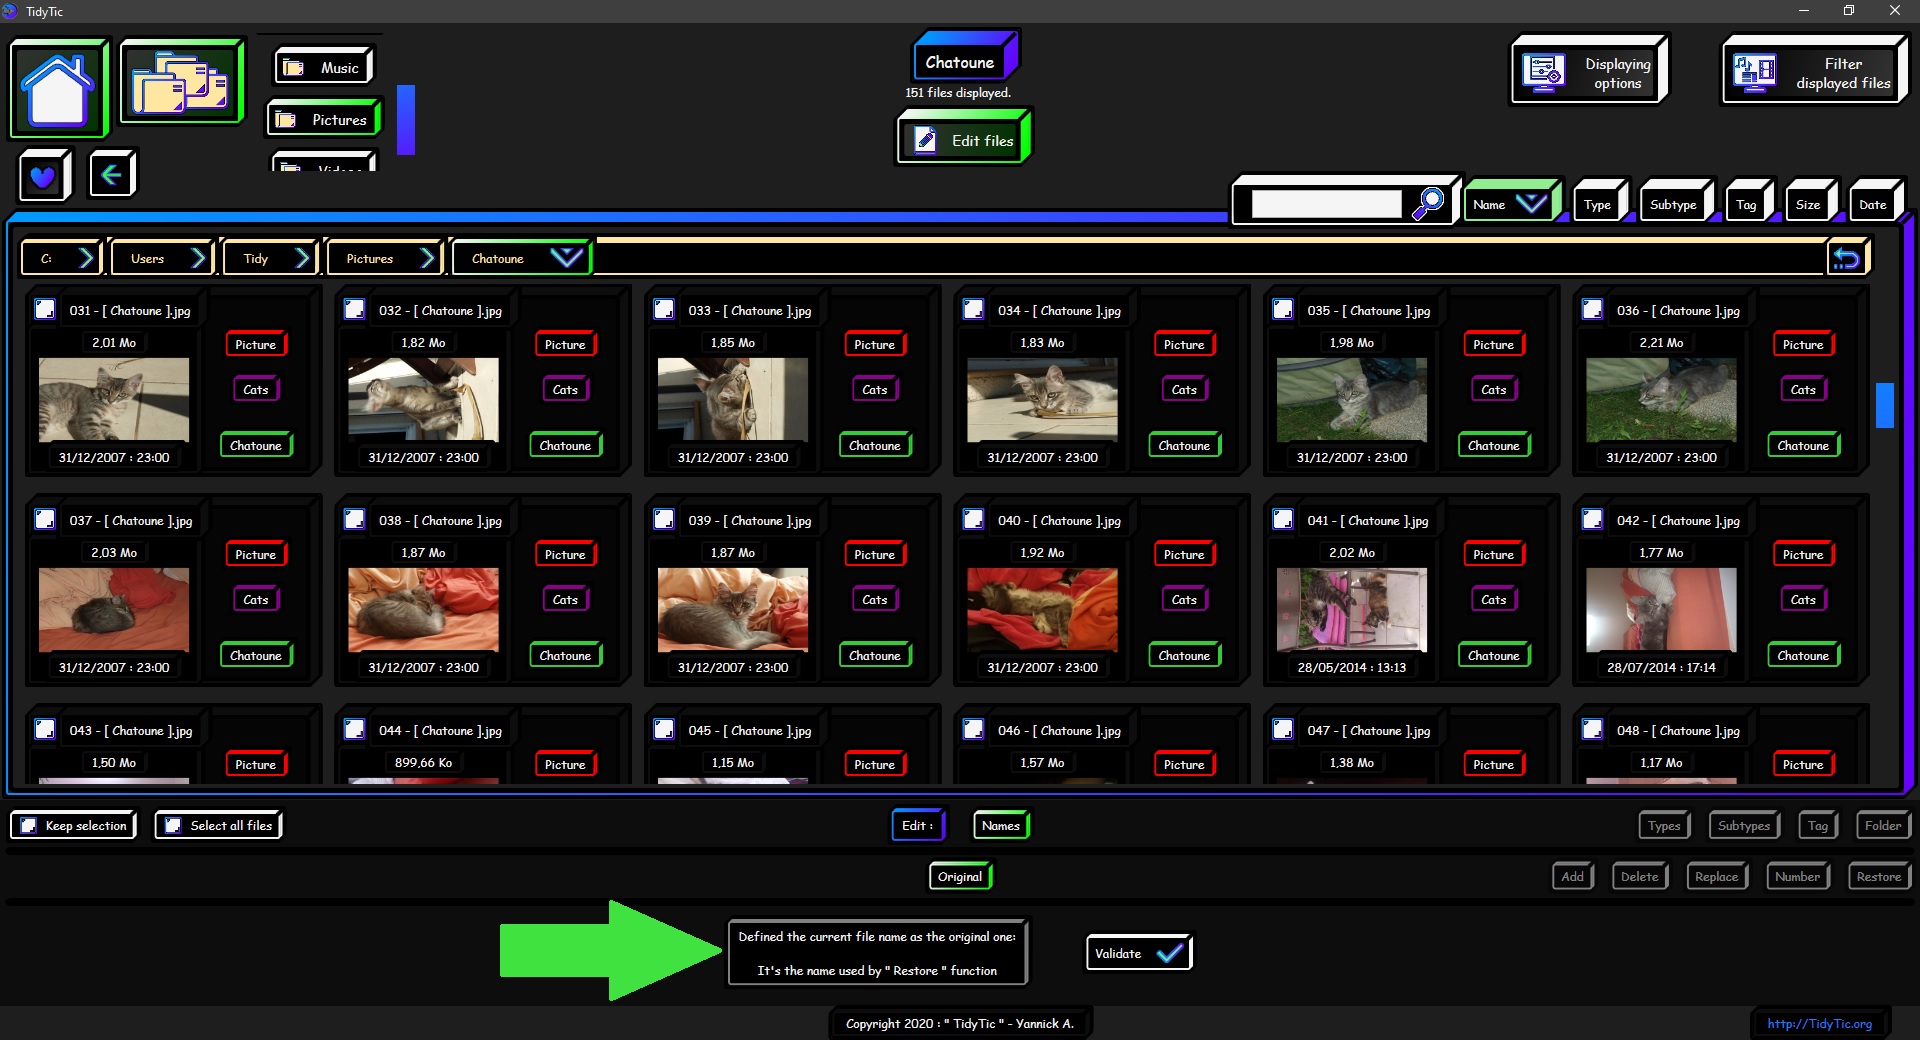
The "Original" function, this is very simple to understand.
It allows replacing the “original name” of the file by the current name of the file.
In general you will use it on files that you have already renamed and that you really want to keep like that.
To be able to return to it easily in case of handling error for example.
In my case I am very happy with the new name of Chatoune photos.
So I'm going to define them as the original names of the files.
Thus leaving me possibility of finding them easily thanks to the "Restore" function if one day I made a bad manipulation on the name of these files.
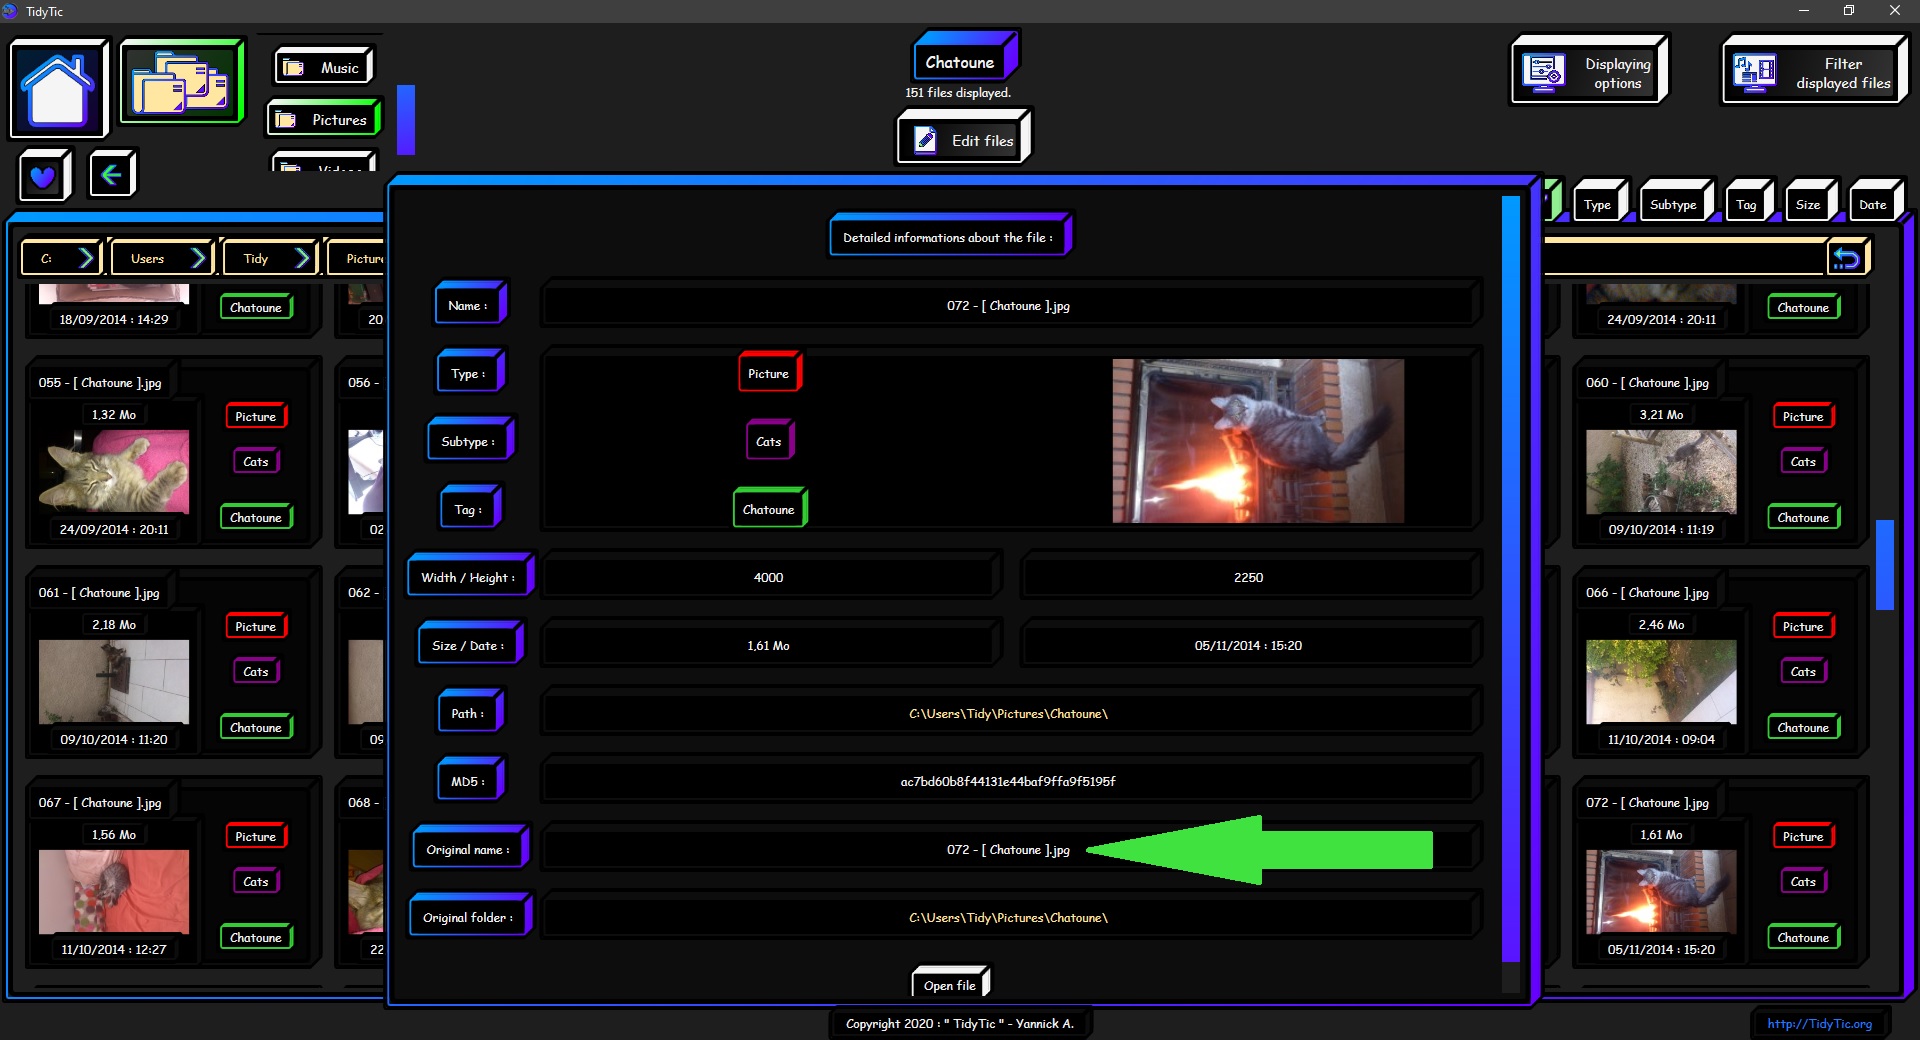
This action will have no visual effect on your files as it uses the current name of these files.
However, you can still verify that the original name has been updated in the "Detailed information about the file" window.
To display this window, simply deactivate the "Edit files" mode and double right click on the file.
How to quickly rename a single file :
When the "Edit files" mode is activated you can easily change the name of a file without having to go through the available tools.
You just need to double left click on a file to open a modification box allowing you to type the name you want.
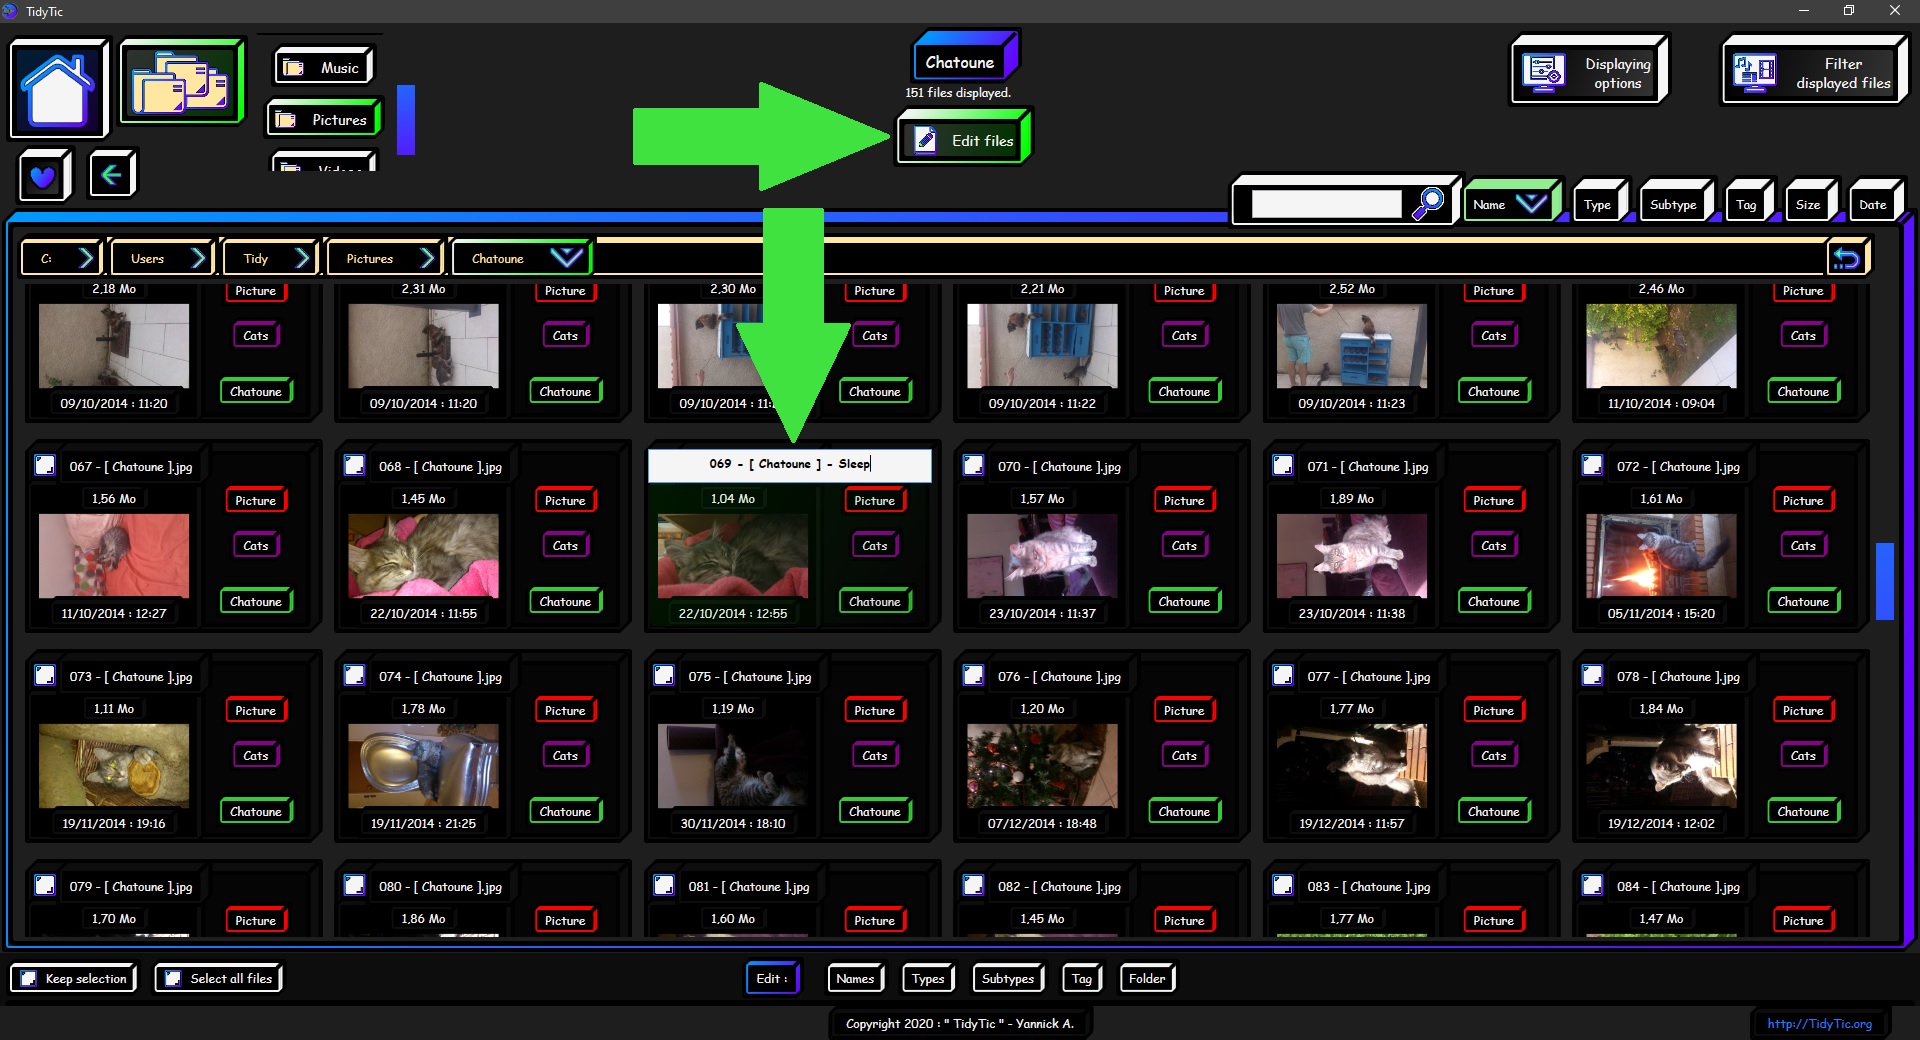
To save modifications, click outside the modification box or press "Enter" key on your keyboard.
To cancel modifications, press "Esc" key on your keyboard.
To finish here are some tips on cases that you may encounter:
I have double spaces see triple spaces in the name of my files! How to remove them without deleting all the spaces ?
In "Edit files" mode, choose the "Name" option and finally the "Replace" option.
Select all files.
Ask TidyTic to replace “ ” (double space) with “ ” (single space).
On the screenshot below I selected the spaces with my mouse in the modification boxes in order to show them to you.
Launch the action on the files containing these double spaces.
If your files contained triple spaces or even more, there is nothing to change, only launch this action several times until there are only single spaces left.
I have a space at the beginning (or at the end) of the name of my files ! How to remove them without deleting all the spaces ?
On the following screenshot I start modifying the name on a file so that I can select the name and see the space at the beginning of the files name.
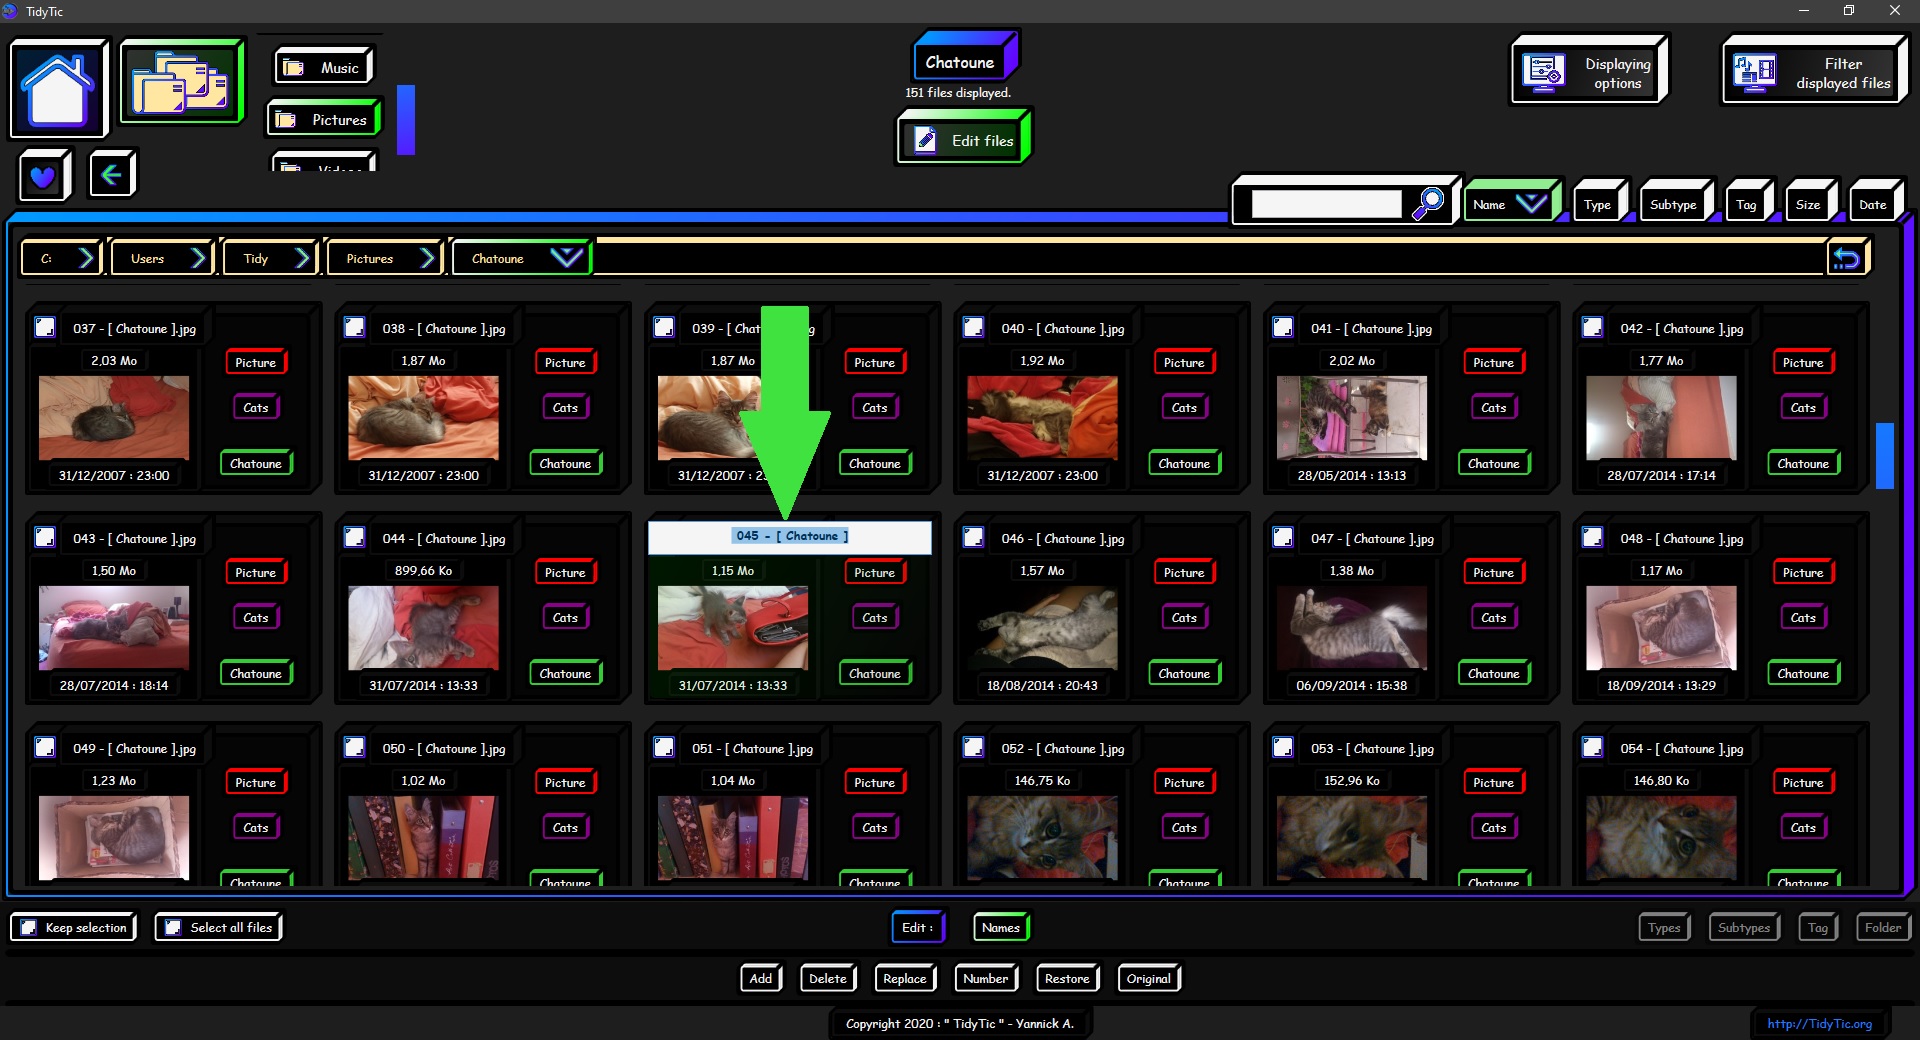
I will then choose the "Add" option in the name modification menu.
Then I will ask TidyTic to add "1234DEL" for example at the beginning of each file.
What I ask to add doesn't really matter, just be sure it's not already present in the file names.
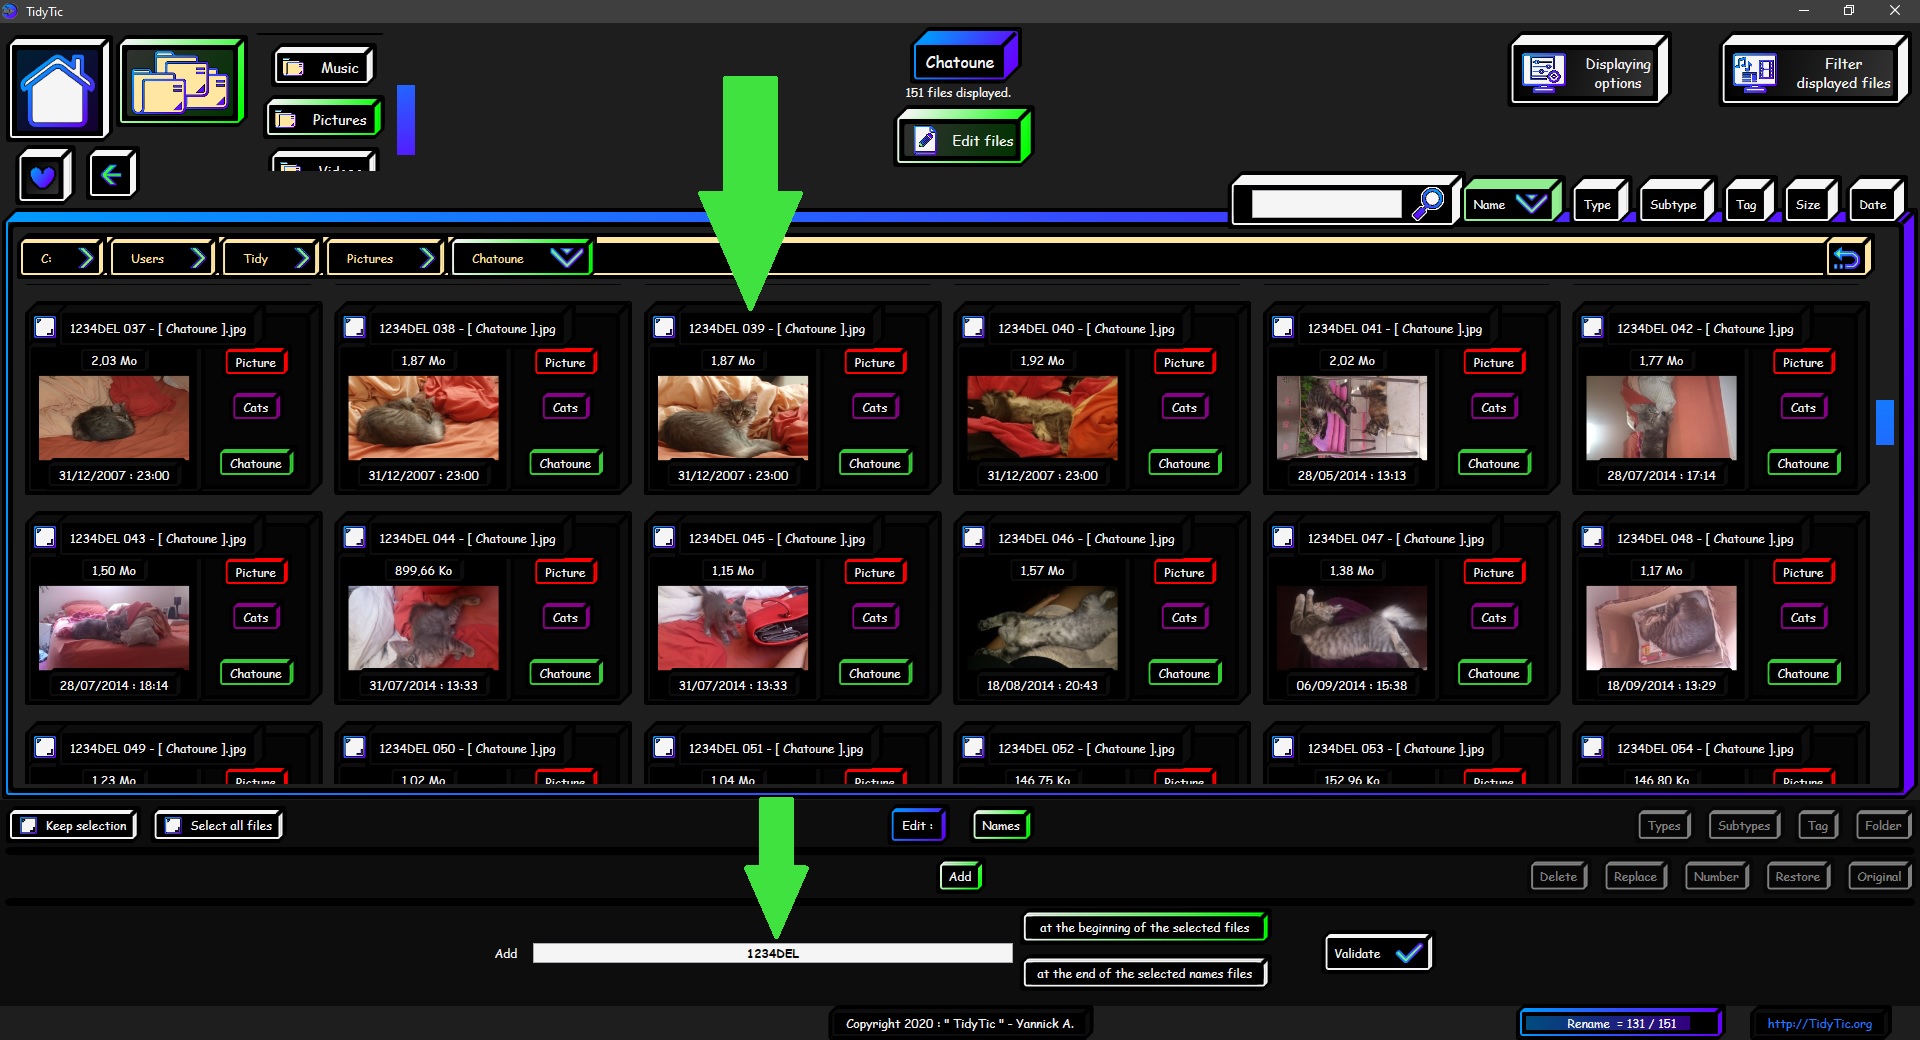
Then I just have to choose the "Delete" option in the menu.
And ask the software to delete "1234DEL " while remembering to add a space at the end.
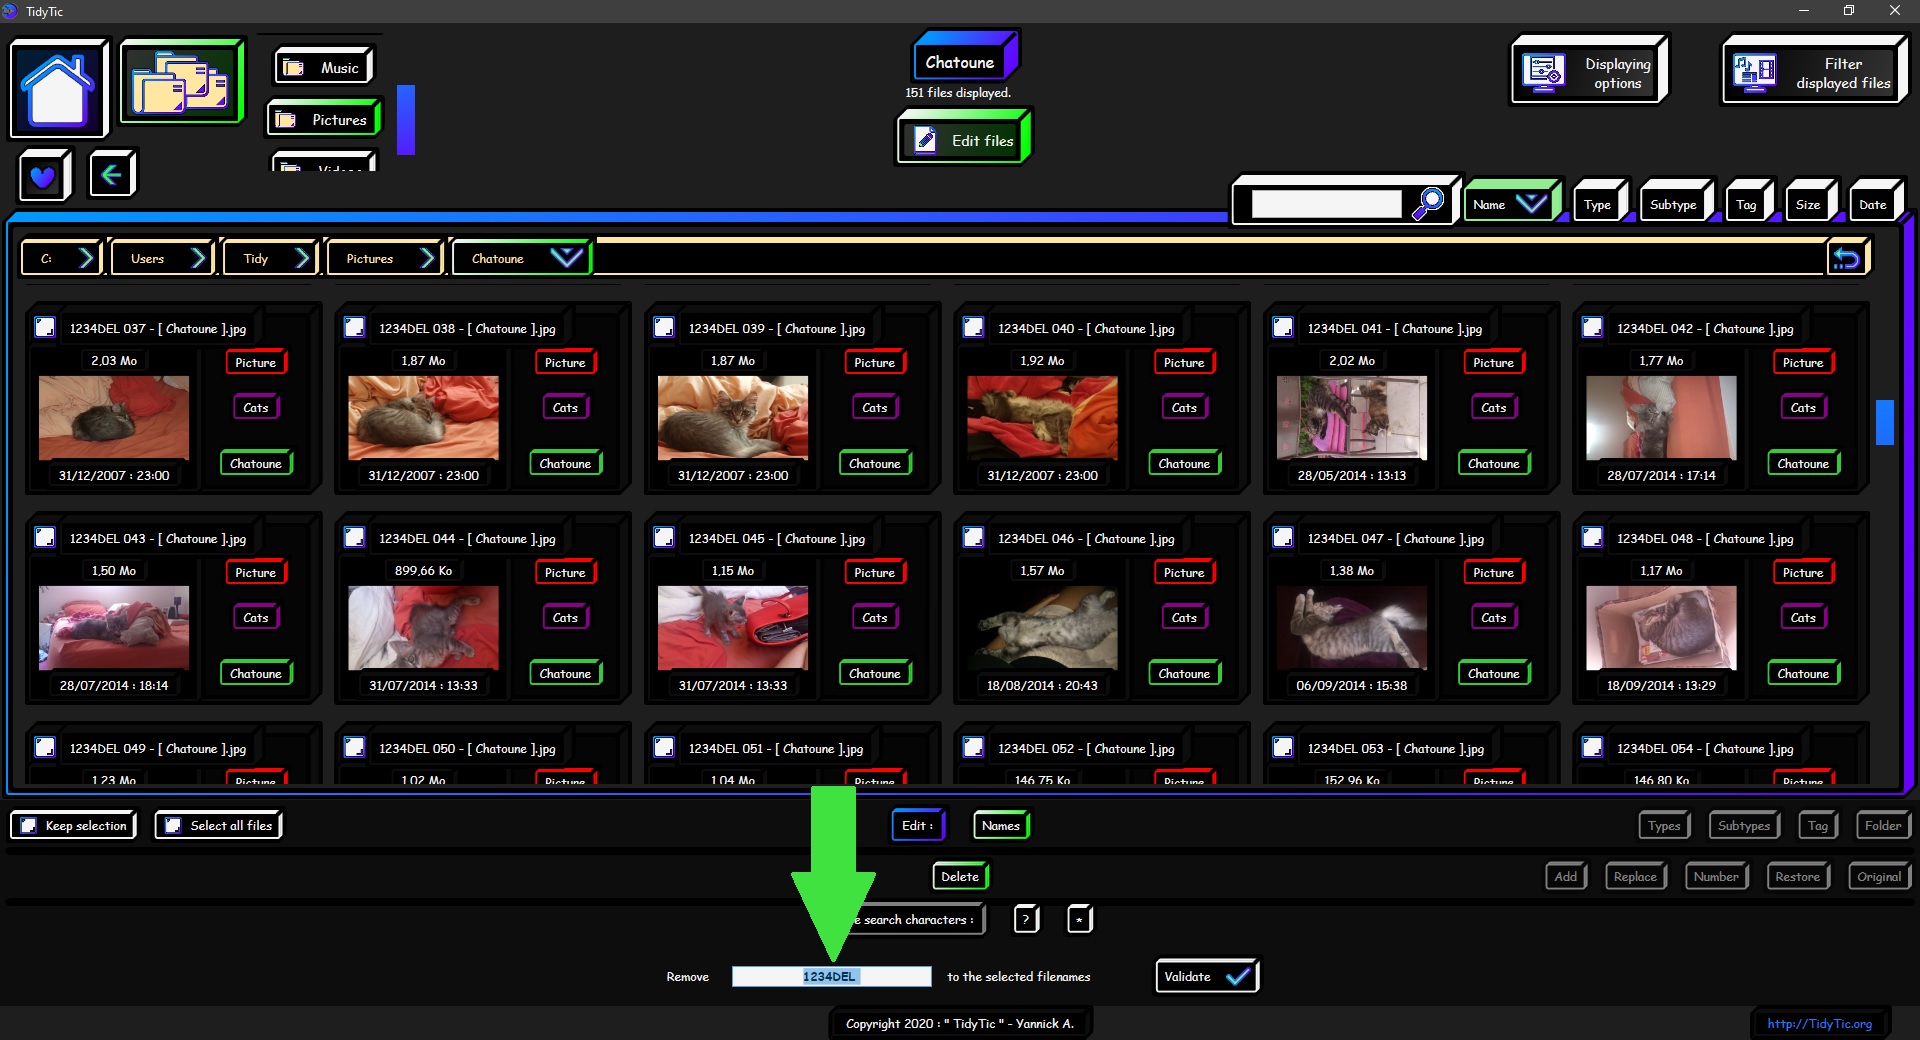
It only remains for me to launch the action and the software will erase what I just added in the names as well as the space that is right after.
Leaving the rest of file name completely intact.
As you can see above my files have no more space at the beginning of their name.
If the space were at the end of file names the principle would be exactly the same.
"1234DEL" must be added at the end of each file.
And ask the software to delete " 1234DEL", this time I just put the space at the beginning of what I ask to delete.
The software will delete what you have just added as well as the space that was at the end of the files name.
If some of the files had no space, you will still have "1234DEL" in their names.
Ask the software to delete "1234DEL" without any spaces in order to finish cleaning up the file names.
If you had a double space at the beginning or at the end, use the method to remove the double spaces before using this method.
If I ask the software to delete ".jpg" on my files name, will it delete the extension ?
The answer is no !
All the tools available to modify names in TidyTic will always ignore the file extension.
To modify the extension of a file it is not a question of renaming it, it is necessary to change the format of the file itself (that is to say the way in which it is stored on your computer).
You must use appropriate software for this, such as Paint for an picture for example.
And TidyTic is not made for that. It is there to help you organize or rename your files and not to change their format.
This concludes Part 1 on possible changes to the name of your files.
We can thank Chatoune who gave his agreement to be on all the screenshots of this tutorial ^^.
Part 2: Modify the type of your files :
Changing the type (picture, video, audio, etc.) of your files in TidyTic leaves you with two choices: "Replace" and "Auto".

The “Replace” option as its name suggests will allow you to replace the type of files you have selected.
You just have to choose the files, chose the new type and validate the action.

The "Auto" option will choose the type that corresponds to the format of your files : according to their extension (.mp3, .jpg, .avi etc)
Each type in TidyTic has an extension list which corresponds to it so that it can be known whether a file is an picture or a video for example.
In order to know this extension list or modify it or customize a type, you will have to go through the edit : "Type, Sub-type, Tag" page of the software.
Note that the "Picture" and "Video" types are special types in TidyTic.
For all files of these types the software will generate a thumbnail.
Certain particular picture or video formats however can not have thumbnails.
For example Photoshop or Gimp working files.
For these files as for the other types the software will simply recover the icon that your Windows uses for these files.
File types will be very useful for filtering the display or use of automatic rules in TidyTic.
See the tutorial "View your files in TidyTic :" for more information.
As well as the tutorial "Automatic rules: Automating the tidying of all files on your PC"
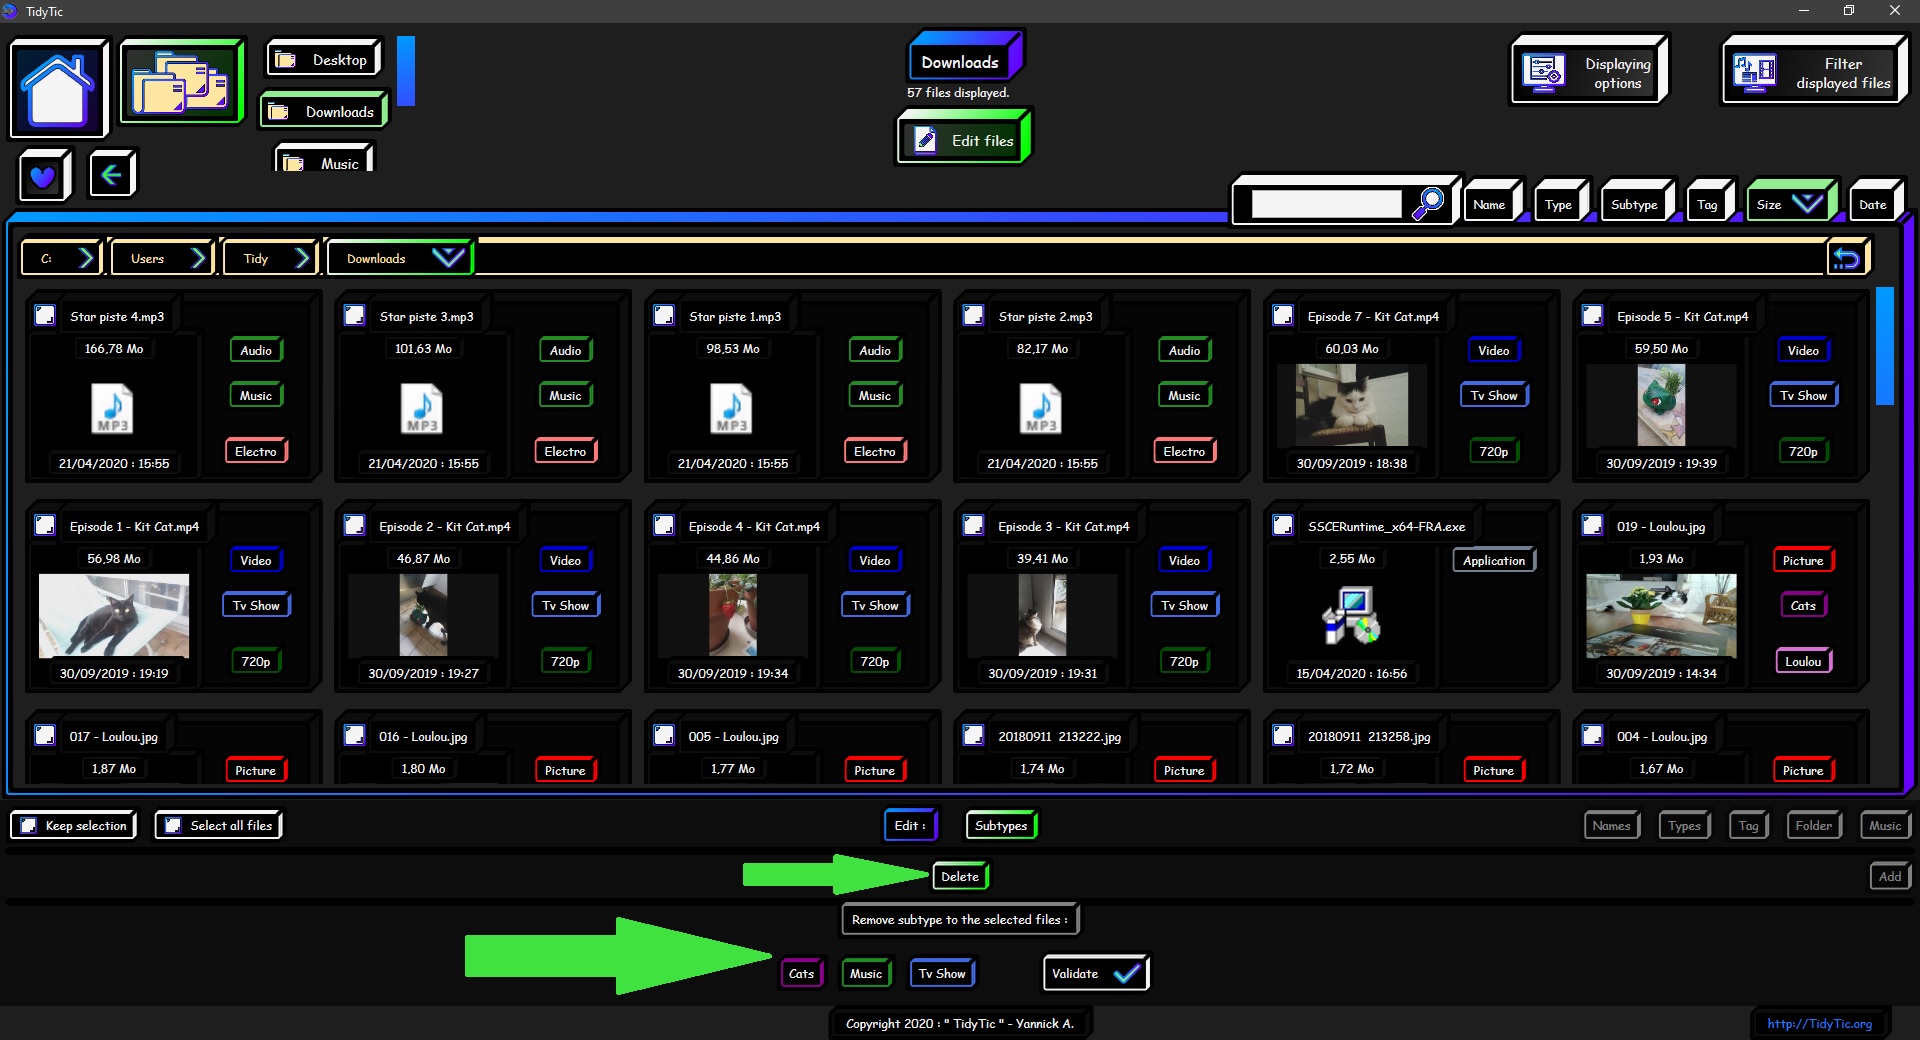
Part 3: Add, delete a subtype on your files :
Changing the subtype of your files in TidyTic leaves you with two choices: "Add" and "Delete".
You can add as many subtypes as you want to a file. This leaves you free to customize your files the way you want.
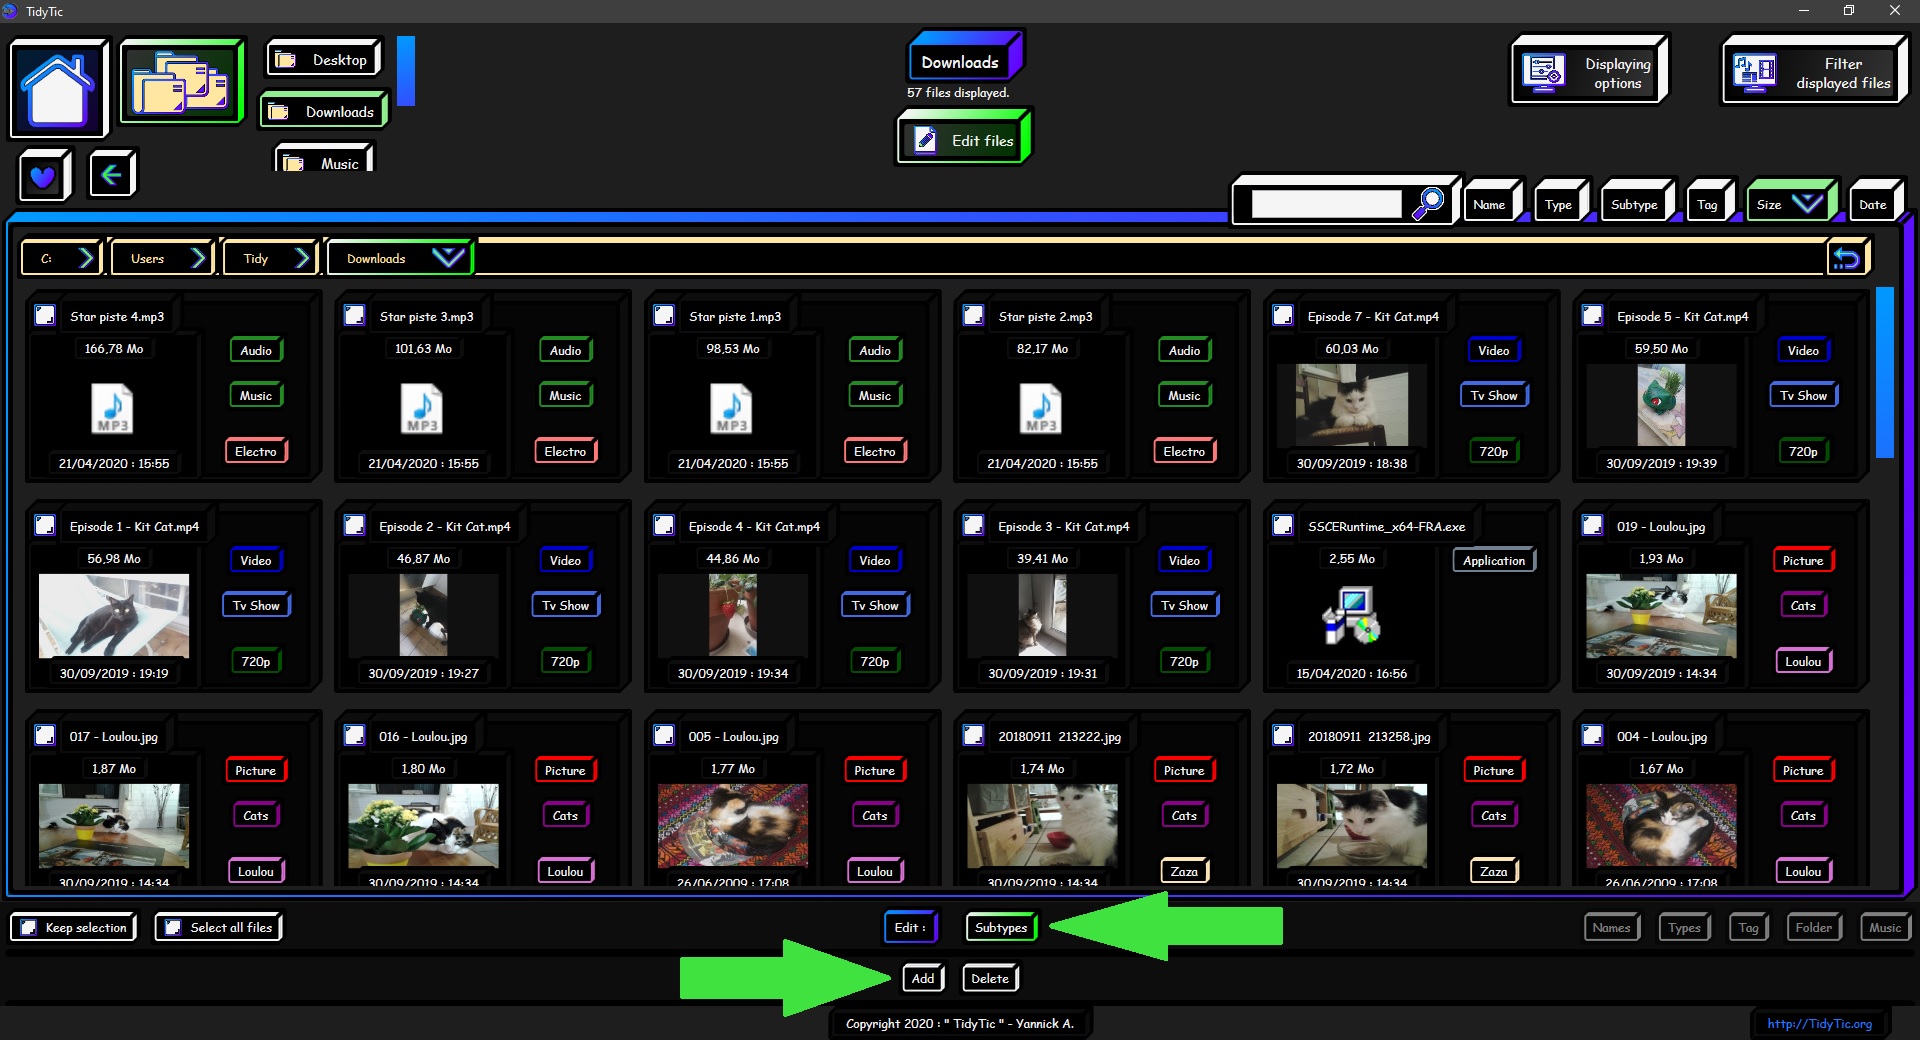
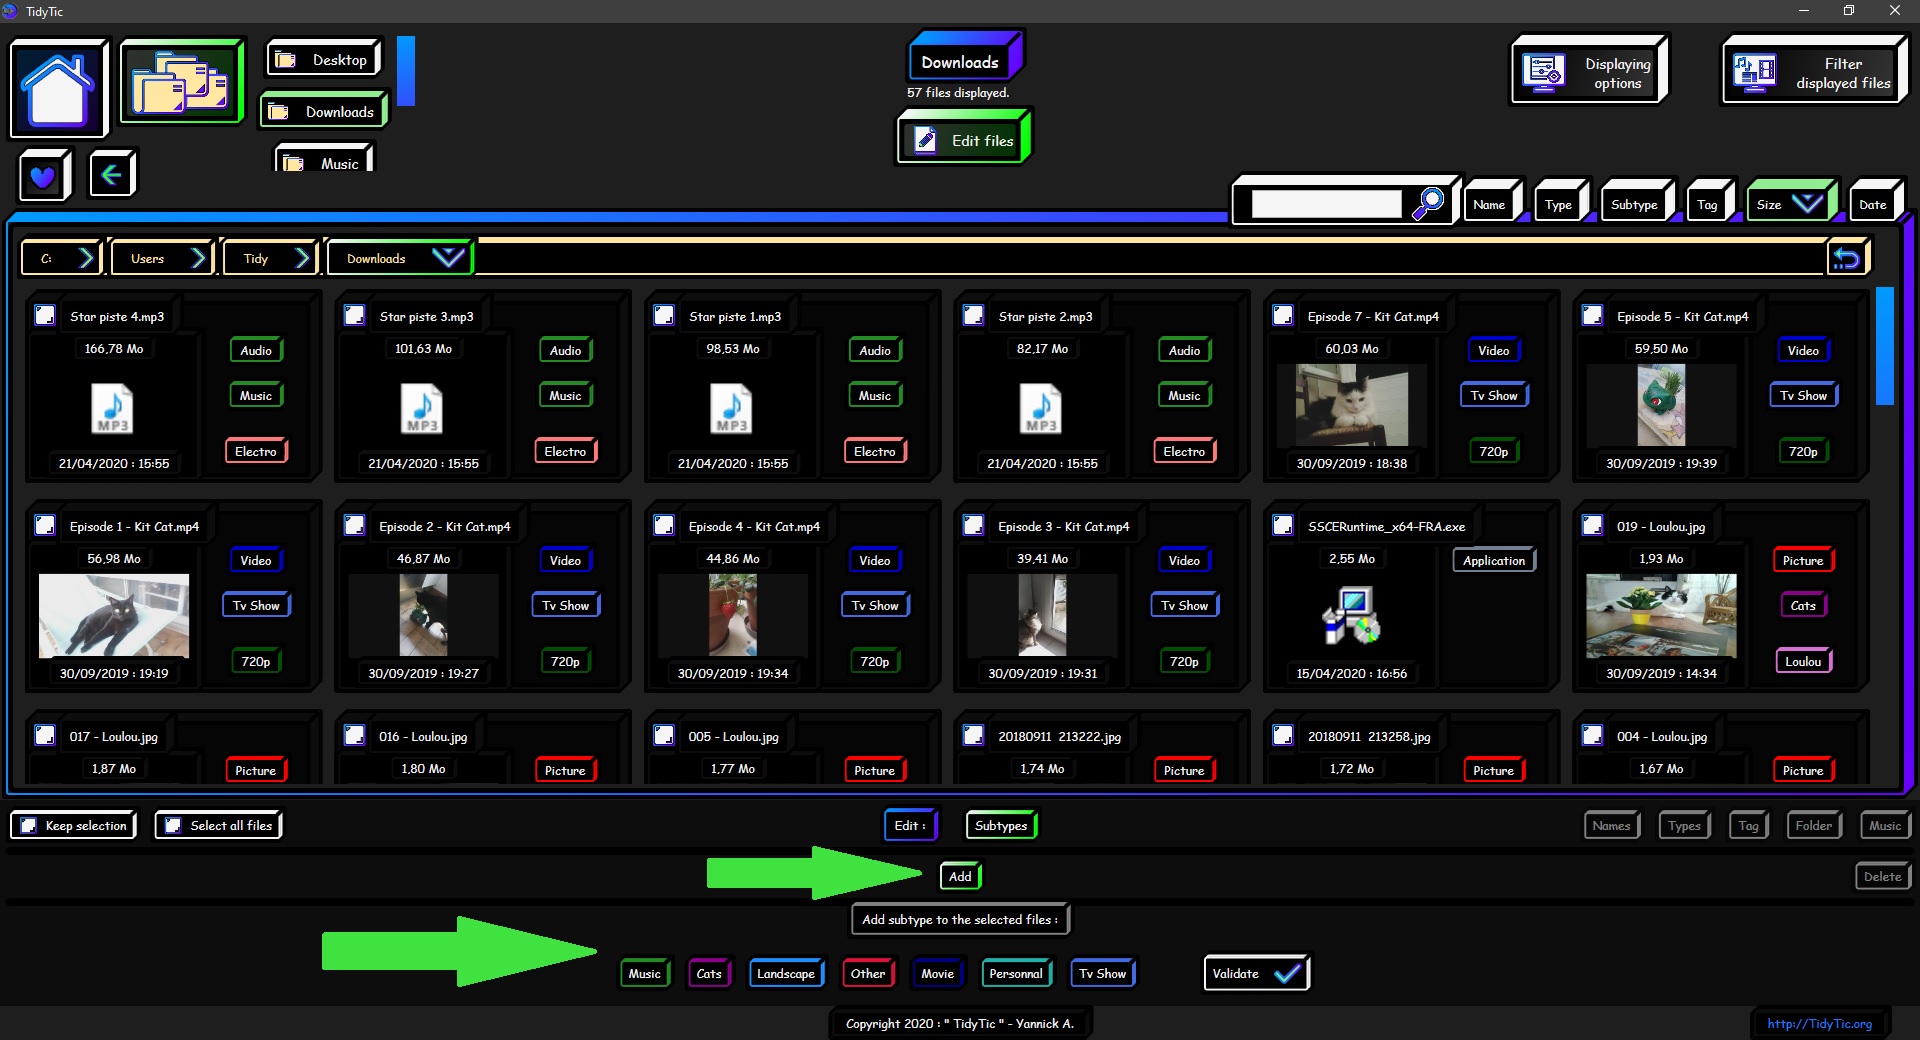
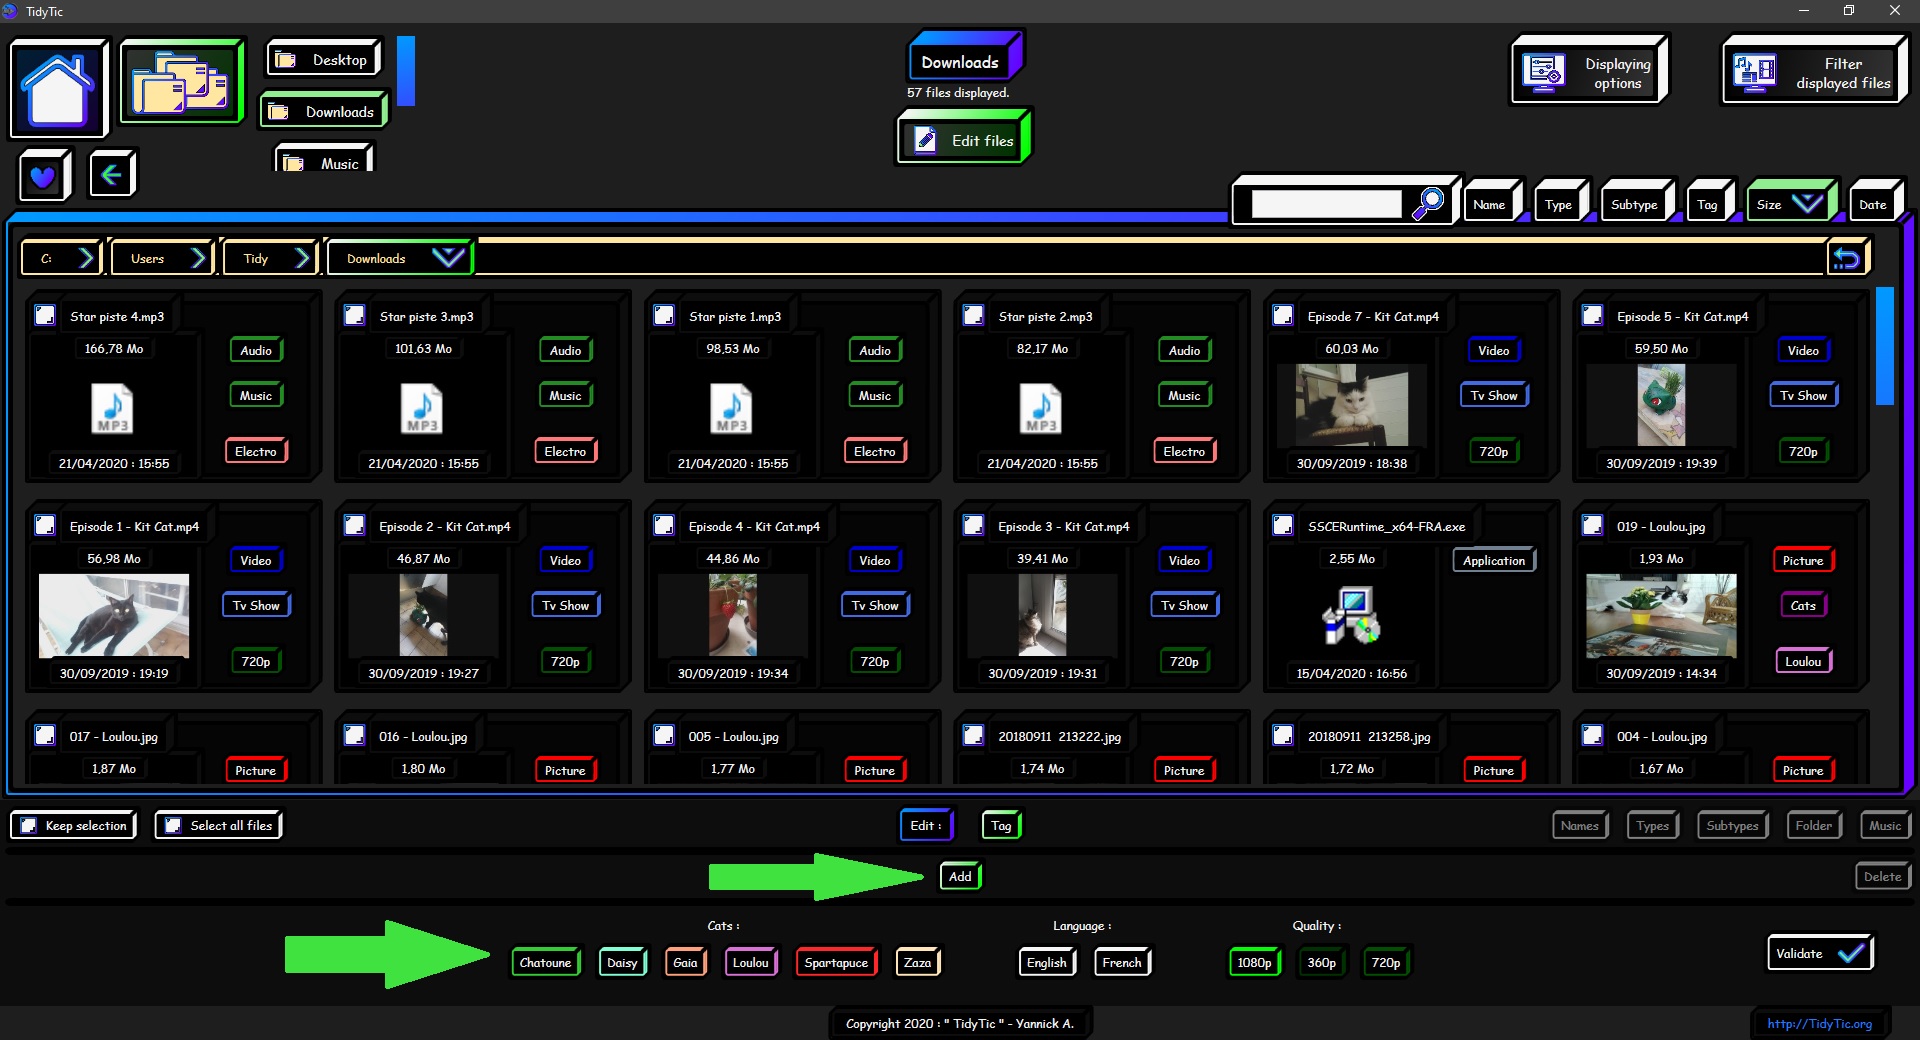
The "Add" option will offer you all subtypes available for files currently displayed.
So if videos are displayed it will offer you all possible subtypes of video type.
This allow lighten the menu if you have a lot of subtypes for each of your types.
Note that if you ask the software to add a subtype to a file whose type does not match its parent type, it will not be added.
If for example I try to add to my videos the subtype "landscape" whose parent is the type "picture" no action will be done.
The software checks for compatibility with the file type by itself before making an addition.
Allowing you to select all of your files without worrying about the type to start adding a subtype without worrying about making a mistake.
TidyTic will take care of checking whether this is possible.
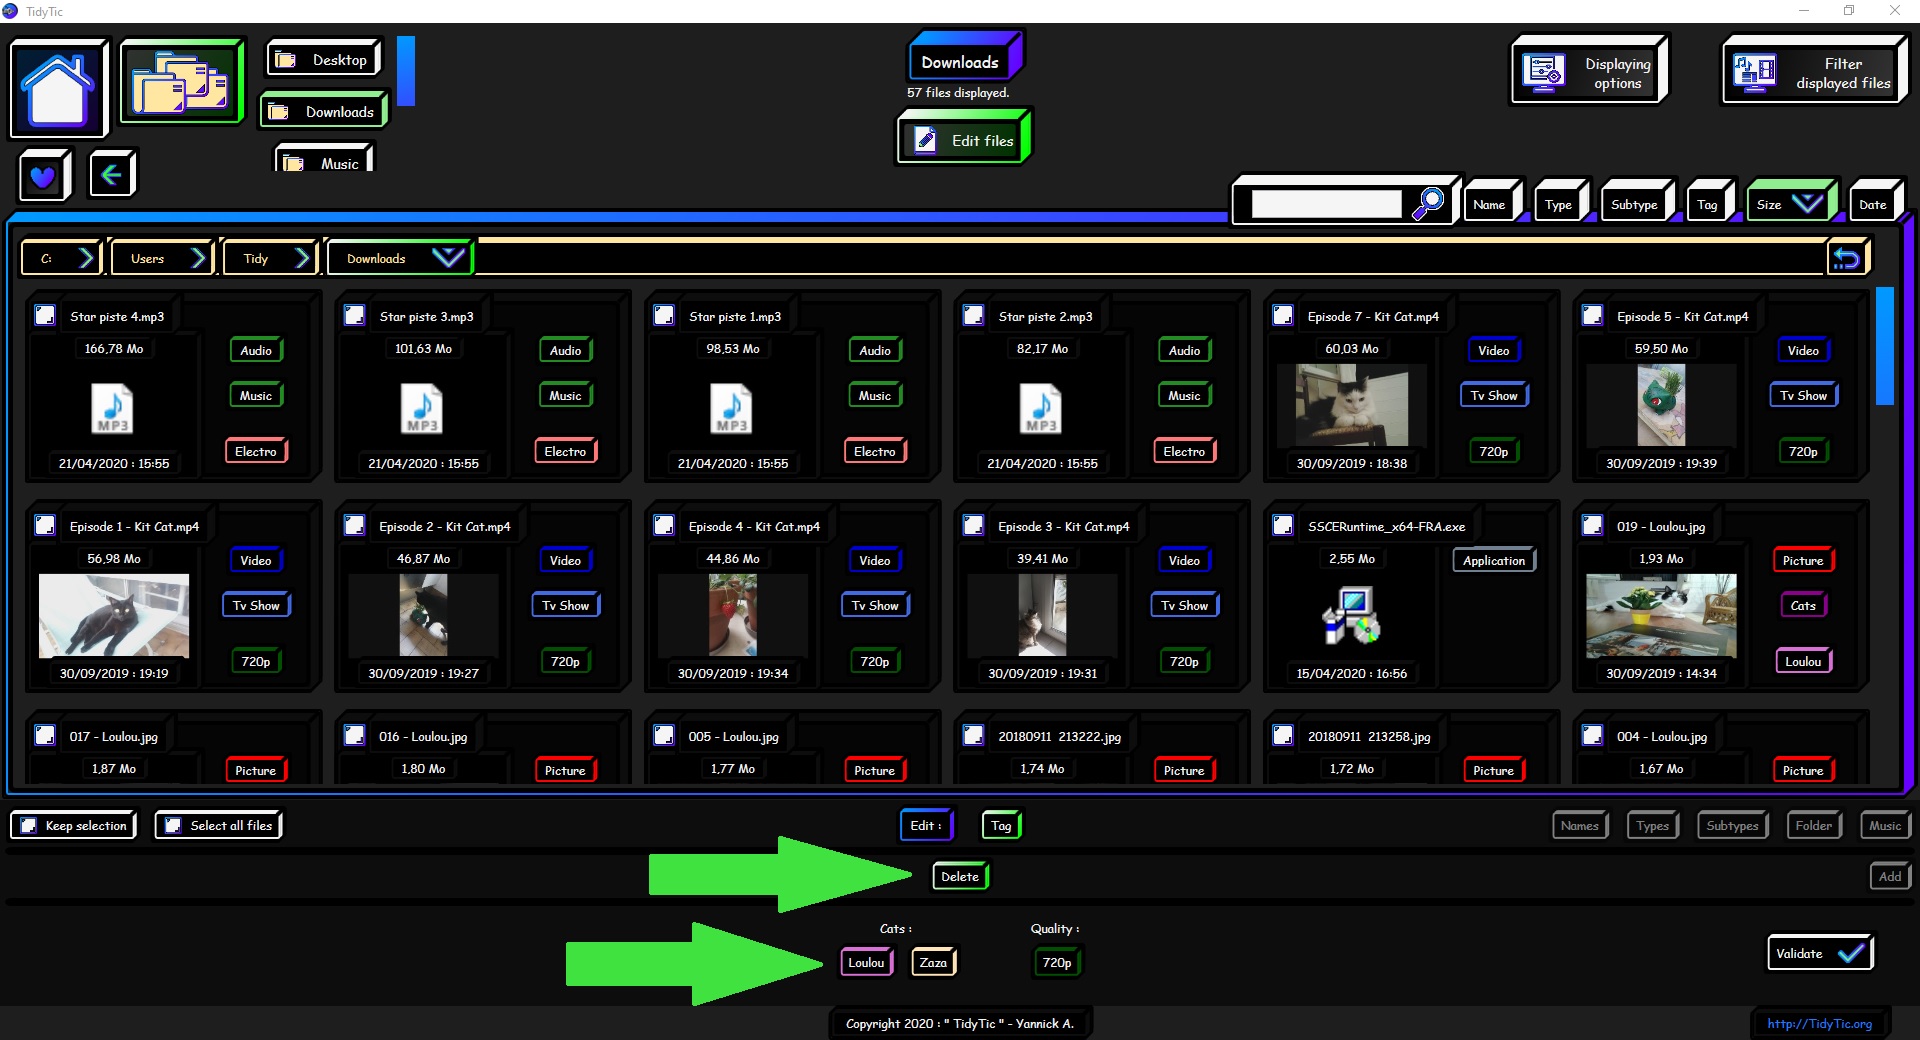
The “Delete” option will offer you in the list only subtypes which are associated with the files currently displayed.
Again in order to lighten the menu and facilitate your manipulations on the files.
Just select the subtype you want to delete and the files on which you want to delete it.
If you ask the software to remove a subtype from a file that does not have it, no action will be made on this file.
Again to allow you to select any file without worrying about making a mistake.
As with types, there is a particular subtype in TidyTic : the "Music" subtype.
If you want to associate an artist, album or genre to an audio file, it must be associated to the "Music" subtype.
When scanning your files, TidyTic automatically associated all audio files with an artist, album or genre to the subtype "Music"
I will go into a little more detail about this in "Part 6: Music: Edit the artists, albums and genres of your music."
For files associated with the music subtype TidyTic also checked if you had an image associated with the artist or album in order to use it as a thumbnail instead of the file icon.
In order to customize, create or delete a subtype, you will need to go to the edit : “Type, Subtype, Tag” page of the software.
As with types, the file subtypes will be very useful for filtering the display or use of automatic rules in TidyTic.
See the tutorial "View your files in TidyTic :" for more information.
As well as the tutorial "Automatic rules: Automating the tidying of all files on your PC".
Part 4: Add, Delete tag to your files :
Changing the tag of your files in TidyTic leaves you with two choices: "Add" and "Delete".
You can add as many tag as you want to a file. This leaves you free to customize your files the way you want.
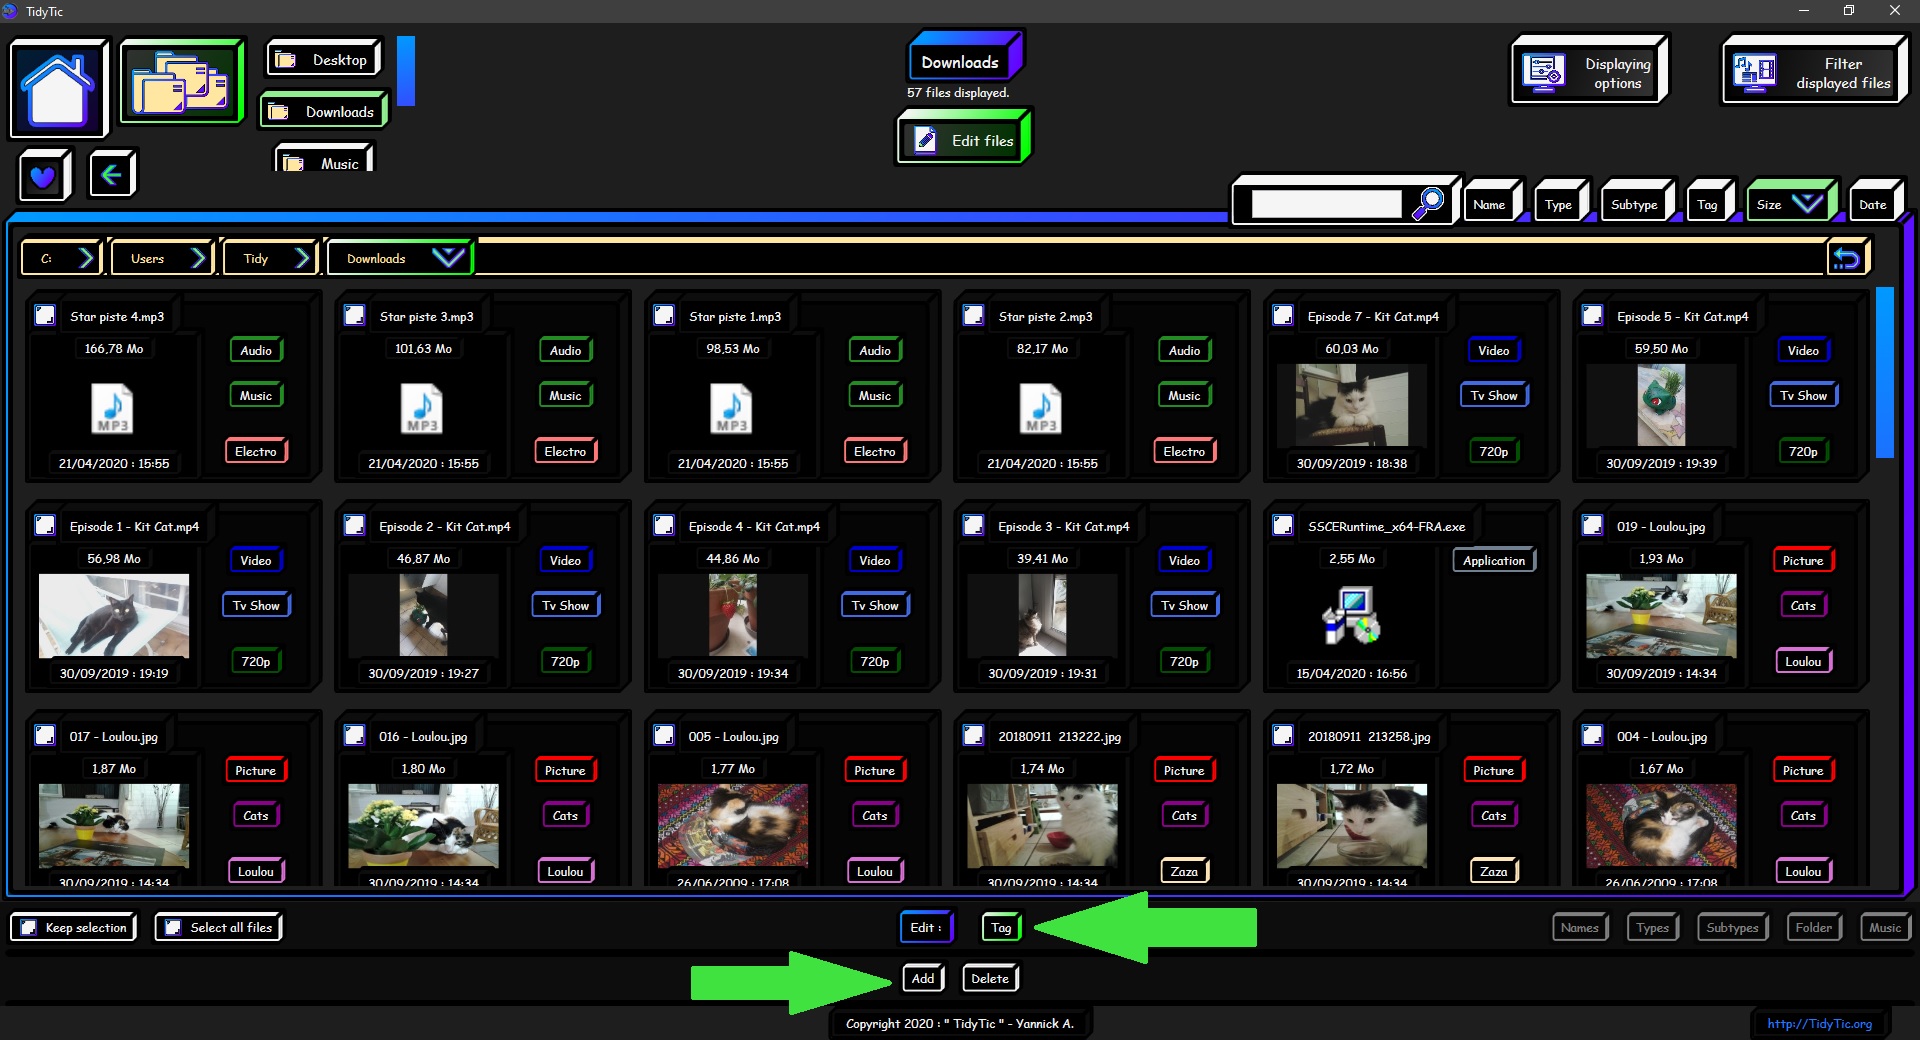
The "Add" option will only offer you tag available for the files currently displayed.
These tag are always associated with one or more type / subtype.
Again to lighten the menu when you have many tag.
As for the subtypes TidyTic will check by itself whether this tag is compatible with the file before adding it.
Still leaving you the option of roughly selecting your files without fear of making a mistake.
The "Delete" option will offer you in the list only tag which are associated with the files currently displayed.
Again in order to lighten the menu and facilitate your manipulations on the files.
Just select the tag you want to delete and the files on which you want to delete it.
If you ask the software to delete a tag from a file that does not have it, no action will be made on this file.
Again to allow you to select any files without worrying about making a mistake.
In order to personalize, create or delete a tag, you will have to go through the edit : “Type, Subtype, Tag” page of the software.
As with types and subtypes, tag of the files will be very useful for filtering the display or use of automatic rules in TidyTic.
See the tutorial "View your files in TidyTic :" for more information.
As well as the tutorial "Automatic rules: Automating the tidying of all files on your PC".
Part 5: Folder : move your files using TidyTic :
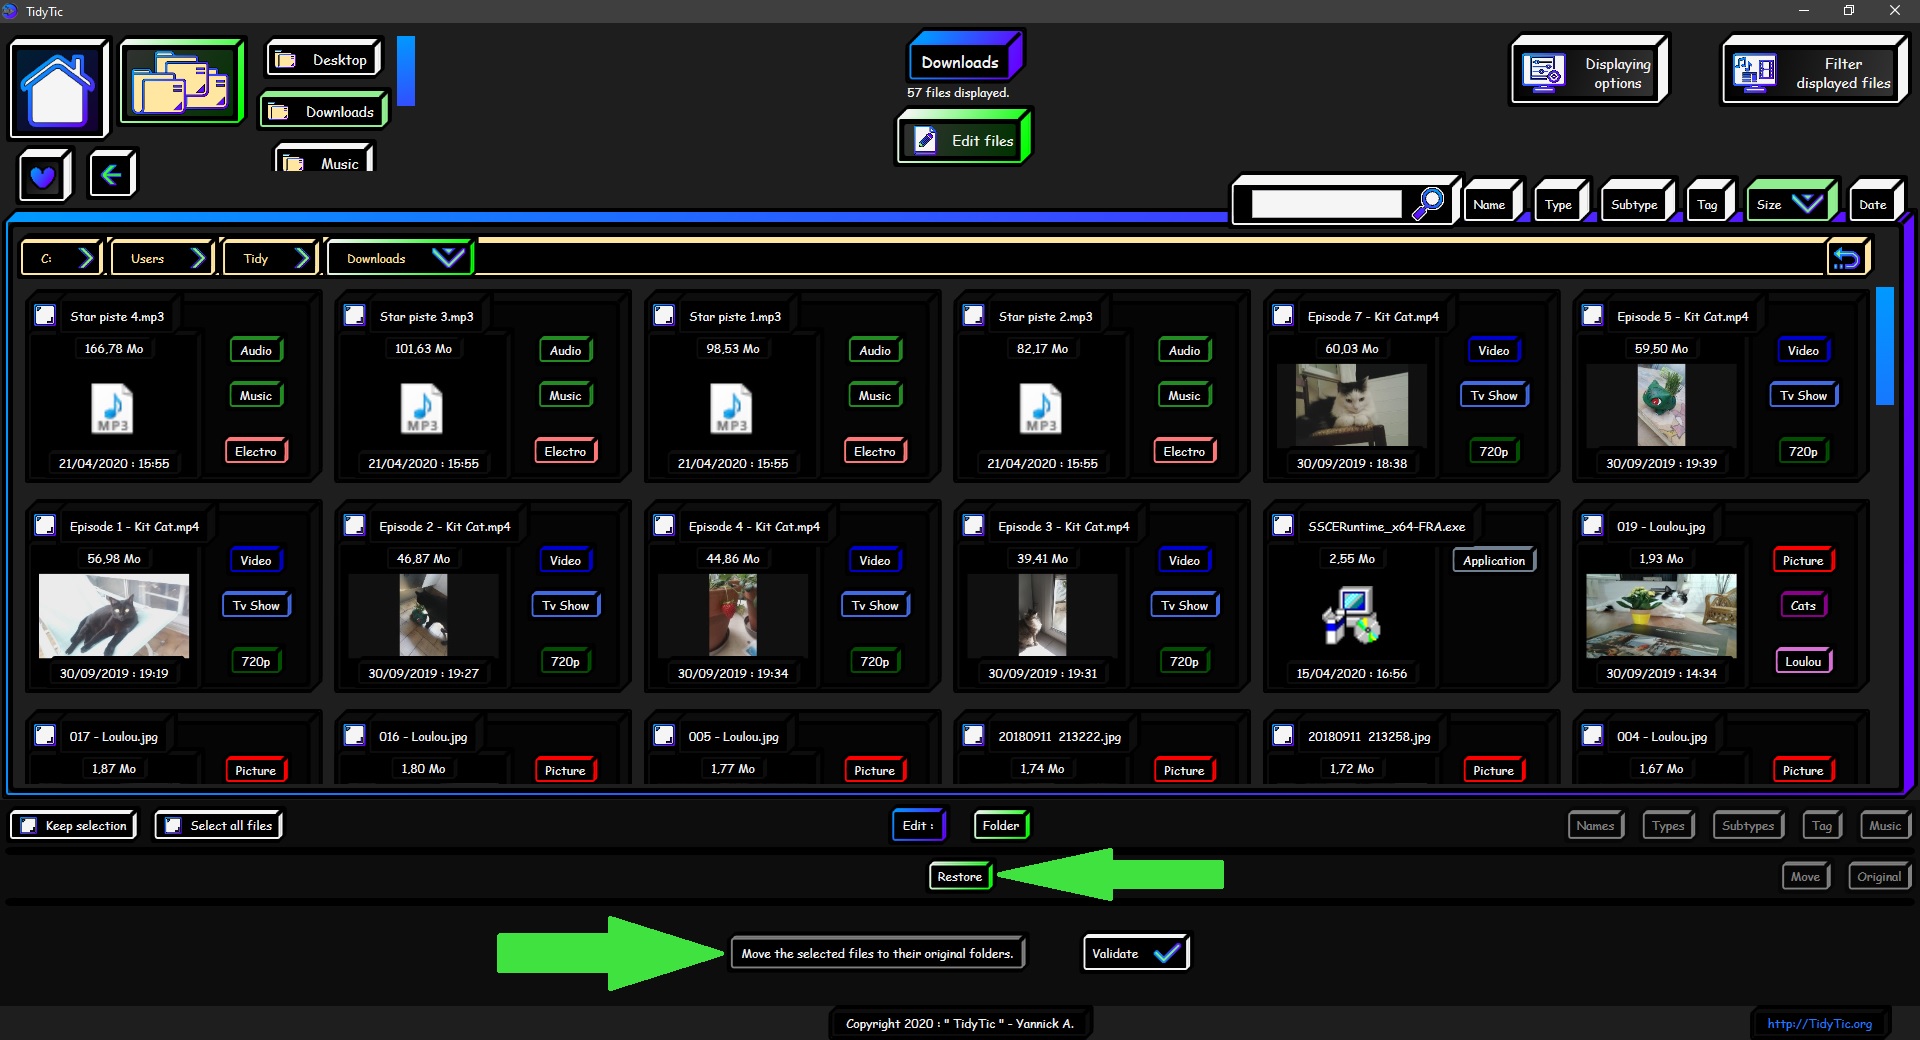
Changing the folder of your files from the "Edit files" menu in TidyTic gives you three choices: "Move", "Restore" and "Original".
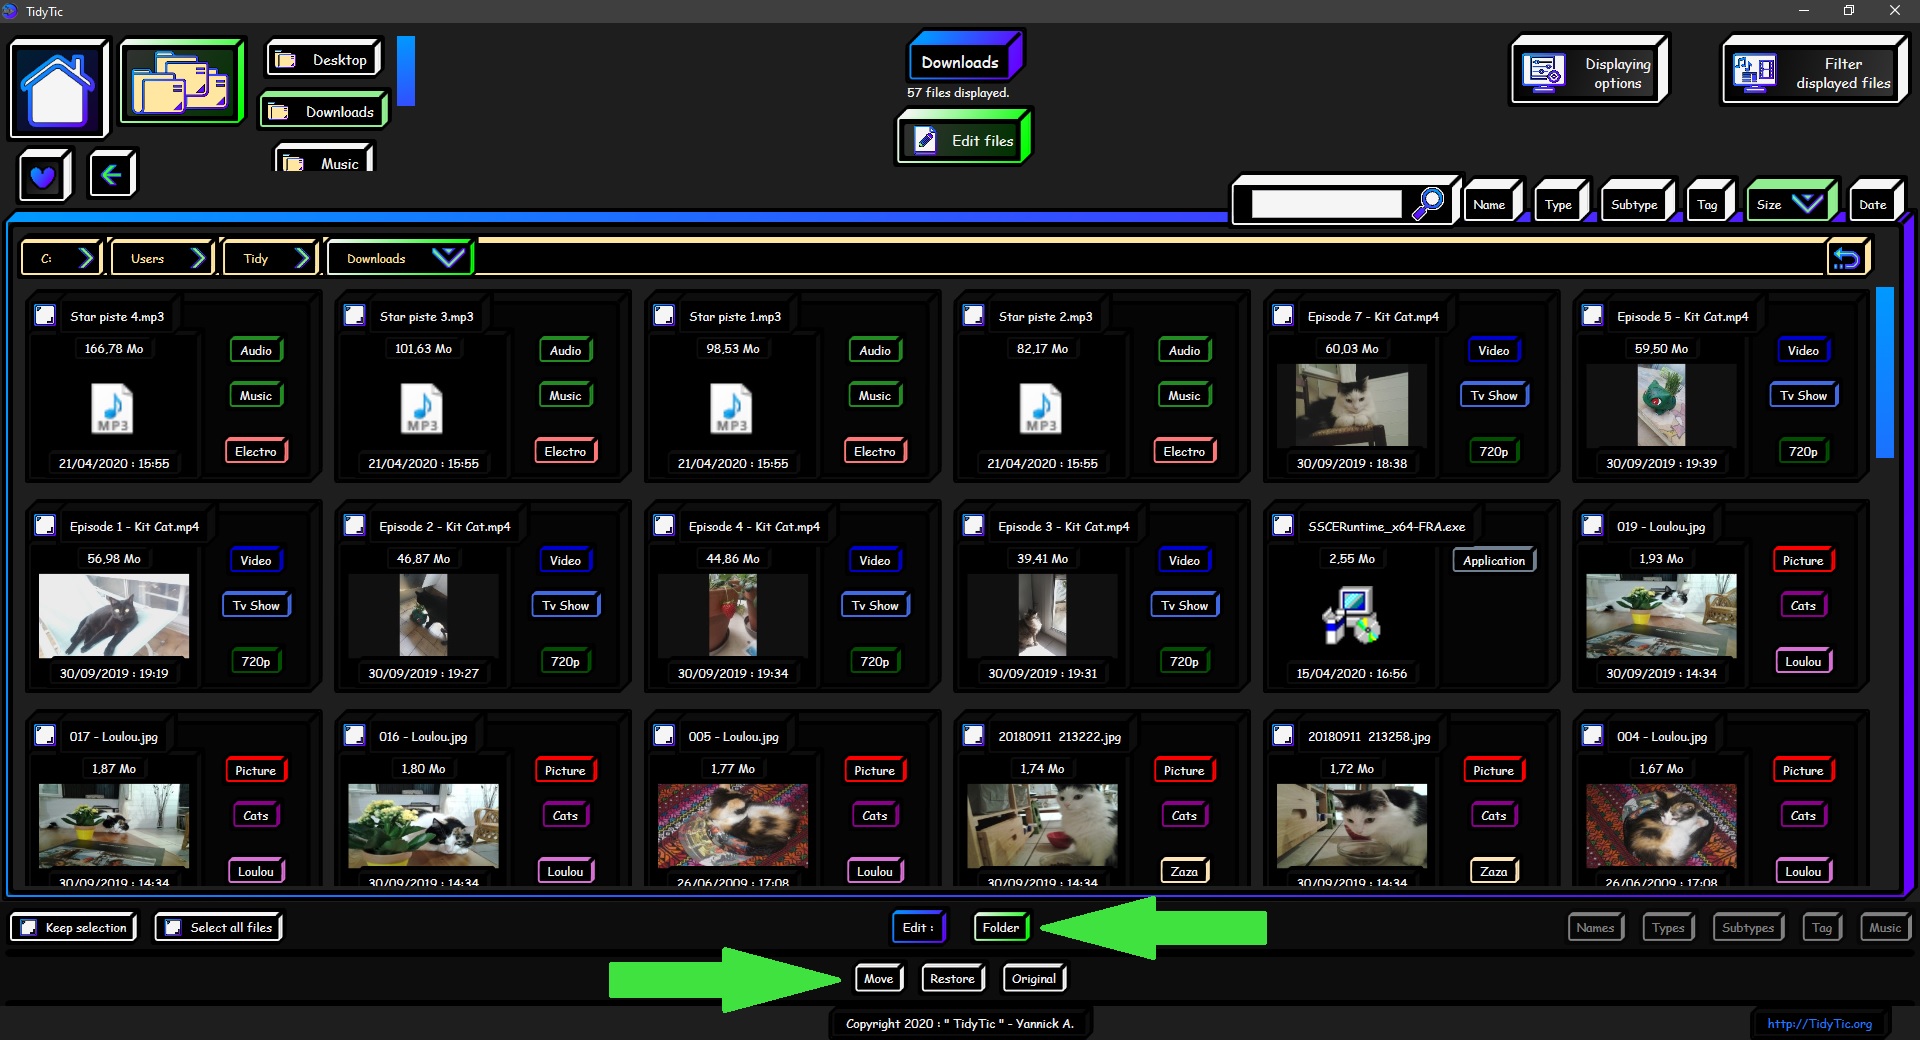
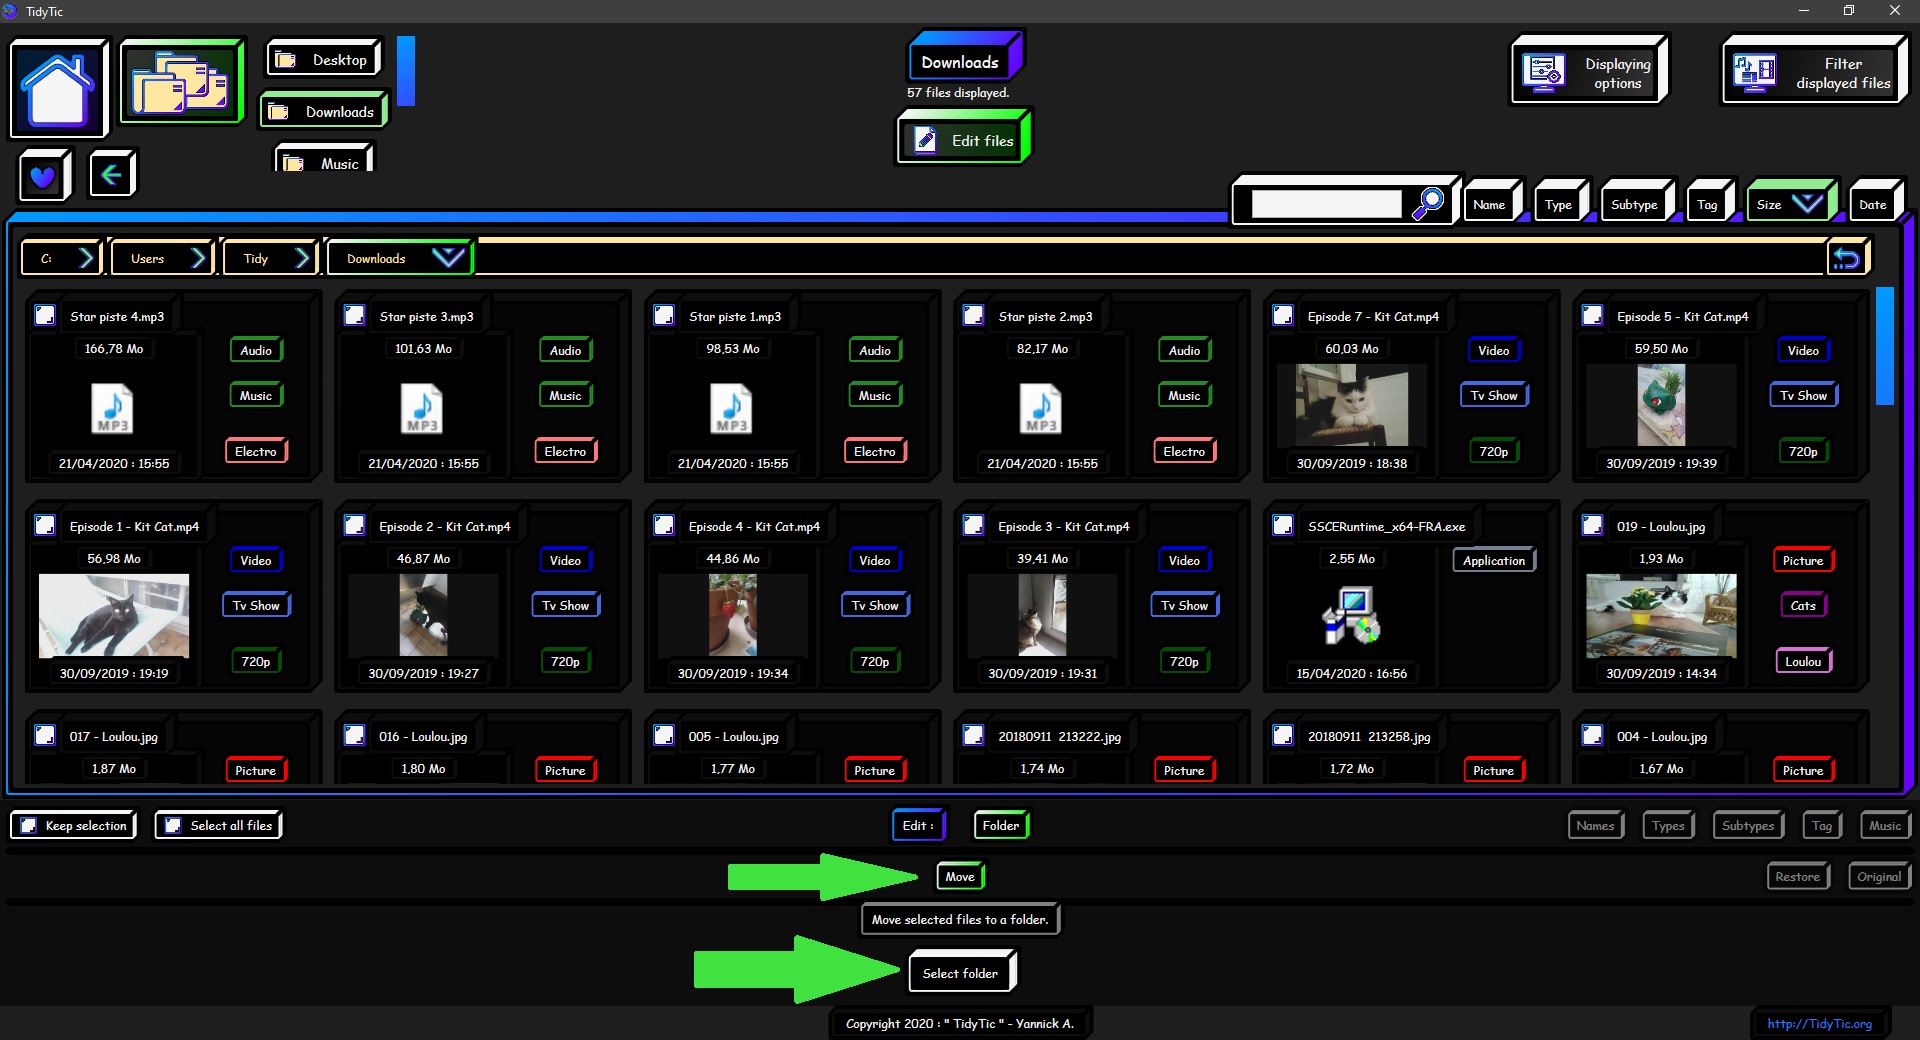
The "Move" option is very easy to use :
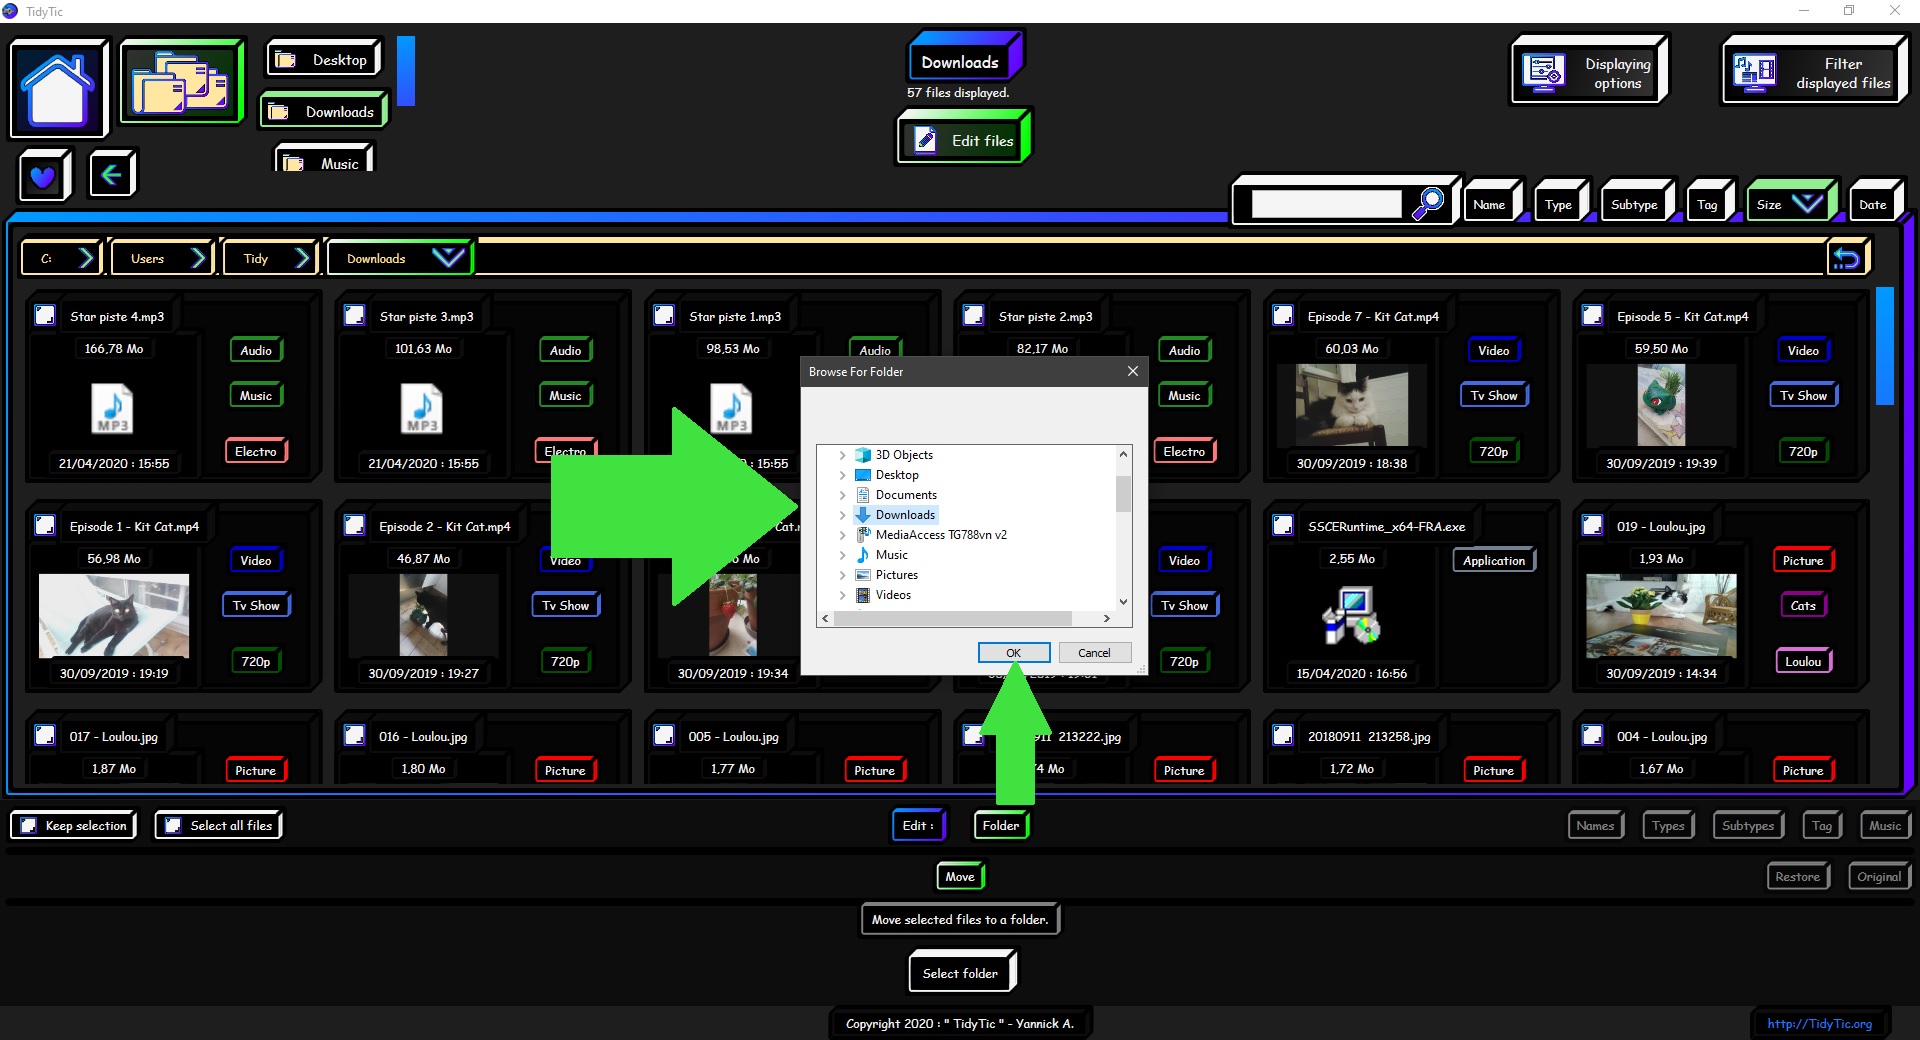
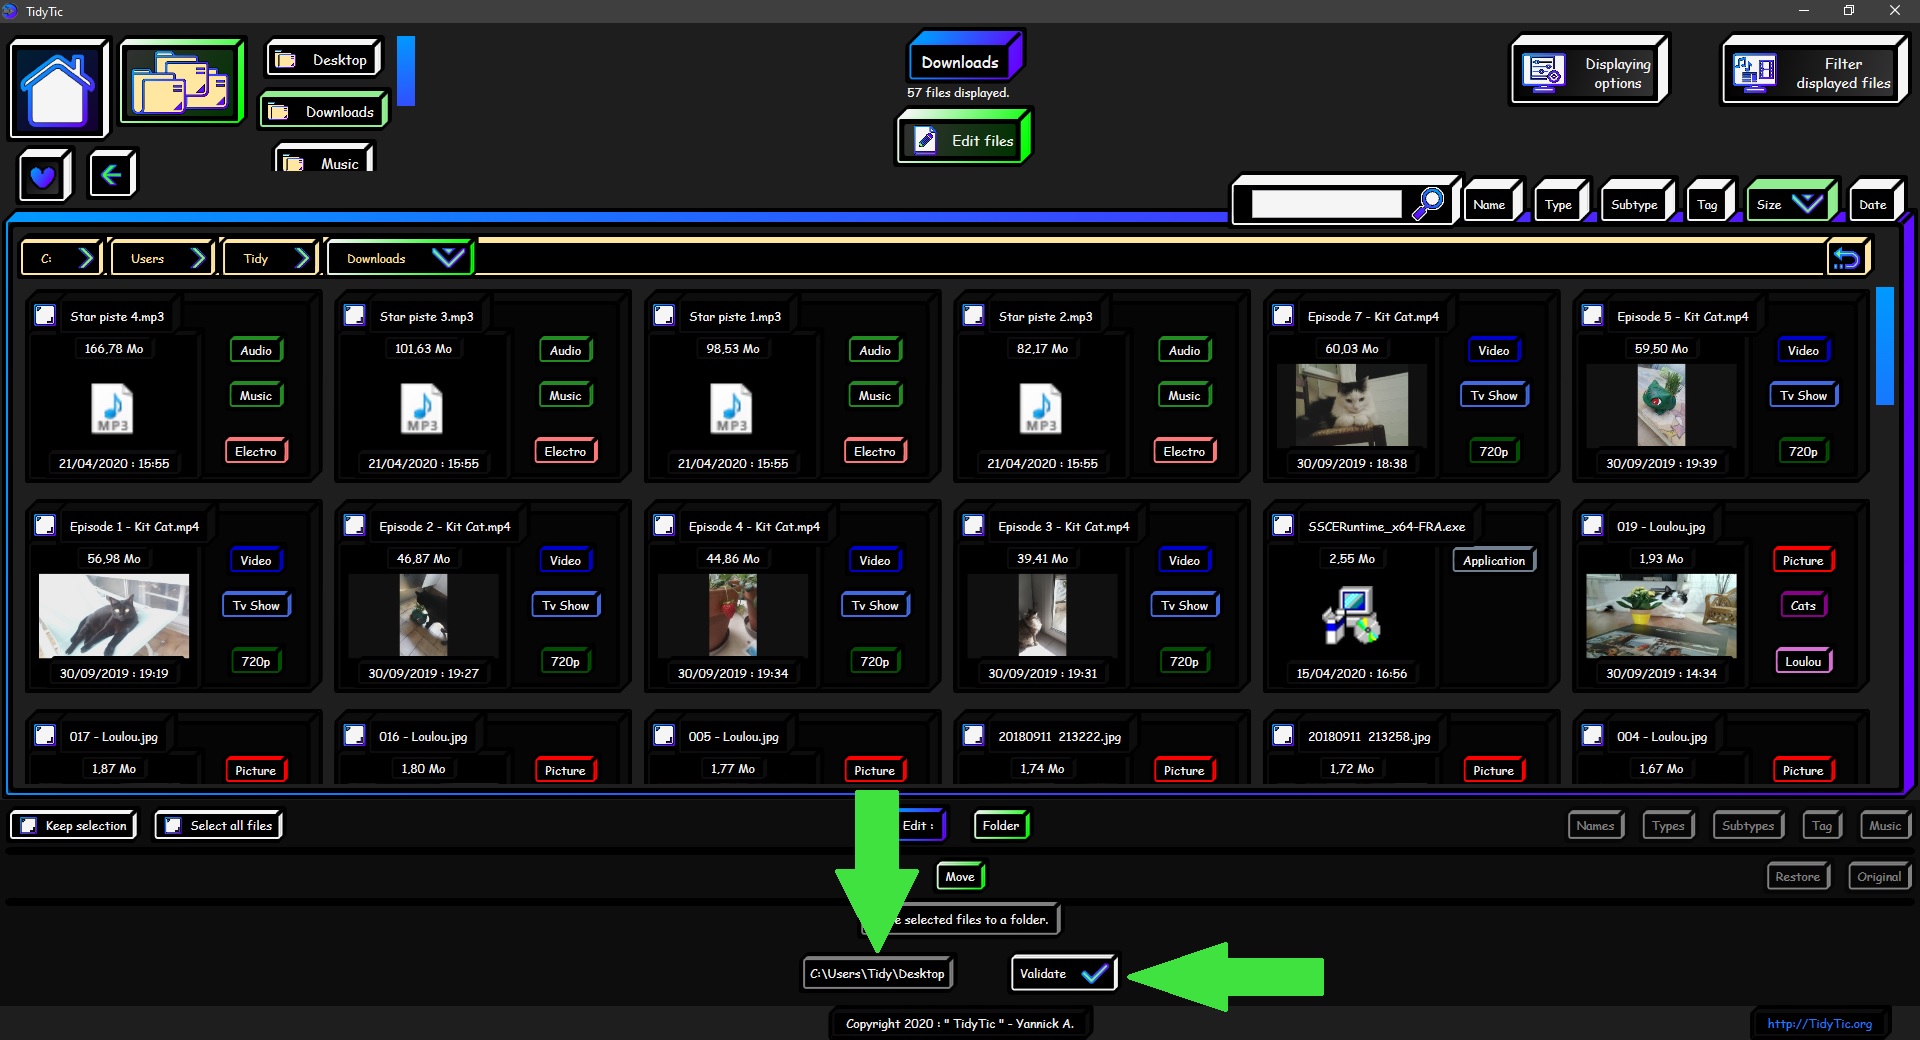
You choose the folder in which you want to move your files using the corresponding button.
Then you just have to select the files you want to move and validate the action.
Be careful however, TidyTic will allow you to choose as destination for moving your files only a folder or sub-folder from the list of monitored folders.
If you want to move them out of a list folder you will need to use Windows for this.
But in this case, during the next scan of your files by the software, the files which have been moved will be considered as "not found".
Because they are no longer present in the monitored folders, for example files moved to a USB key.
The software will however keep all information on these files so that it can be found later.
If you later add this USB key to the list of monitored files, they will be found by TidyTic.
 ____
____  ____
____ 
The “Restore” option in this menu is really simple, it will not offer you any options, only an action to validate.
The purpose of this function is to put the file back in the folder where it was first scanned by TidyTic: Its original folder.
Very handy if you have moved a file without wanting to, either by TidyTic using one of its tools or even by Windows.
This allows you to make handling errors without being afraid of having difficulty returning to the original state.
By validating this action all selected files will return to their original folder.
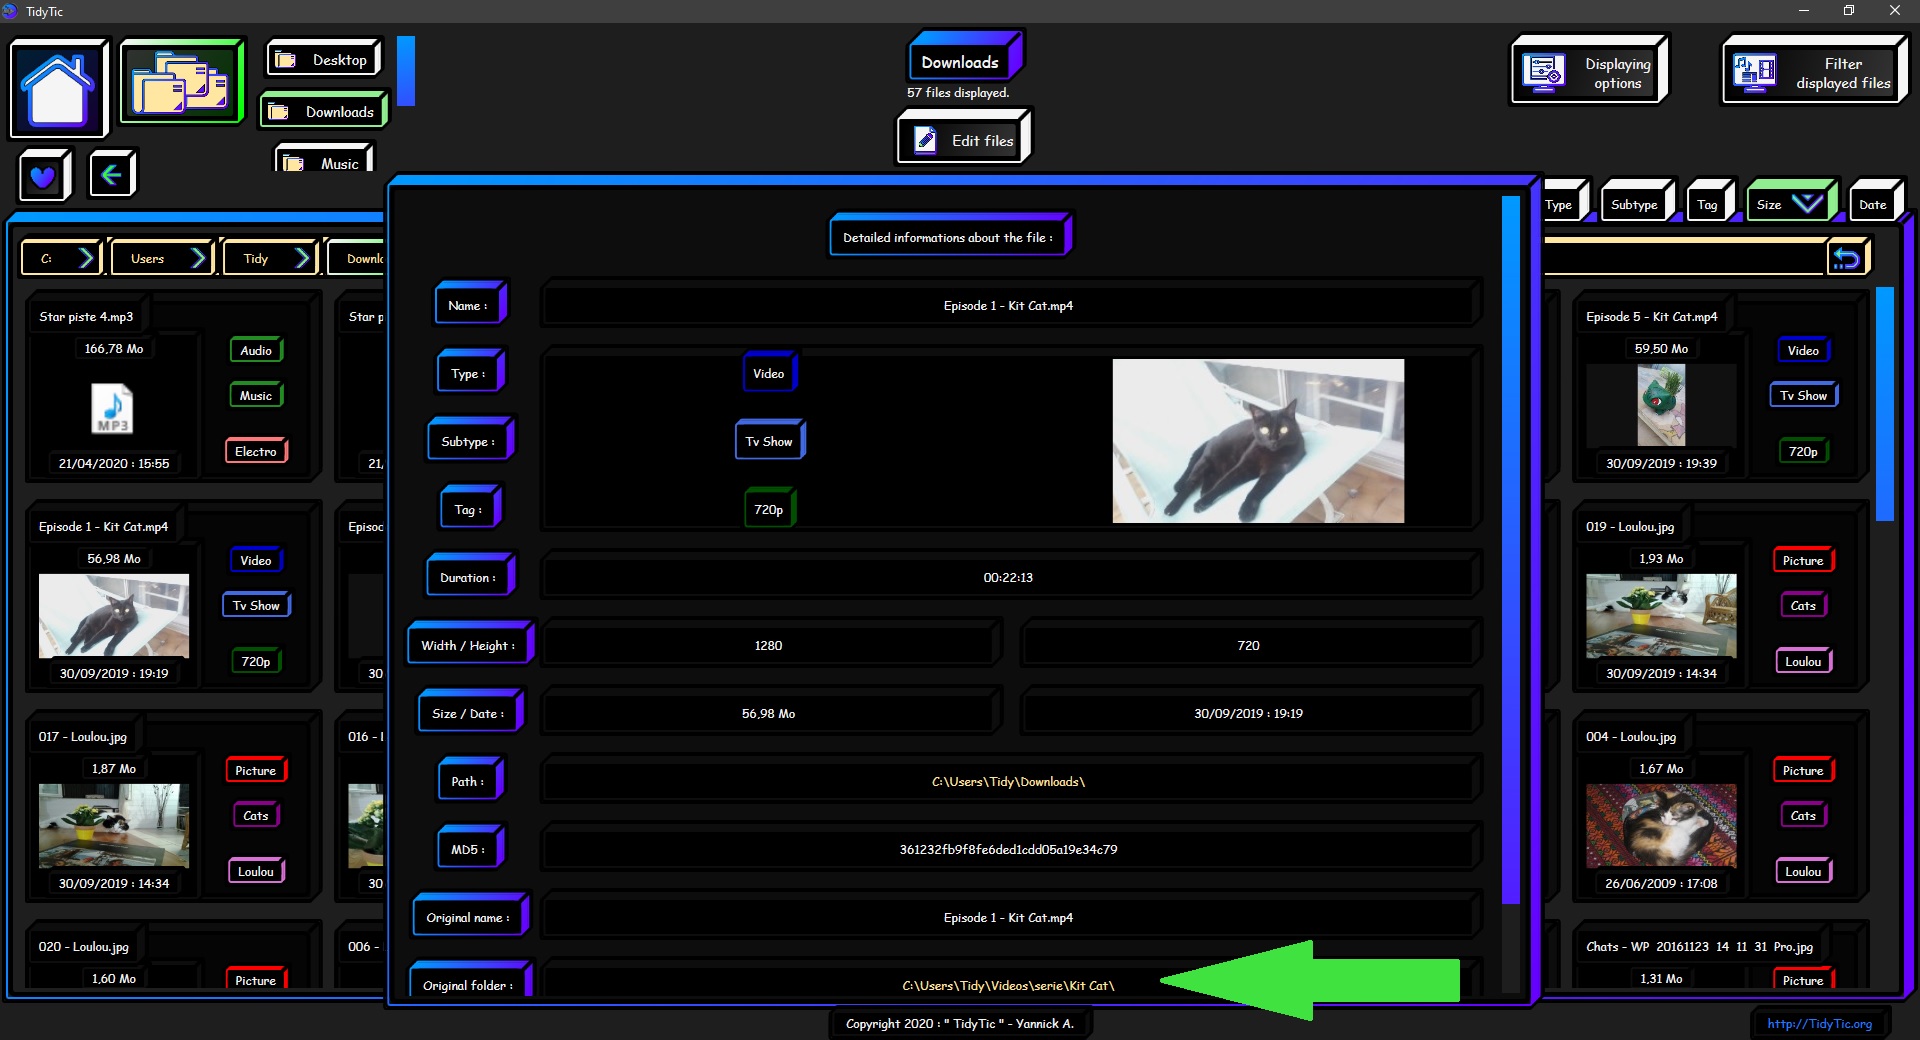
To find out the original folder of your files, simply deactivate the "Edit files" mode to return to normal browsing mode.
Then double right click on the file.
This will display the detailed information window of the file that contains the original folder in addition to a lot of information.
 ____
____ 
The “Original” option in this menu is once again very easy to understand.
This option allows you to replace the “original folder” of the file with the folder currently in use.
In general you will use it on files that you have finished tidying and that you really want to keep in this folder.
To be able to easily put them back in this folder thanks to the “Restore” function in case of a handling error for example.
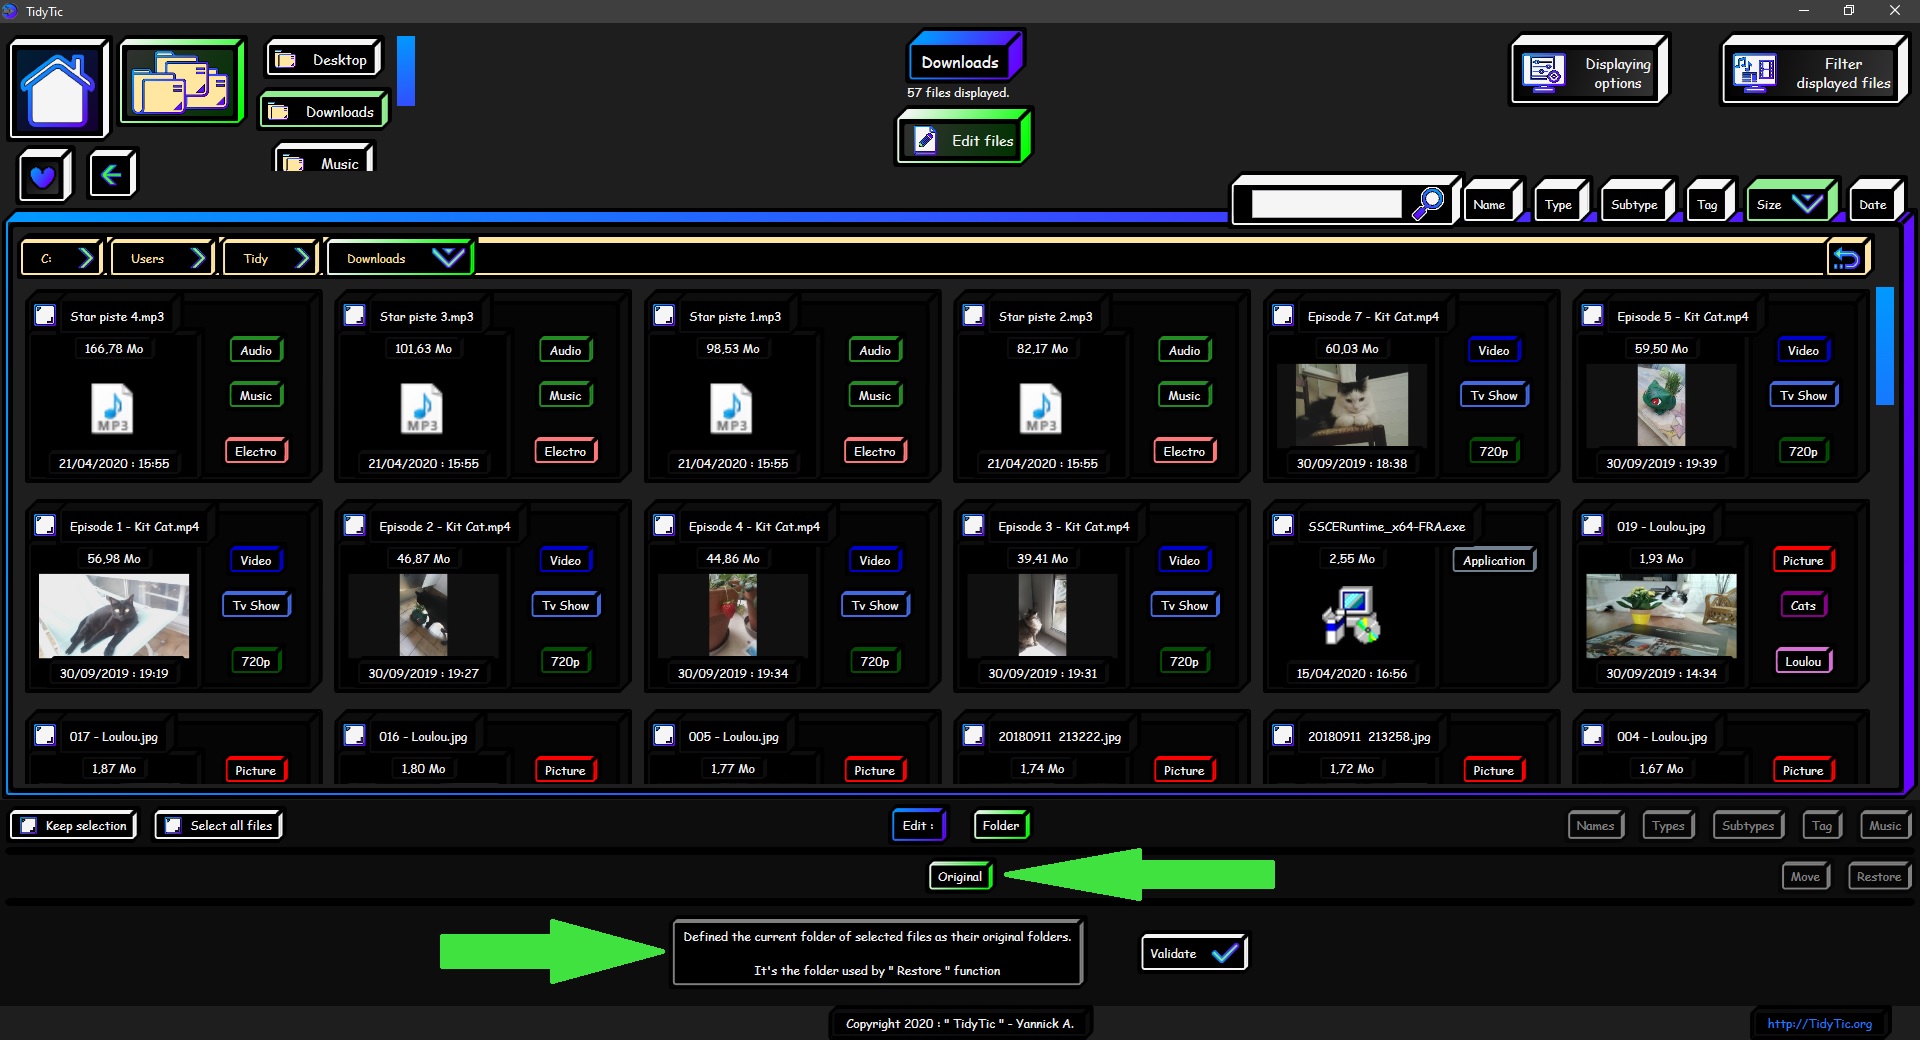
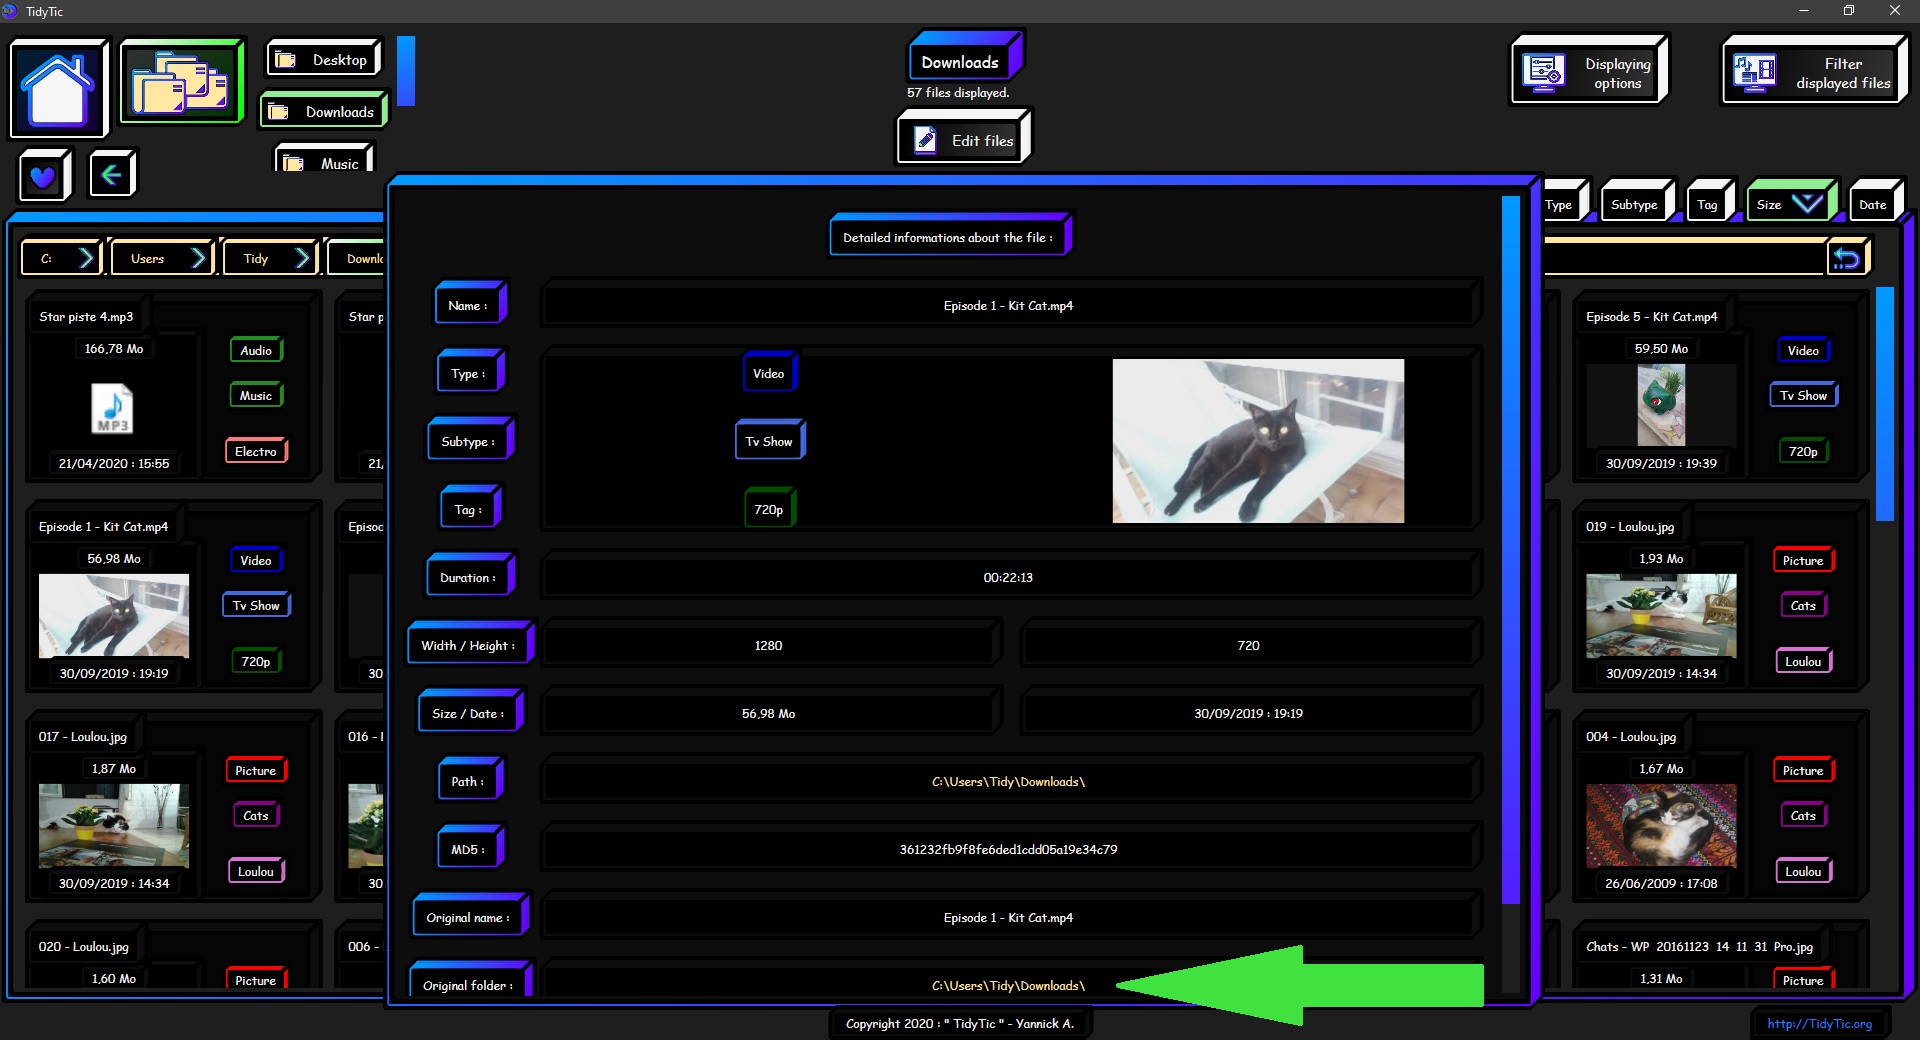
This action will have no visual effect on your files as it does not move any files.
However, you can still verify that the original folder has been updated in the "Detailed information about the file" window.
To display this window, deactivate the "Edit files" mode and double right click on the file.
Part 6: Music: Edit artists, albums and genres of your music :
The "Edit files" menu also offers you many possibilities to customize information of your music.
Simply select the “Music” option from this menu, which will be available if files belonging to the “Music” subtype are present in the files displayed.
This option will leave you with many possibilities such as adding or removing the artist from your music, the album or even the genre.
You will also have other slightly more specific functions such as "Clean" and "Auto".
Any modifications you can make from these options will be present in the file itself !
It is this information that you can see when you use the Windows player to play your music or your phone and even the your car radio.
So all modifications you make with these options will be visible outside of TidyTic on any medium capable of reading your music.
I will detail below the possibilities that all these functions offer you.
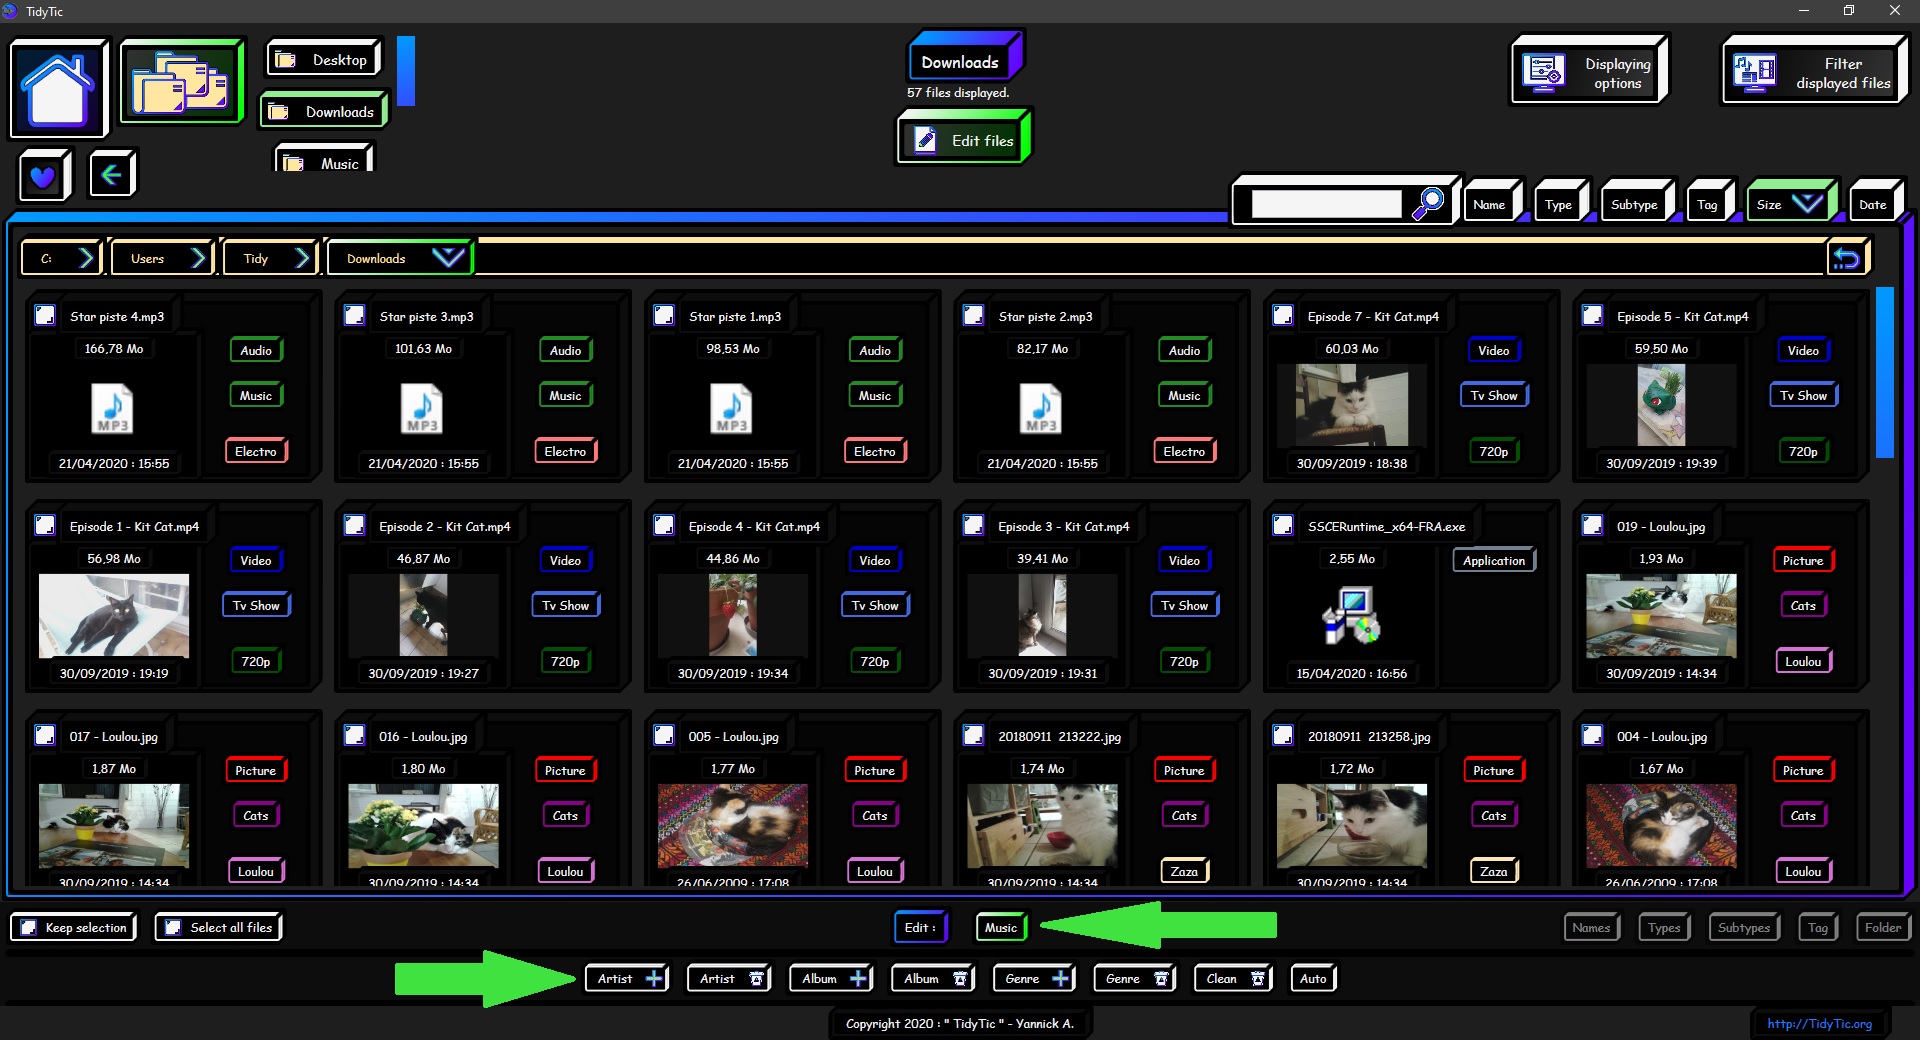
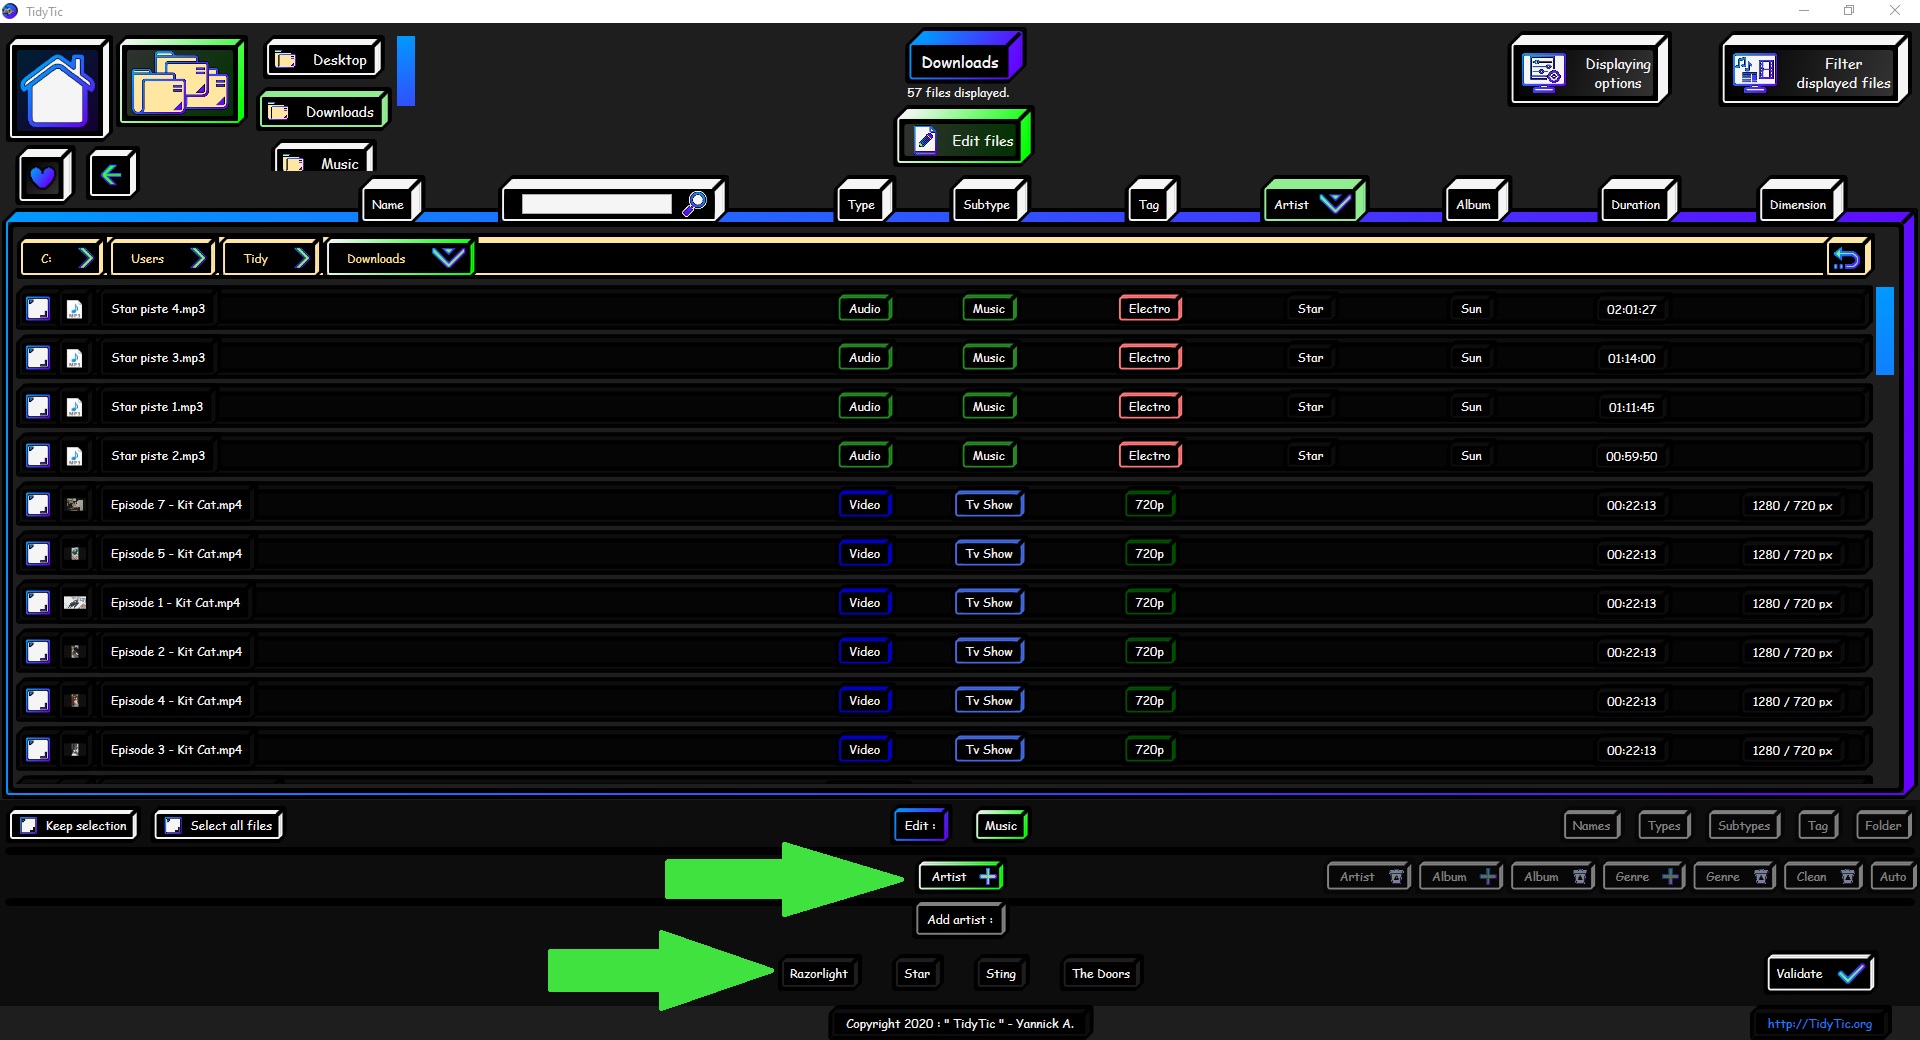
The " Artist + " option allows you to add an artist to the music you are going to select.
You will be able to see in the list all artists that TidyTic knows : those who were found during the scanning of your music present in your monitored folders.
Just select the artist you want to add and select the music on which you want to add it.
A music can very well have several artists in this information. However, some audio players will only show you the first one on the list.
If you want to create a new artist to add it to your music, however, you must go to the edit :"Music Library” page of the software.
For more information see the tutorial: "How to manage your music library with TidyTic ?”
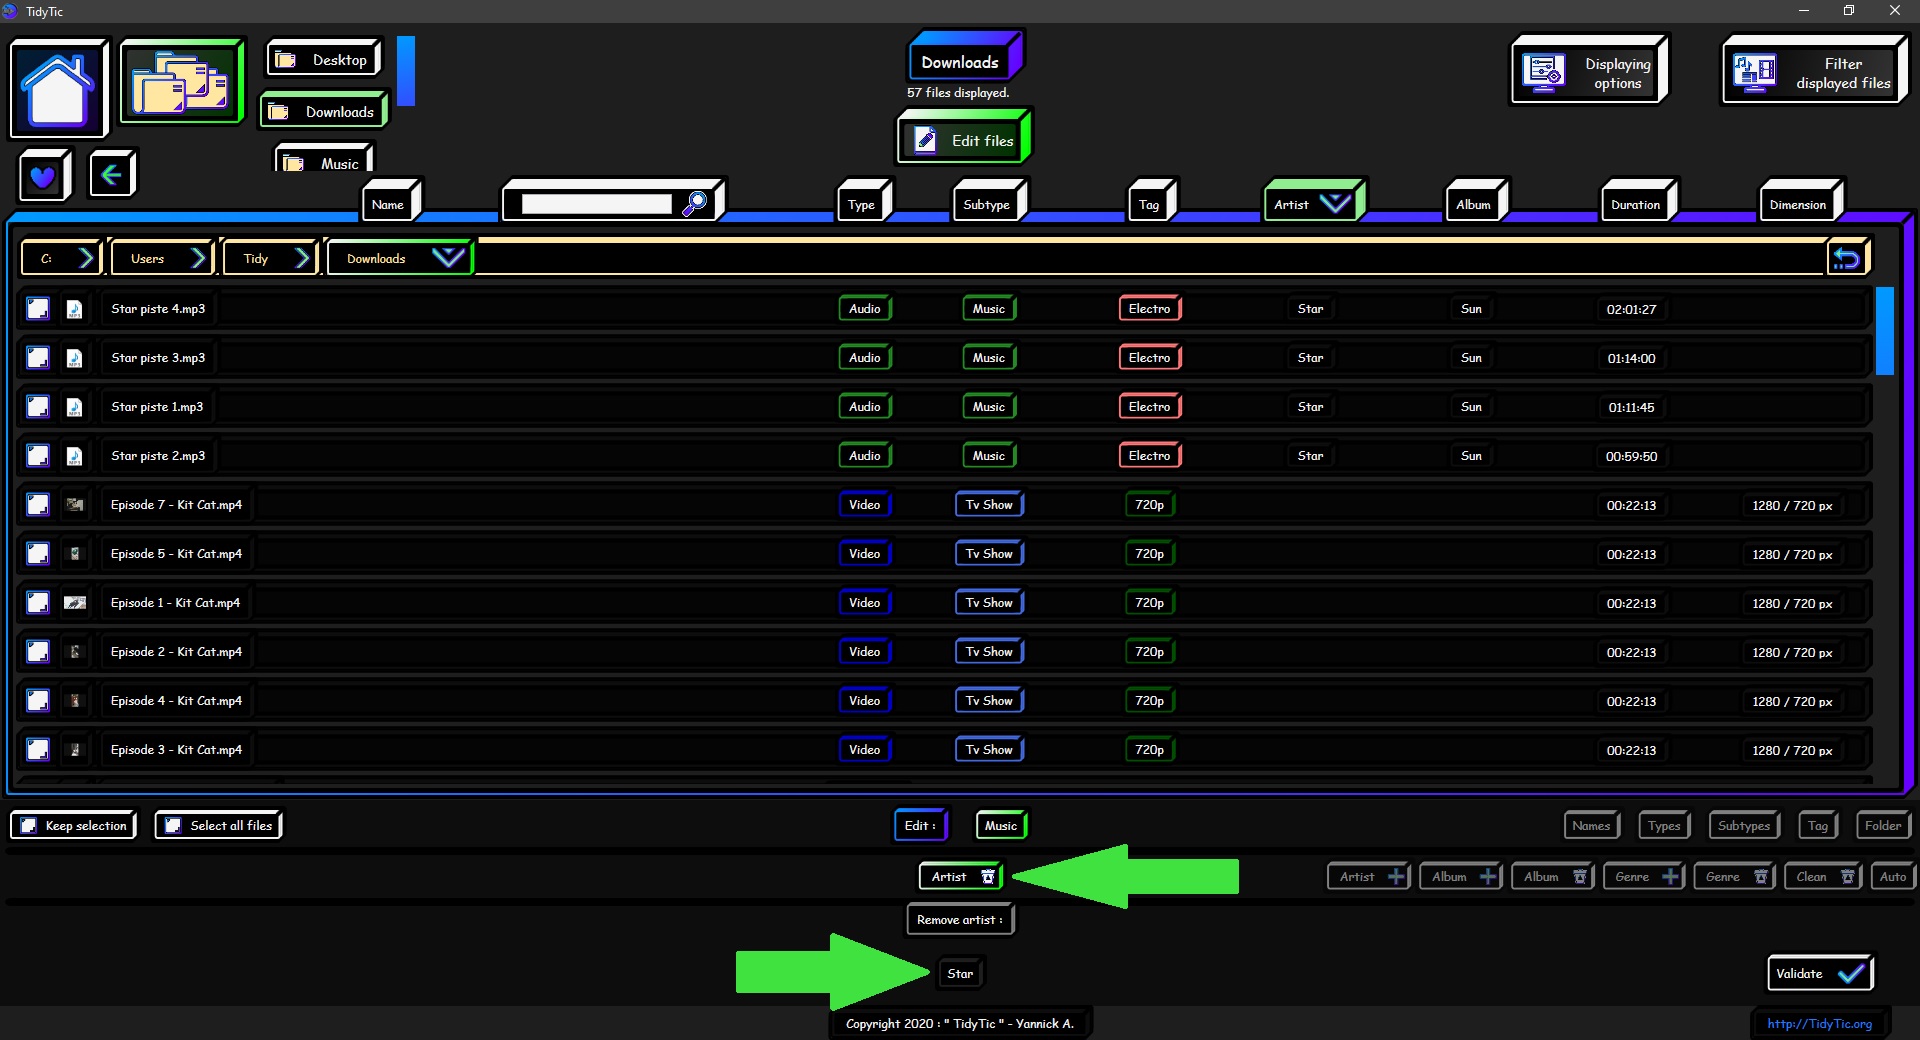
The " Artist ![]() " option allows you to delete an artist already present in one of your music.
" option allows you to delete an artist already present in one of your music.
You will see in the list only artist that are present in the files currently displayed.
This is to lighten the menu and facilitate your modifications.
Just select the artist you want to delete and select the music on which you want to delete it.
If you ask the software to delete an artist who is not present in the information of the selected music no change will be made.
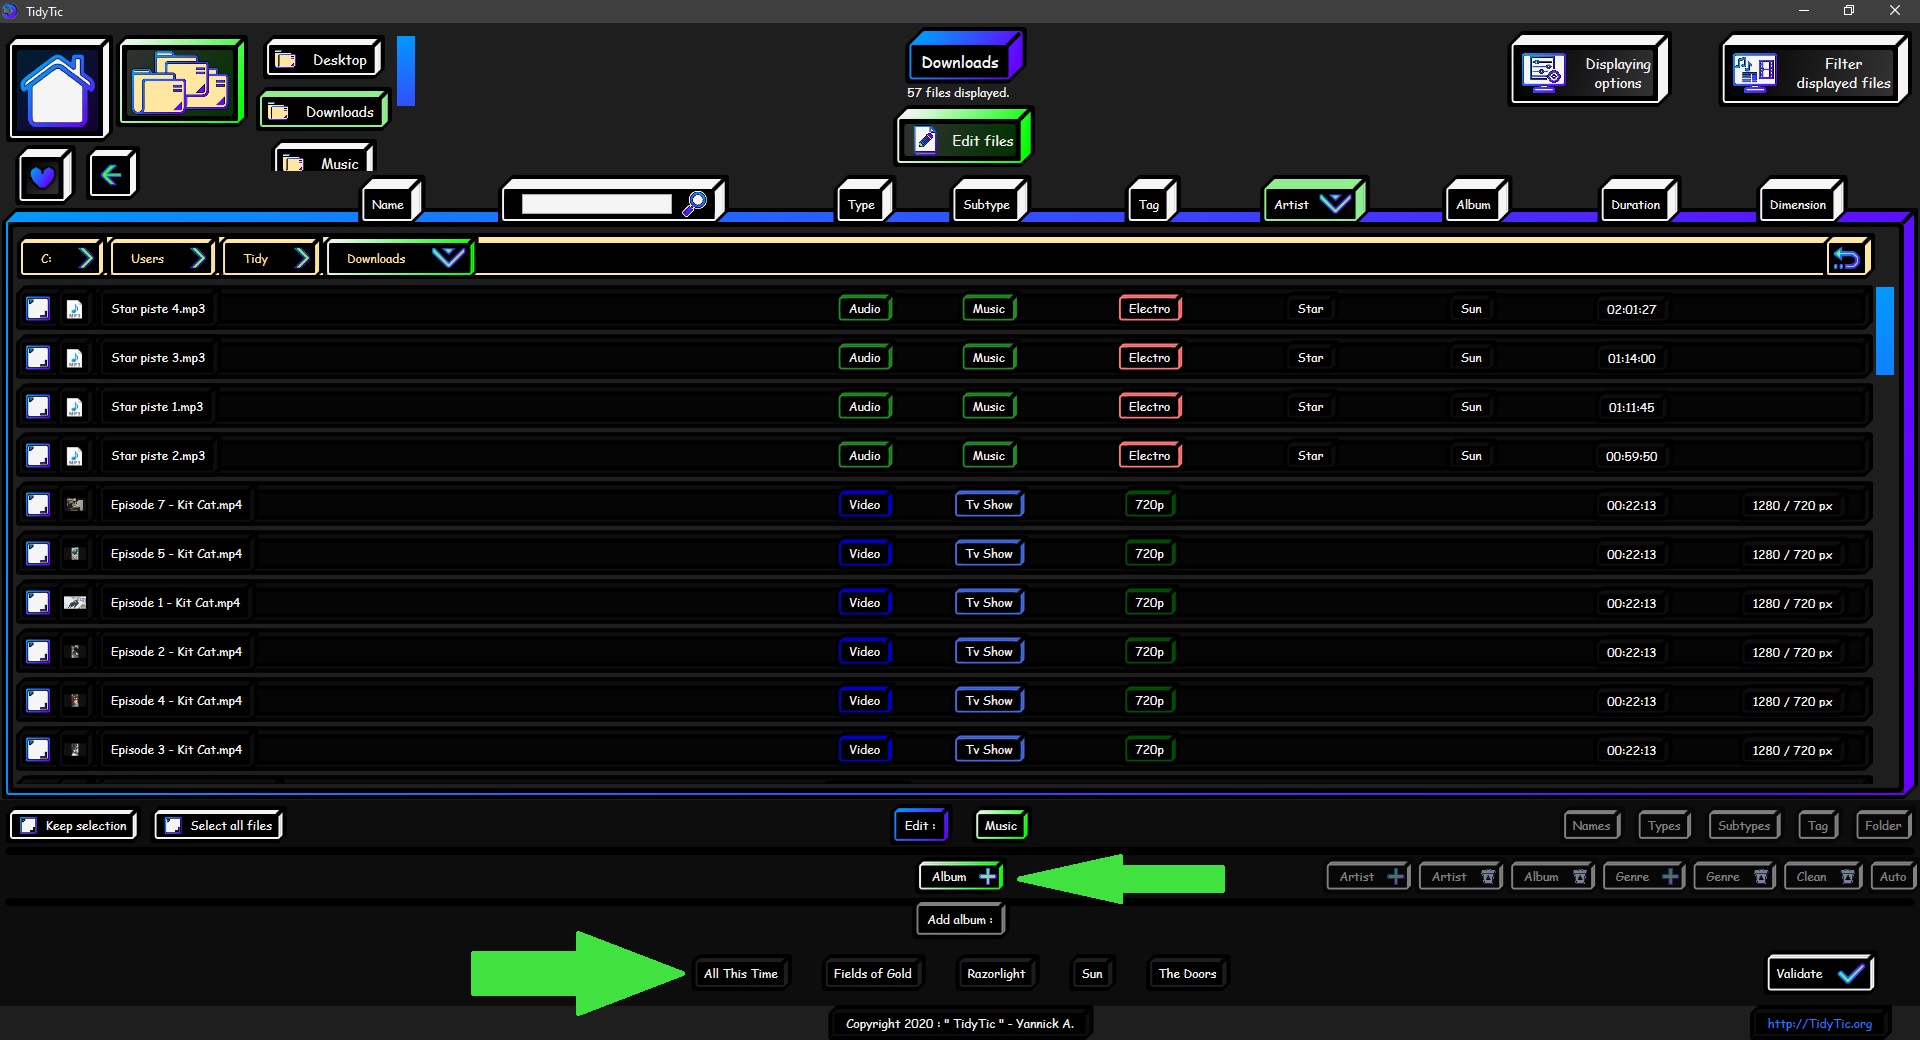
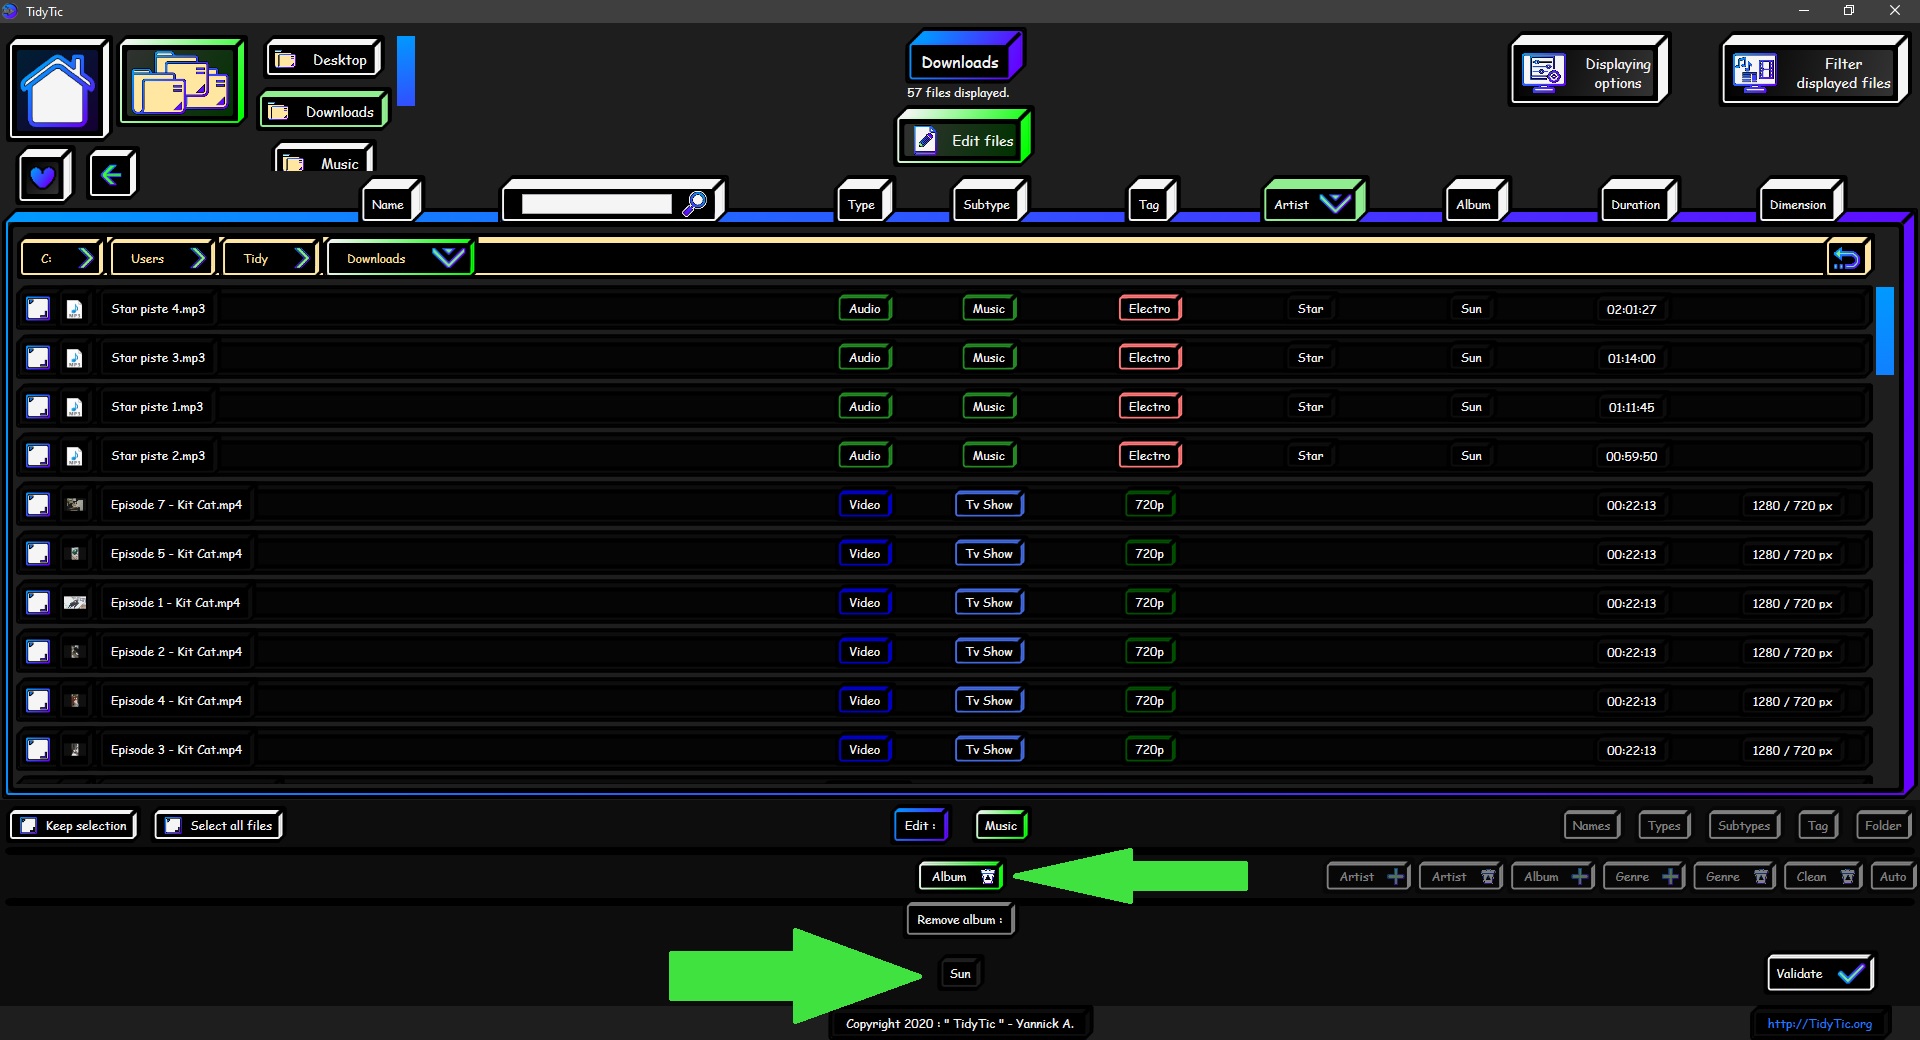
The " Album + " option allows you to add an album to the music you are going to select.
You will be able to see in the list all albums that TidyTic knows : those who were found during the scanning of your music present in your monitored folders.
Just select the album you want to add and select the music on which you want to add it.
Please note that a music can only have one album in this information.
If you add an album to music that already has one it will simply replace the old album in the file information.
If you want to create a new album to add it to your music, however, you must go to the edit : "Music Library” page of the software.
For more information see the tutorial: "How to manage your music library with TidyTic ?”
The " Album ![]() " option allows you to delete an album already present in one of your music.
" option allows you to delete an album already present in one of your music.
You will see in the list only album that are present in the files currently displayed.
This is to lighten the menu and facilitate your modifications.
Just select the album you want to delete and select the music on which you want to delete it.
If you ask the software to delete an album who is not present in the information of the selected music no change will be made.
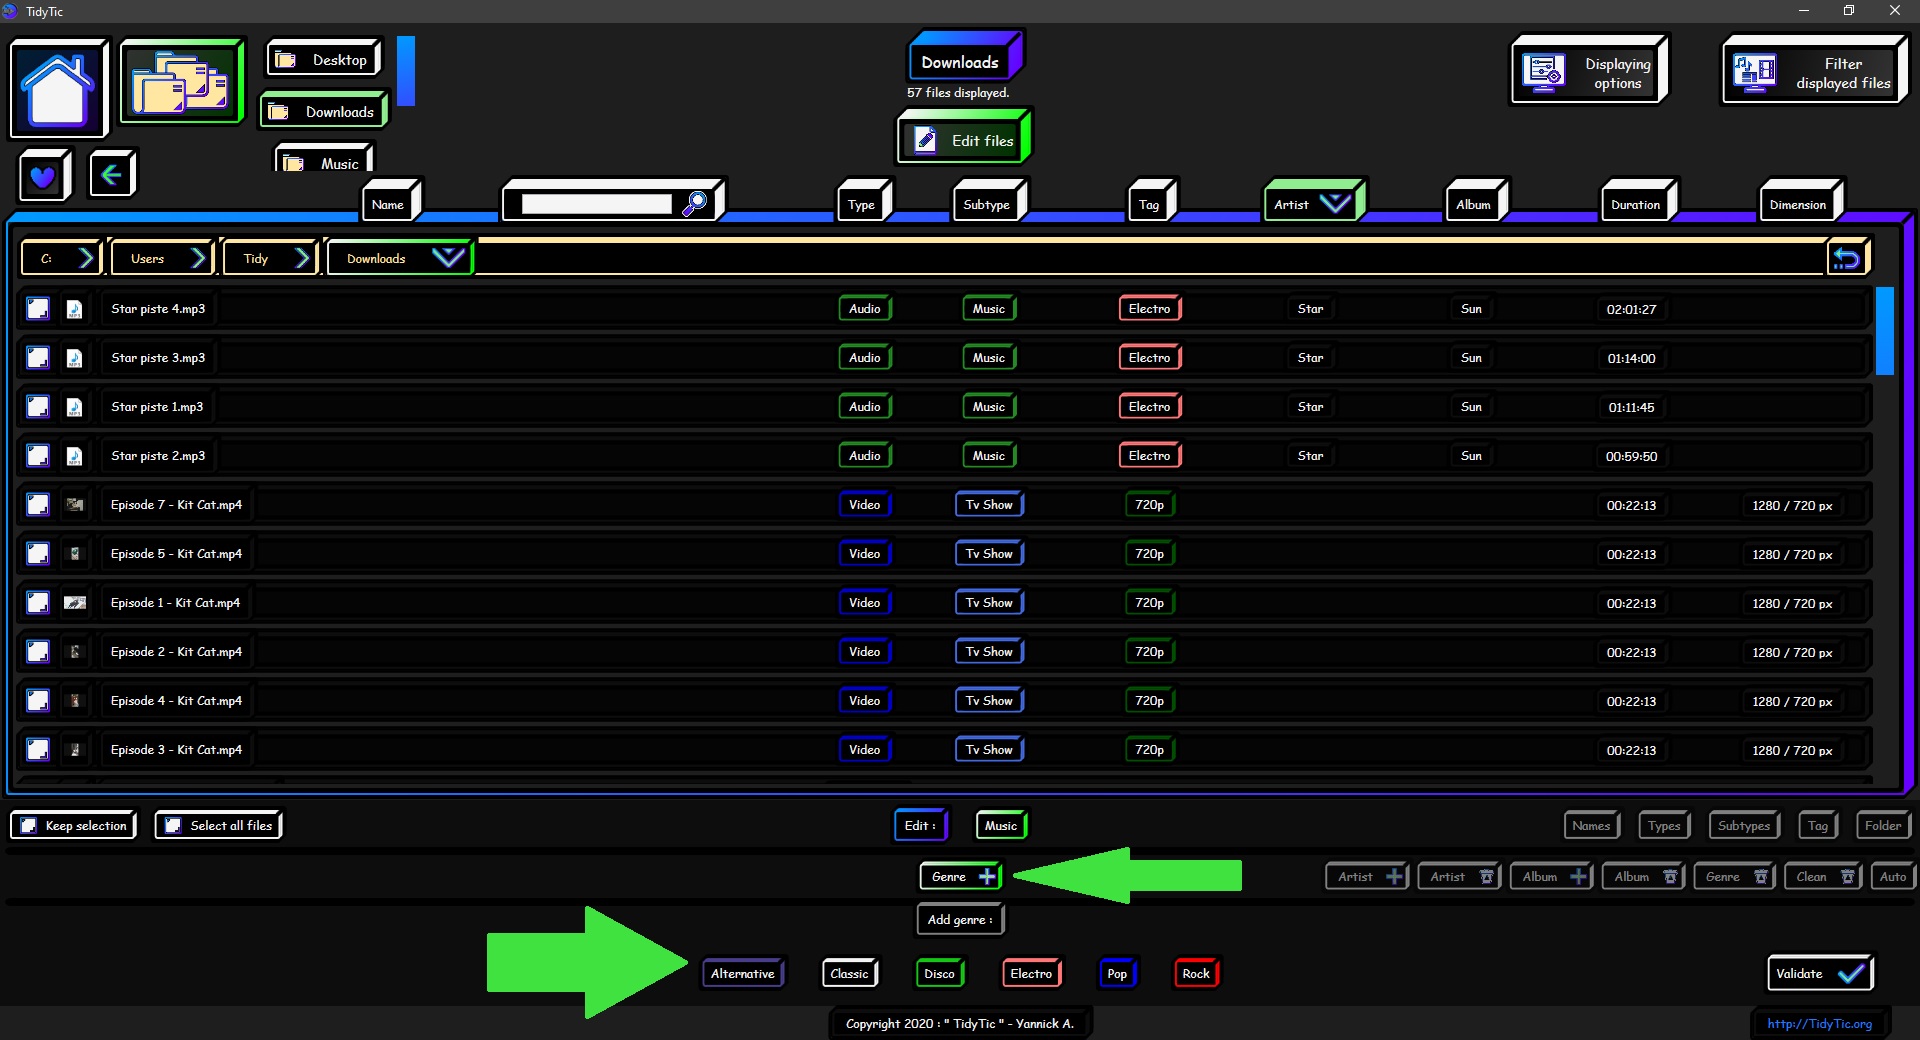
The " Genre + " option allows you to add an genre to the music you are going to select.
You will be able to see in the list all genre that TidyTic knows : those who were found during the scanning of your music present in your monitored folders.
Just select the genre you want to add and select the music on which you want to add it.
A music can very well have several genres in this information. However, some audio players will only show you the first one on the list.
If you want to create a new genre to add it to your music, however, you must go to the edit :"Music Library” page of the software.
For more information see the tutorial: "How to manage your music library with TidyTic ?”
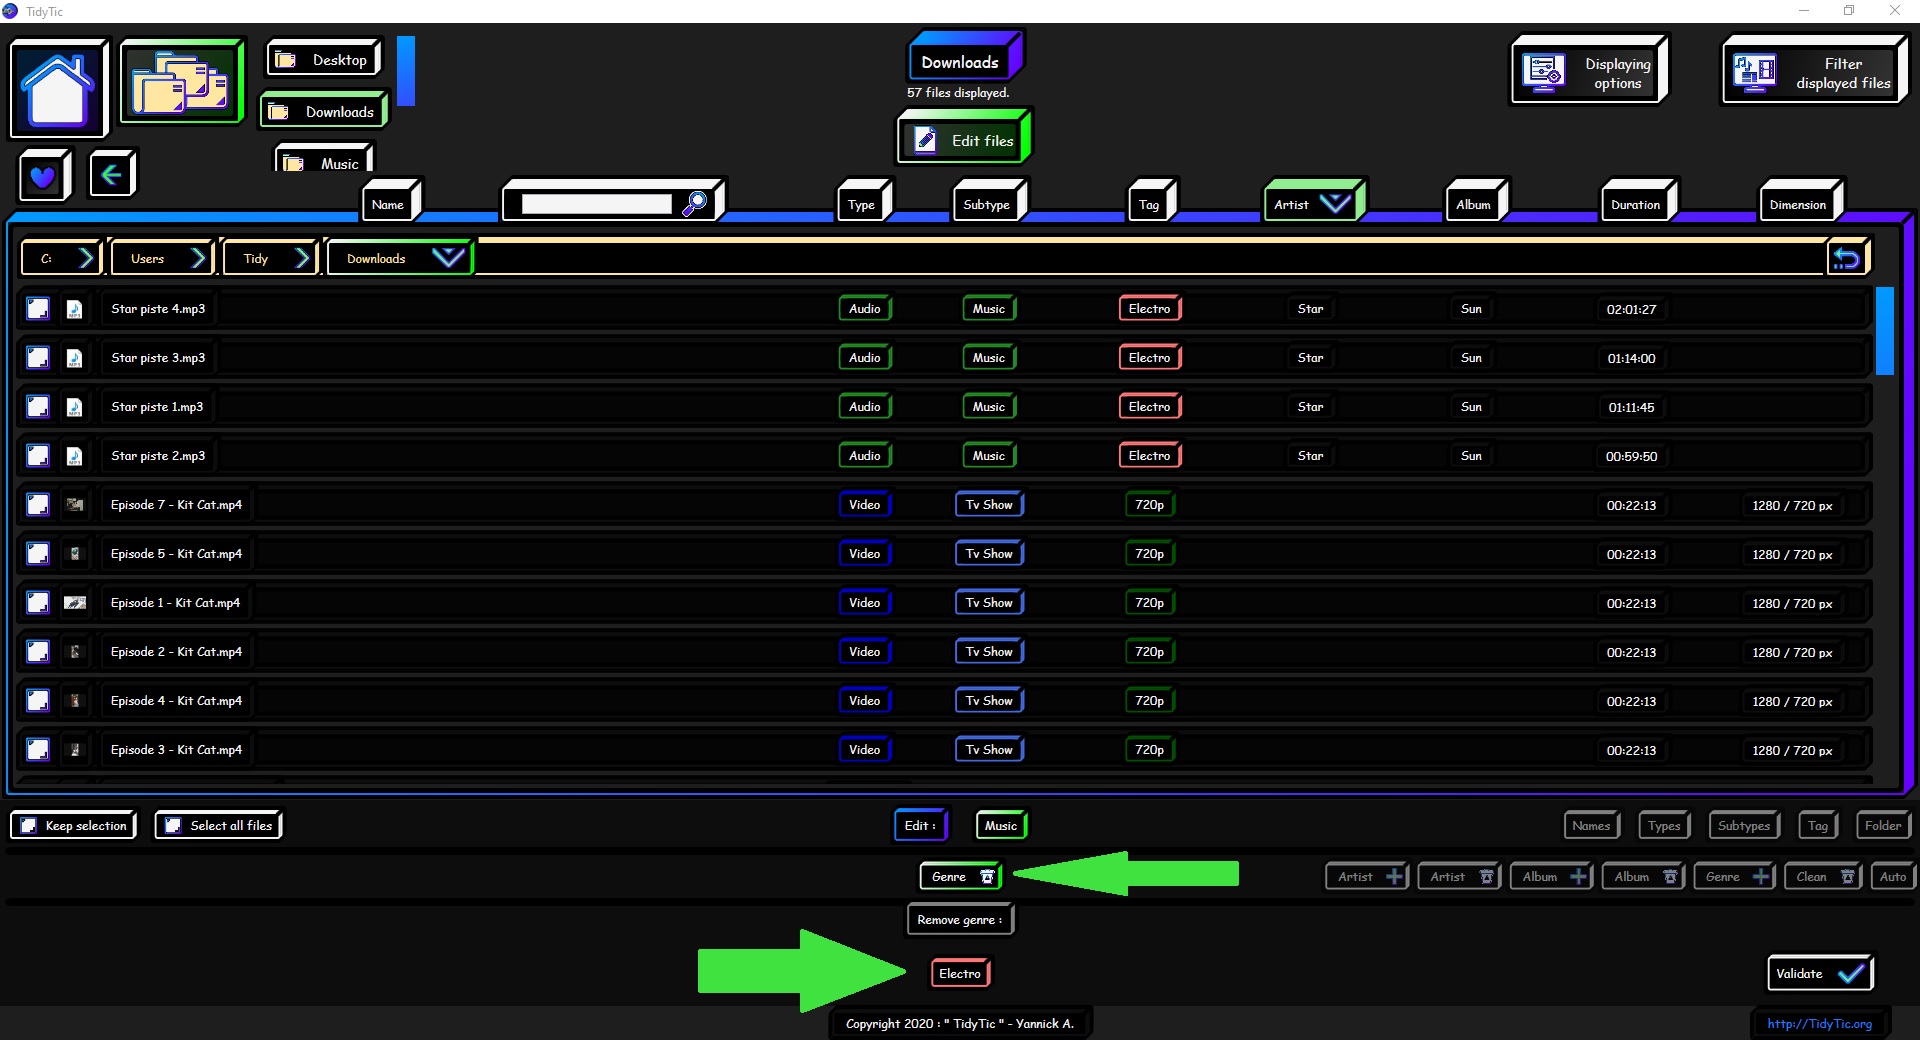
The " Genre ![]() " option allows you to delete an genre already present in one of your music.
" option allows you to delete an genre already present in one of your music.
You will see in the list only genre that are present in the files currently displayed.
This is to lighten the menu and facilitate your modifications.
Just select the genre you want to delete and select the music on which you want to delete it.
If you ask the software to delete an genre who is not present in the information of the selected music no change will be made.
The " Clean ![]() " option allows you to delete all information present in one of your music such as the artist, album, genre or even the title of the music.
" option allows you to delete all information present in one of your music such as the artist, album, genre or even the title of the music.
In the list you can choose what information you want to delete :
- Title
- Artist
- Album
- Genre
Just select the information you want to delete and select the music on which you want to delete it.

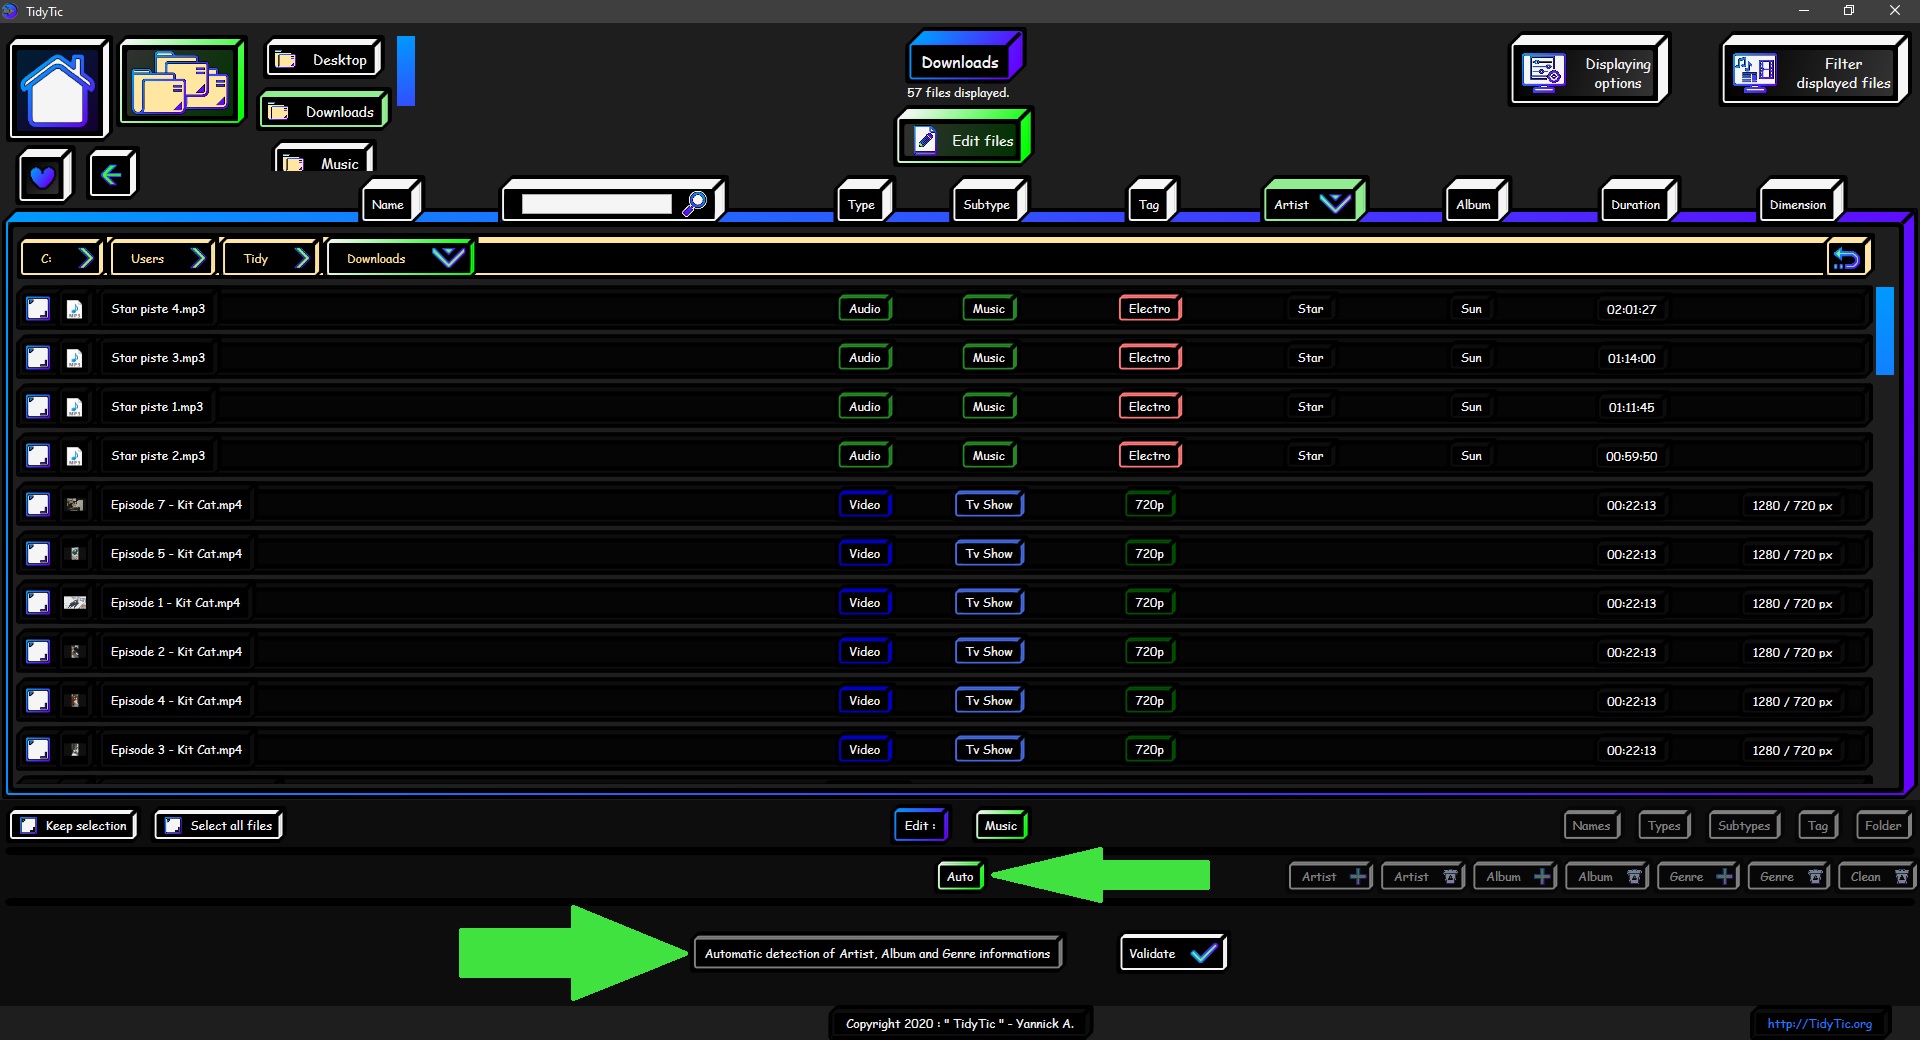
The “ Auto ” option allows you to automatically retrieve all information present in a music in order to update information on the “Music library” page of the software.
It will be useful if you have made modifications to your music from external software after TidyTic has already scanned this music.
You just need to select the music concerned and validate the action.
TidyTic will then retrieve all information from the selected music in order to add it to your music library present in the software.
This also makes it possible to update information known by TidyTic on the selected music : Artist, album, genre and title of the music.
How do I change title of a music so that it is displayed correctly in my audio players ?
(Your phone, Windows Media Player, car radio, etc.)
Nothing could be simpler, if you modify the name of a file belonging to the music subtype, TidyTic will automatically match the name of the file with the title of the music.
So whether you go through the tools for modifying the name like "Add", "Delete", "Replace" etc or even simply using simple renaming (double left click on a file in "Edit files" mode), the title of the music will be updated at the same time as the file name.
Be careful however, if the music is currently open in a player like Windows Media Player, the software cannot make any modification to the file because it will already be used by another software.